
|

|

|

|

, position the pointer in the top left (fade in) or top right (fade out) corner of the clip, then drag to adjust the fade duration.
, position the pointer in the top left (fade in) or top right (fade out) corner of the clip, then drag to adjust the fade duration.
, position the pointer over the clip’s start or end point, then drag to adjust the start/end position.
, position the pointer over the clip’s start or end point, then drag to adjust the start/end position.
, position the pointer over the clip’s start or end point, then hold ALT+SHIFT and drag to adjust the start/end position.
, position the pointer over the clip’s start or end point, then hold ALT+SHIFT and drag to adjust the start/end position.
, position the pointer within the clip, then hold ALT+SHIFT and drag left/right to move the data within the clip boundaries.
, position the pointer within the clip, then hold ALT+SHIFT and drag left/right to move the data within the clip boundaries.
, position the pointer over the clip, then click to select the clip.
, position the pointer below the clip header, then drag to make a time selection.
, position the pointer outside any clips, then drag to make a time selection.
, drag with the right mouse button to lasso the clips you want to select. It is sufficient to simply touch the clips you want to select; there is no need to fully enclose the clips.
, position the pointer outside any clips, then drag over the clips you want to select.
, position the pointer over the clip, then click to select the clip.
, position the pointer over the clip, then drag to make a time selection.
, drag with the right mouse button to lasso the clips you want to select. It is sufficient to simply touch the clips you want to select; there is no need to fully enclose the clips.
, drag across the bottom half of the clip to mute a time region, and drag across the top half to unmute a time region.
, click the bottom half of the clip to mute the entire clip, and click the top half of the clip to unmute the clip.
, position the pointer outside any clips and drag over the clips you want to mute/unmute.
, hold down the CTRL key and drag across the region you want to isolate.
, hold down the CTRL key and click the clip to isolate the entire clip/lane.
, position the pointer over the clip header, then drag the clip or selection to the desired location.
, drag the clip or selection to the desired location.
, hold down CTRL+SHIFT and position the pointer over the clip’s first half and drag to stretch the beginning, or position the pointer over the clip’s second half and drag to stretch the end.
, position the pointer over the clip’s first half and drag to stretch the beginning, or position the pointer over the clip’s second half and drag to stretch the end.
, hold down CTRL+SHIFT and position the pointer over the clip’s first half and drag to stretch the beginning, or position the pointer over the clip’s second half and drag to stretch the end.
, hold down CTRL+SHIFT and position the pointer over the clip’s first half and drag to stretch the beginning, or position the pointer over the clip’s second half and drag to stretch the end.
, position the pointer over the clip’s first half and drag to stretch the beginning, or position the pointer over the clip’s second half and drag to stretch the end. Tip: The Stretch tool now supports lasso selection and time selection.
, hold down CTRL+SHIFT and position the pointer over the clip’s first half and drag to stretch the beginning, or position the pointer over the clip’s second half and drag to stretch the end.
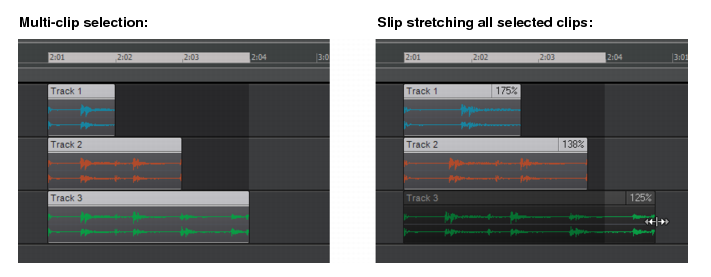
Figure 240. Multi-clip slip stretching.
, position the pointer over the top half of the clip, then drag to erase a time selection.
, position the pointer over the bottom half of the clip, then click to erase the entire clip.
, position the pointer outside any clips, then drag over the clips you want to erase. Hold down the ALT key and drag to erase by time.
, position the pointer where you want to split the clip, then hold down ALT and click (or lasso to split a region).
, position the pointer where you want to split the clip, then click (or drag to split one or more clips at the mousedown and mouseup points).
Tip - Searching Documentation
Tip: To search for a specific topic, type your search query in the Search Cakewalk.com field at the top right of this page.
When the search results appear, click which product's documentation you would like to search to filter the search results further.
Note - Using Offline Help
Note: If you prefer to always use offline Help, go to Edit > Preferences > File > Advanced in your Cakewalk software and select Always Use Offline Help.
If you are not connected to the internet, your Cakewalk software will default to showing offline help until an internet connection becomes available.