10 Microphone Placement Techniques for Acoustic Guitar
Last updated on 3/11/2016by Dan Gonzalez
(All photographs by Tara Zanett)
Microphone placement is the foundation for any solid recording. Placement is usually dictated by musical genre but most engineers place microphones to capture a good overall balance of the instrument. This article proves to present some different placement techniques for a simple acoustic guitar recording.
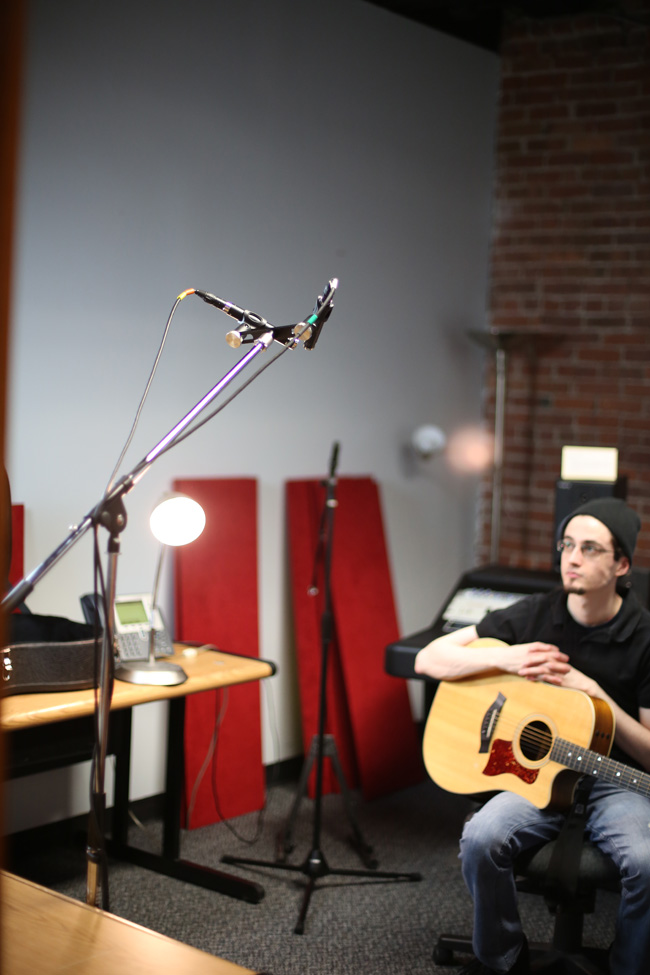
1. Blumlein Configuration
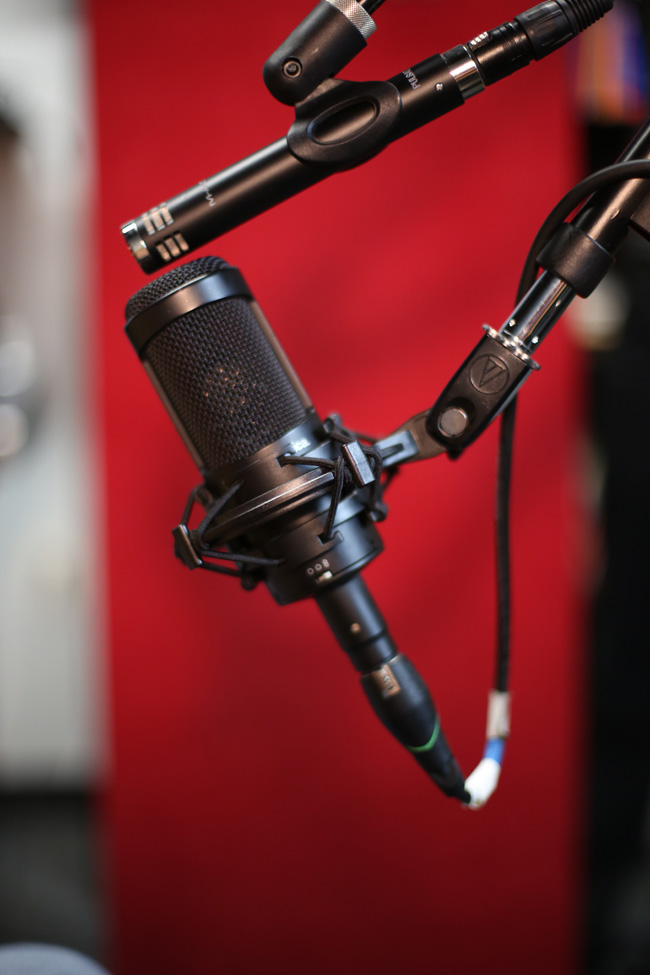
Blumlein requires the use of two Bi-Directional Microphones placed at a 90º angle. Bi-Directional microphones capture the signal in front of them and behind so the room ambience plays a significant factor in the sound. Most microphones have a setting that looks like a figure “8” and can be switched easily into this mode. As you can see by the above image it takes a bit of setup to get the capsules of the microphones as close to one another as possible without having them touch. The next step is getting the 90º angle to face the sound source.
In this case the microphones were moderately close to the acoustic guitar player and the 90º angle was pointing at the highest fret of the guitar which was just past the sound hole. The outcome was a wide and clear signal that could accommodate most recordings for general acoustic guitar tracking. This worked well because the signal was within a small and somewhat quiet room. I found that the signal could be routed in stereo or mono and still work well in most mix situations.
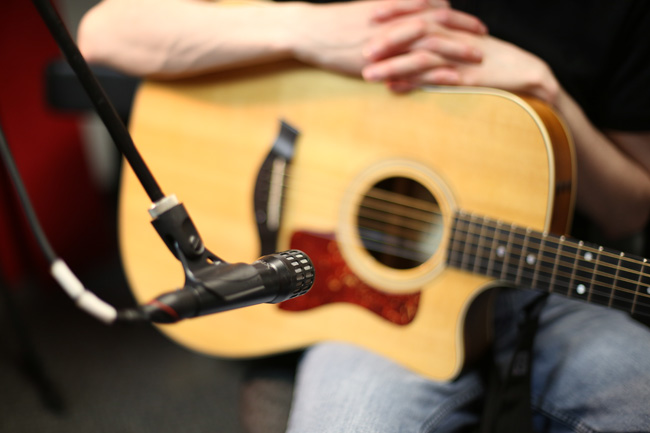
2. One Large Diaphragm Condenser Close Mic
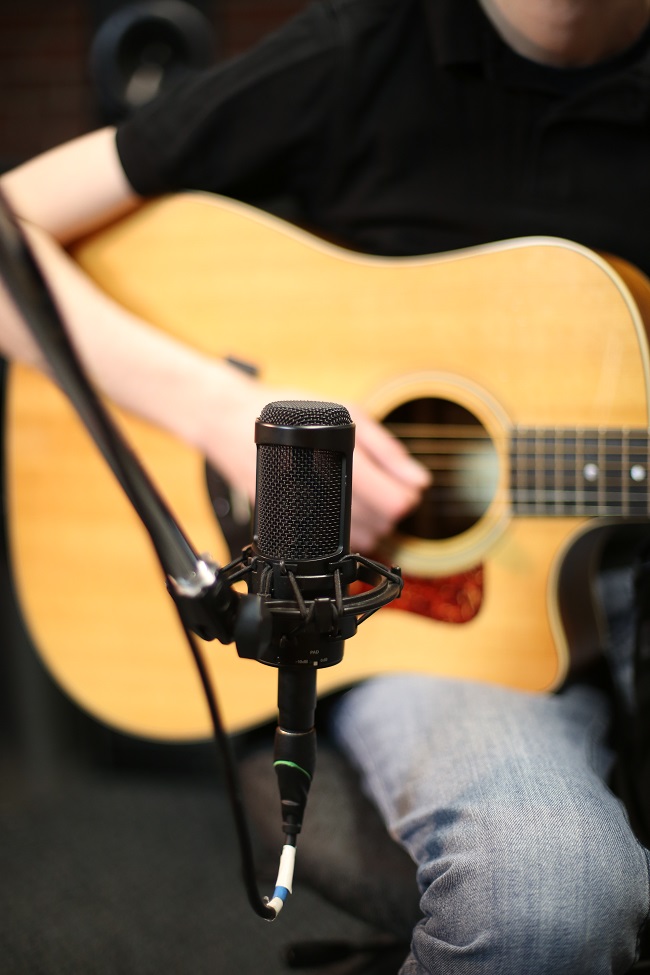
This placement used a single Large Diaphragm Condenser facing the area between the soundhole and the top of the fretboard. The microphone was switched into the Cardioid polar pattern setting to reduce any room ambience from behind the microphone. Cardioid focus the microphone to only retain signals from mostly in front of the microphone. This setting is much more narrow in comparison to a stereo configuration and would be perfect for double-tracking purposes where the player would strum two different performances of the same chord progression and pan them hard left and hard right. By nature the microphone is very sensitive and picks up much of the low end of the acoustic giving it a thick and chunky sound. This caveat makes it the perfect candidate for Acoustic Guitar driven music where the acoustic guitar upholds much of the harmony for track.
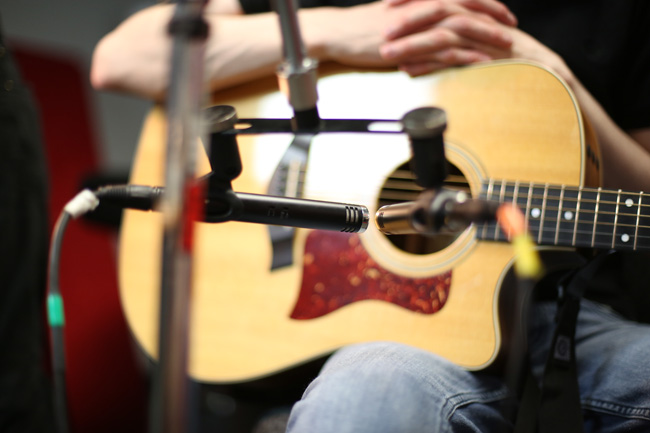
3. Spaced Pair
This configuration uses two Small Condenser Microphones set about 2.5ft away from one another. One is pointed towards the 8th fret of the acoustic guitar and the other is pointed directly at the12th fret just past where most of the strumming is happening. I set these closer to the player because the microphones retain fewer lower frequencies that the large diaphragm microphones. They also tend to register the high end of the frequency spectrum with more detail.
A substantial part of the placement is how far the microphones are placed from the source. Placing the microphones any further from the source would have resulted in a thin sound and any closer would have choked the sound.
I am a fan of this configuration because it captures the fret noise as well as the body of the guitar. You could use this for many applications especially if the acoustic guitarist has a lot of busy left handed hammer-ons and pull-offs. The microphone that points at the neck of the guitar is there to capture these small intricacies that are lost down by the sound hole.
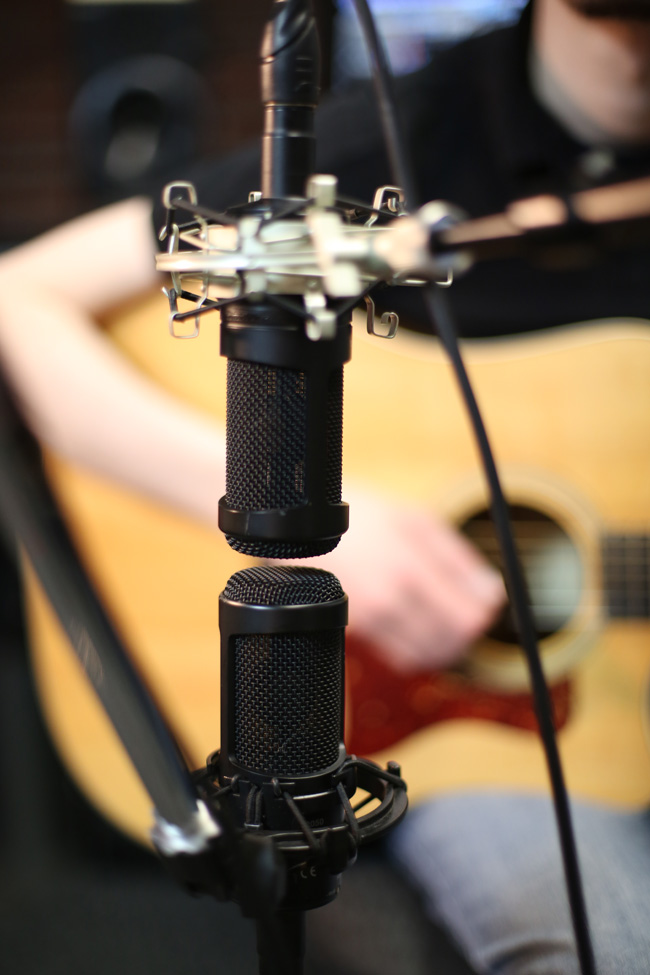
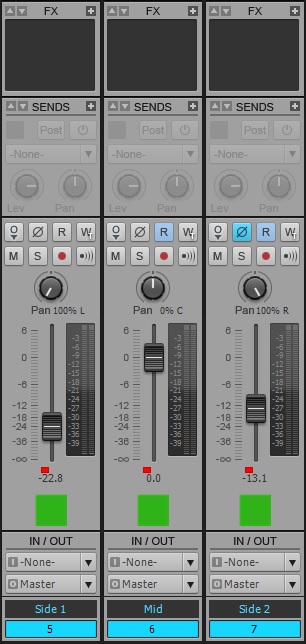
4. Mid-Side

This technique is used by some and hated by others. The Mid-Side microphone placement requires the use of two microphones and three signals. First one must set up the microphones in the configuration shown in the example. The Large Diaphragm Condenser is set to “Figure 8” or “Bi-Directional” (same thing) and placed so that the capsule of the microphone is perpendicular to the sound source. The Small Condenser Microphone is placed above it directly facing the sound source. The Small Condenser is the “Mid” and the Large Condenser is the “Side”.
Special Routing
Within your respective DAW you can duplicate the Large Condenser track or send the track to a separate bus. The end goal to have a duplication of the Large Condenser’s signal. Apply the “Phase” button to the duplicated signal and pan both Large Condenser tracks opposite of one another, hard left and hard right. Mix these two tracks in under the “Mid” signal and the resulting effect is a somewhat roomy and spacious sound.
5. One Small Diaphragm Condenser Close Mic
When processing these tracks I was able to extract just the single Small Condenser microphone from the Mid-Side placement. If you review example two of this article you can hear how severely different the tone, body, and clarity of a LDC vs the SDC mono signals. The brightness of the Small Condenser microphone would be useful in a track with dense and complex instrumentation.
6. Vertical Spaced Pair
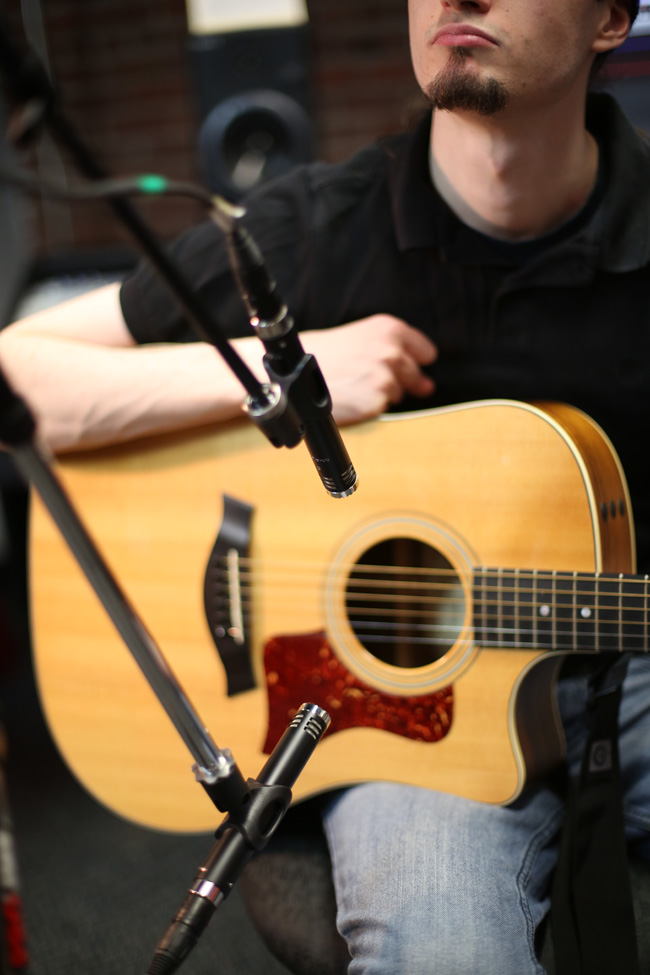
This is my favorite configuration out of all the ones listed in this article. In the above picture I have placed two SDC microphones in a vertical spaced pairing about seven inches apart. The bottom microphone’s capsule is pointed directly at the lower three strings of the acoustic and the top microphone is pointed at the top three strings. Angling them inward balances both the high and low end so that there aren’t very many holes in the fidelity of the signal.
When panning these signals extreme left and right the stereo image is very interesting. Depending on strum direction you can almost feel the attack of the guitar pick on the high and low strings moving from left to right and right to left. This may not be every engineers ideal microphone placement but it does lend itself to some interesting mix options. I would experiment with this placement specifically on a singer/songwriter act that had only acoustic guitar and vocal. The quality of the recording is very intimate and would be fitting for that style. Most of those types of acts rely heavily on the acoustic guitar for a controlled low end, present midrange, clear shimmering high end, without taking away from the vocal.
7. XY
The XY configuration is a stereo option for many different applications. For this you must have the two microphones placed at 90º angle with the capsules as close to one another as possible without having them touch. The angle is then pointed towards the sound source. For this placement I pointed the angle towards the sound hole of the guitar. The idea was to get a somewhat wide stereo image of the guitar but I feel that having the microphones where they were narrowed the signal out. Typically I use this configuration in a situation where there is not an ample amount of time to set up a wide stereo configuration.
Phasing Issues? Stereo bar to the rescue!
Capturing an accurate stereo recording can be derailed by phasing issues easier than you would think. If a stereo microphone configuration has one microphone slightly closer to the sound source than the other then the recorded waveforms will begin to cancel themselves out. To alleviate this many engineers will use a stereo bar like the one shown in examples 7 and 8.
8. Room
This configuration is typically used in conjunction with some closer microphones. In listening to this example you can get an idea of how thin the signal can become the farther away it is. Also, general room ambience becomes far more noticeable when using a set of room microphones. Many engineers will always put up room microphones when the chance presents itself. Next time you have spare inputs try it out and you may or may not find it useful later in the mix.
9. Dual Dynamic

Using two dynamic microphones on an acoustic leads to some interesting choices for panning later in the mix.This techniques comes from placement used on guitar amps and bass amps. In those situations you can experiment with the tone of the speaker by angling one of the microphones off-axis so the microphone retains resonating frequencies that a flush microphone would not pick up. I feel that it is important to experiment with off-axis placements because after all we never have our ears flush against an instrument while we are listening to it. To some degree we are always listening in an off axis setting so why not try it out?
One microphones capsule is facing directly at the sound source while the other is underneath it at an angle facing the exact same area. This variation of axis allows you pan these two microphones moderately left and right in the mix. It will feel a bit uneasy if they are panned too hard, but it does make for a wider signal than just straight mono. I’ve used this technique with great results when engineering for groups where the guitar is more of a rhythmic instrument and plays short percussive chords instead of heavily strummed open chords. If you are in a situation where the vocalists wants to play and sing then you could use this to reduce the amount of vocal in the microphones while capturing a great performance on the vocal with a more detailed condenser microphone.
10. Single Dynamic
Using a single Dynamic microphone may or may not be your most commonly used DIY method for demoing out songs or making a quick and dirty recording. This example was included because I wanted to show the drastic differences between this commonly used technique and some others that take more than thirty seconds to set up. You can learn a lot about your own acoustic guitar by trying some of the techniques in this article. Some of these placements may work better on other guitars you own so sit down one day and spend a couple hours trying some different microphones techniques. That being said, this microphone technique is widely used in live situations because it can withstand high sound pressure levels and reduce potential feedback through on stage monitors and house speakers. It’s important to be weary of those types of situations especially in highly reflective rooms that are very small or have low ceilings.