TH2 is Your New Pedalboard
Last updated on 3/18/2016Turning this powerful amp, cab, mic & pedal modeler into a MIDI-controlled effect.
by Dean Capper
TH2 is the guitar amp modeling software included in SONAR X2 and Music Creator 6 Touch, and while it deserves all the high praise it’s received as a guitar processor, one aspect that is often overlooked is its deep MIDI routing capability. More specifically, it’s possible to adjust the settings of TH2’s amps and effects pedals and even switch between separate banks, sounds and variations by using a hardware MIDI controller or a MIDI CC message in a track. With this setup, TH2 can become your full-time pedalboard and let you take the sounds of your studio recording to the stage.
Wait, what’s that sound? Oh, it’s all the groaning from the people who think that mixing “MIDI” with “stage” will only lead to wasted time and headaches. Fear not, TH2 is smarter than usual software and the flexibility you’ll gain—even if you don’t make TH2 your pedalboard—will be well worthwhile.
Keep in mind that SONAR X2 Producer, Studio, Essential and Music Creator 6 Touch all come with different editions of TH2. For the sake of simplicity, this article will refer to these as well as TH2’s full version only as “TH2.” Apply the steps here to your particular edition.
Initial Setup
To get started, make a new project and give it a name. To keep the upcoming routing clear, select a template without any tracks, like the Normal Template.
Configure TH2 as a Soft Synth
By default, TH2 is an audio effect, meaning that it accepts and outputs only audio data. However, we’re going to change things so TH2 will accept MIDI data as well.
- Open the Utilities menu and select the Cakewalk Plug-in Manager.
- When the Plug-in Manager opens, select “VST Audio Effects (VST)” from the left-hand column and then select TH2 from the middle column.
- In the VST Configuration section towards the bottom of the Plug-in Manager, click the Plug-in Properties button.
- Click the “Configure as synth” box to check it, click the OK button and then close the Plug-in Manager.
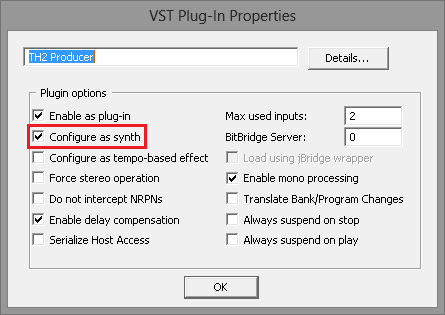
After closing the VST Plug-in Properties, you will notice that TH2 is no longer listed with your Audio Effects. You'll now find it among your VST Instruments/soft synths.
Note that this change is global. When you use TH2 in future projects, it will be in the Soft Synths category until you deselect the “Configure as synth” box.
Set up a Wah Pedal
There is a dedicated MIDI Binding for the Wah and Volume pedals. Wah is a great starting point since the setup is straightforward and we already know what sound to expect.
- Insert an audio track into your project, and then right-click in its FX Bin.
- In the menu that appears, select Soft Synths > TH2.
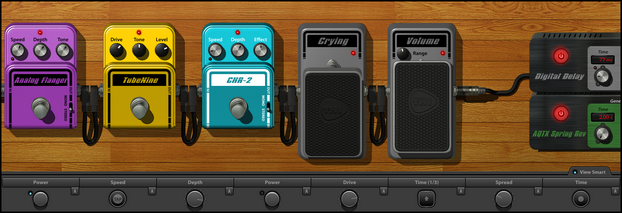
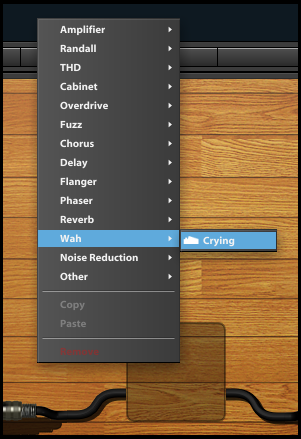
- When TH2 opens, right-click one of the translucent boxes on the “floor” and add a Wah pedal. Once it’s there, you can click and drag the Wah pedal with your mouse to hear its effect on any currently playing audio.
TH2 has boxes on the “floor” where effects, amps and cabinets can be added by right-clicking.
- Insert a MIDI track into your project, and route its Output to TH2. Press a key or turn a knob on your MIDI controller to make sure the track is receiving data. This track is responsible for passing MIDI data from your controller to TH2, so if there is no metering here, the subsequent steps will not work.
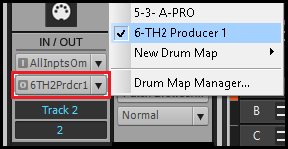
The lower menu in the IN/OUT section sets the track’s output.
Troubleshooting: if this MIDI track’s meter does not indicate any MIDI activity while playing your controller, make sure that Input Echo is active and that the input menu of this MIDI track is receiving data from your MIDI controller. It is usually best to set this input menu to "All Inputs > MIDI Omni."
Mapping the Wah to a MIDI CC
- With TH2 open, click the Preferences button in the lower-right corner.
- Click the MIDI Bindings tab to edit the MIDI mappings for TH2.
- Click the Wah pedal button in the Learn column and move a knob or slider on your MIDI controller. TH2 will automatically map the MIDI data that it receives to the Wah pedal.
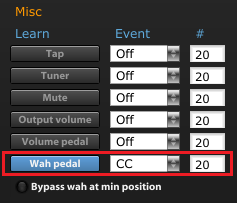
Troubleshooting: If the button remains blue and the Event and # columns never change, TH2 is not receiving MIDI data. Check the input of the MIDI track that was inserted above to make sure it is set to the correct MIDI port. If it is set to All Inputs > MIDI Omni, your MIDI hardware will likely need to be set up again.
- Close the Preferences and move the knob or slider on your MIDI hardware (or play the project if you’ve drawn the data), you should see the Wah pedal moving.
In case you have no MIDI controller, type a CC into the Wah pedal’s # column instead of using the Learn function. You’ll need to manually draw the controller data into the Piano Roll View or the MIDI track’s automation lane. It's recommended to use a MIDI CC that has a full range of values (0–127) and isn’t commonly in use (like CC 109). On/off messages like Sustain (CC 64) will not control TH2 sufficiently. Take note of the CC number that you assign to TH2 so you’ll remember what to program into the Piano Roll View or the MIDI track’s automation.
Smart Controls for the rest of the board

Wah and Volume are the only pedals that have their own MIDI Learn buttons in the Preferences. To control any other effects or amps, load them into TH2 and then drag each one to the Smart Controls at the bottom. You’ll be able to choose which parameter gets mapped to each knob at this time. Return to the MIDI Bindings in the Preferences and follow the same MIDI Learn procedure to map the Smart Controls to a note or CC.
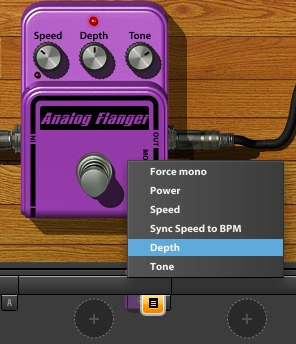
Selecting the analog flanger’s Depth knob after dragging it to a Smart Control.
Mapping the Smart Controls makes it easy to experiment with different settings one at a time or several in conjunction. Record what you like best and adjust anything later in the Piano Roll View or track automation.
Switching Between Sounds
In a typical DAW setup at a recording session, your leads, effects, chuggz, etc. would each be a separate chain of plug-ins contained in an effects bin. There would likely be multiple instances of the same amp modeling software on separate tracks/buses that use various settings to achieve the different tones. This is completely fine, but what if you want to take these sounds out of the studio?
Moving between tracks with this kind of setup would involve a cumbersome process of disabling/enabling input echos and refocusing tracks with the risk of bogging down the CPU. TH2 only needs to be inserted once in order to quickly switch between any of its eight variations.
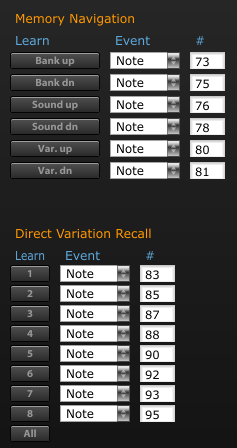
Assign MIDI notes, program changes or CC’s to navigate through or directly recall banks, sounds and variations.
By now, it should be pretty clear that whatever you can rig up inside TH2 can be controlled very flexibly. MIDI mapping makes it easy to adjust parameters, switch between configurations and experiment with different sounds quickly. While it’s obvious that TH2 will work beautifully as an audio effect inside your DAW, it’ll be equally at home at your gig tonight and should put all that groaning to rest.