To Reduce or to Boost, That is the Question - Subtractive Equalization
Last updated on 3/11/2016by Dan Gonzalez
Introduction
Equalization is one of the most powerful tools that an audio engineer can get their hands on. Live engineers, post-production engineers, and recording engineers all have their specific uses for it. It’s so powerful that some beginner engineers habitually reach for it without understanding what it can ultimately do to a mix.
Overview
Let’s resonate on the concept of volume momentarily. It is in our human nature to enjoy music at high volume levels. Concerts are a great examples of this. Outdoor festivals and the like tend to blast our eardrums with massive amounts of volume that we cannot experience in any other format. To most, increasing volume directly correlates to better sound. In a mix setting, dramatically boosting various frequencies can be a crutch for inexperienced mix engineers. By increasing the gain of a specified frequency band on an EQ one can subsequently add unwanted gain to the overall mix. Typically the problem that follows is a battle to keep your master fader from clipping and you all of sudden feel stuck in a gain-staging paradox. This can happen to best of us.
In Use
Apply subtractive EQ techniques to your instruments. Instead of boosting your favorite signals try limiting yourself to cutting. We can call this concept “carving”. Let’s take a look at a musical example. This will demonstrate some key elements of a typical Rock Mix.
Snare
Generally the snare is the focal point of a typical rock oriented mix. I've started with all my faders down and raised the snare to a suitable level: 0dBu. This recording was tracked with two snare microphones. The bottom snare microphone captured the sizzle of the snare and the top microphone captured much of the attack.
The first drawbacks I noticed when isolating the snare recordings was the amount of kick drum and cymbals that were captured. The drums were recorded in a small room with minor acoustic treatment so the initial reflections from behind the drumkit, low ceilings, and the neighboring walls caused more bleed into the snare microphones than what I may have wanted. To remedy this, I started by attenuating the lower frequencies on both the top and bottom snare microphones to filter out any bleed from the kick drum. The snare top microphone’s HPF was applied at 78Hz and the snare bottom microphone’s Low Shelving EQ band was set to 101Hz. This does not isolate the sound of the snare from the kick but rather strips the snare signals of those low end characteristics. These characteristics become more present during the mastering process so it is important to carve out the sound now.
After that some filtering was applied at the top end of both tracks to reduce some splash from the cymbals. The snare top microphone’s LPF tapered off at 12.7kHz while the snare bottom microphone’s LPF was applied a bit higher around 14.9kHz. Targeting a problematic frequency requires that you listen with your eyes closed. Many of us are guilty of listening with our eyes rather than actually looking away from the computer monitor and focusing in on the sound. In my opinion these filter cuts start right where the sound of the snare begins to suffer and the cymbals do not become too obviously filtered from the signal.
Lastly, I applied a massive cut at 313Hz on the snare top signal and another on the snare bottom around 357Hz. There is an attractive thick response between 78Hz and 313Hz and again between 101Hz and 357Hz . By cutting I have effectively exposed that thick response instead of boosting that entire spectrum. In addition, I felt that the snare bottom signal resonates nicely around some of the sibilant frequencies as well as the high mid range. To enforce those frequencies, I scooped -3dB of gain at 2kHz to enforce the frequencies in the 5 - 6kHz and 400Hz - 1.5kHz range.
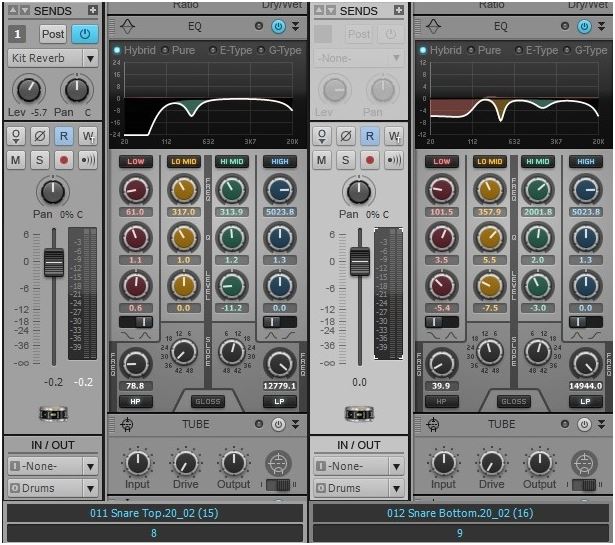
Above image: Snare Top (Left), Snare Bottom (Right)
Guitars
Your guitar tone can change significantly by carving out the correct frequencies and reducing those that introduce unwanted noise. Distorted electric guitars tend to occupy most of the mid-range based on their nature of their sound. This mix was tricky because the band is instrumental and their music relies heavily on the layering of multiple guitar tones.
Here I have chosen to attenuate the unwanted rumbling of the of the low end of the rhythm guitars using the supplied HPF. The bass guitar is rather guitar-like in this song therefore it is important to make room for that. The HPF for Guitar 1 was applied at 50Hz and similarly to Guitar 2 at 47Hz. Why not the exact same frequency you ask? Having the slightest bit of inconsistencies between two identical hard panned performances tends to create the illusion of more separation than there actually is. In this example the outcome is subtle.
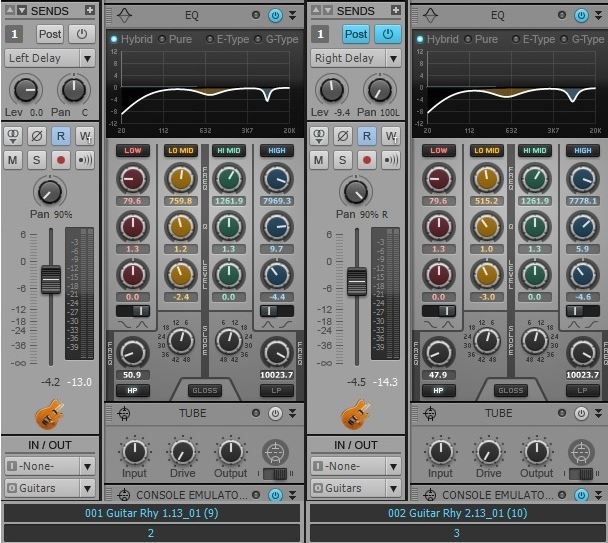
Above image: Rhythm Guitars
Once that was done I scooped the mid range around 800Hz on Guitar 1 and around 515Hz on Guitar 2 to attenuate the nasal midrange frequencies. This also reveals the frequencies in the low midrange that guitars never cease to benefit from. Afterwards I felt the need for the slightest bit of high end on these rhythm tracks so I gently cut around 2.2kHz on Guitar 1 and a bit more at 7.9kHz on Guitar 2. This pushes our ears to listen for the frequencies that occupy the space around these areas.
The lead guitars needed more clarity than they did anything else. Since this is an instrumental style of music I thought it only fitting to treat these main melody instruments as the "Vocal" track. The clarity I wanted occupied the sibilant realm so I filtered down to the top of this spectrum leaving the slightest inconsistencies to make room for the cymbals. Also, both tracks required a dip in the low to midrange at 167Hz and 234Hz to reduce any muddy tones that snuck in from time to time throughout the song.
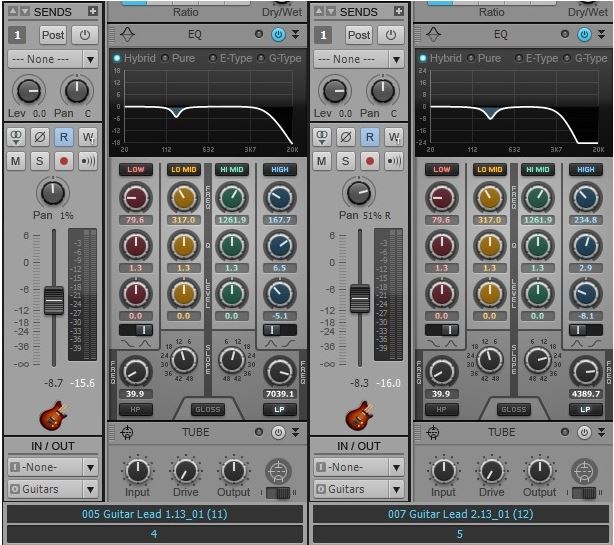
Above image: Lead Guitars
Kick
If the snare was the primary listening point for Rock music then the kick drum is the second most important. By working in the guitars in over the snare I was then met with the challenge of working in a solid kick drum sound. This kick drum was tracked using two different kick drum microphones, one deeper into the drum than the other. For reference, the first kick signal is called the "Kick-In" microphone and the second is the "Kick-Out" signal. (This is one example of the nomenclature used by many engineers to differentiate between the different microphones placed on a drum set)
I started by blending the two signals to my liking and then attenuating any unwanted rumbling around 79Hz. I also reduced most of the high end of the kick-in signal. The LPF was applied drastically at 927Hz. In tapering off the high end I can reduce the unwanted sound of the cymbal splashing and use the kick-in microphone for the proper thump that I was looking for.
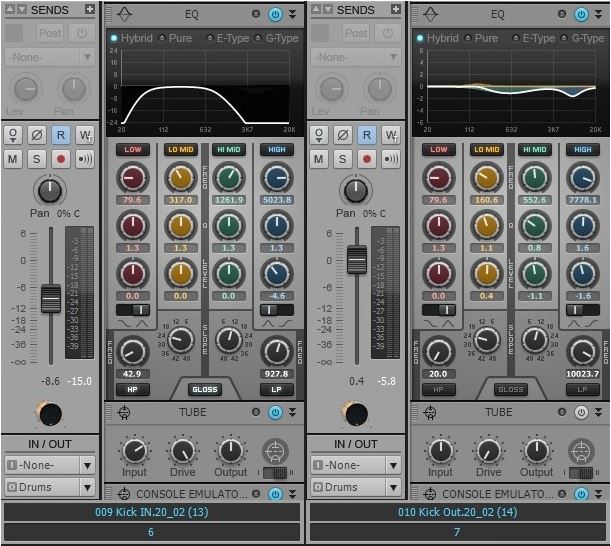
Above image: Kick Drum
The kick-out microphone had a much smoother tone to it so I used this to capture the slapping of the beater against the drum. This slapping of the beater is what will cut through on a pair inexpensive speakers that do not have much bass response. This is important to think about while shaping your sound. Lastly, using my ears, I sought it fitting to attenuate around 552Hz and 7.7kHz. If you are familiar with heavy rock or the metal style then you can understand that the kick needs to have a present and simultaneous thick tone to it. This tone is mostly achieved by reducing most of the mid-range and shaping the low and high end to your liking.
The kick drum is a tough instrument to work into a mix because it does not follow the same rules as other instruments. The trick is getting the kick drum presence into the mix without actually overpowering the mix. Many can adhere to this debacle and that is why it is important to attenuate the kick drum's frequencies rather than boost them.
Bass
The bass in this track caters to fans of the early Metallica era. Bassist Cliff Burton popularized this distorted sound on such tracks as (Anesthesia) Pulling Teeth. It's important to blend this type of bass tone into the bottom of the guitars. In this mix the guitars and the bass become a single unit ebbing and flowing with one another at certain points through the song.
Understandably one can assume that there was much processing done to this track before it's transfer into SONAR. It's important to capture the sound before you start mixing so that your mixing process is not a patch-job.
This tone is aggressive and piercing to the ear. A significant way to know that this instrument needs attention is by the aural fatigue that you may experience while soloing this track and listening to it rather loudly for more than 10 seconds. I aimed to adjust the bass track to fit like a glove under the mix by applying a HPF at 78Hz with a steep bandwidth setting. The amount of bass here needs control. Using a compressor to control the sound would be redundant because of how much overdrive was applied to this track. The overdrive has ultimately eliminated any trace of strong transients.
Lastly, there is another dip in the EQ around 2.2kHz. This adjustment reduces some of the aforementioned piercing sound. Any harsh tones in this register will be too overbearing in the mix.
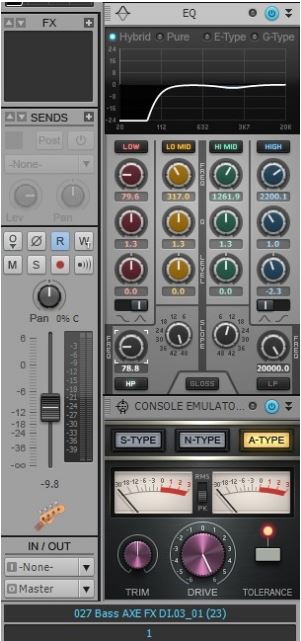
Above image: Bass |
The rest of the drum kit was adjusted as such: |

Above image: Toms
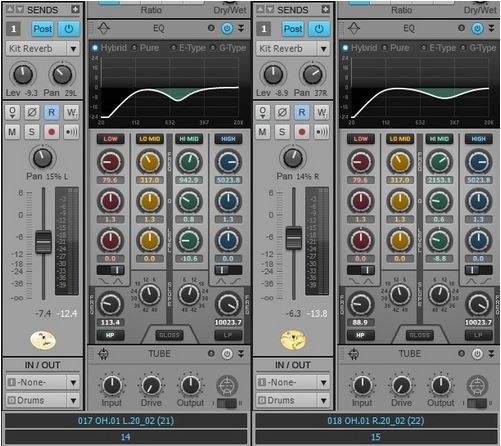
Above image: OH 1 and 2
BONUS! - When should I boost?
Some of you may read this and field this very question. Boosting is something that you can do anytime you want with any given instrument. Obviously it is your own choice in the matter but if you find yourself constantly pulling your faders up and down because your master level is clipping then you may want to apply these EQ techniques to your workflow.
Conclusion:
Mixing is as much of an art as it is understanding the logical ways that instruments interact with one another. By offering this (hopefully logical) method I would hope that you could store this away for a day when you want to question your mixing abilities and test your limits.
Examples:
“Intruder” by Truthseeker