pyro 2003 Overview
Last updated on 3/31/2016
pyro 2003 offers some great new features like the ability to record LPs, cassettes or even internet radio. And now with the edit and clean audio features, you can add a professional touch to any audio file. Here is a brief overview of some of these exciting new features.
Record audio
Open the "Record & edit audio" tab. When first opened, it will look something like this.
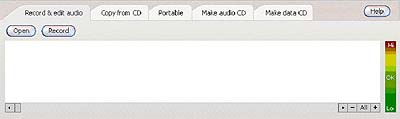
To start a new recording
Press the "Record" button shown above. The transport toolbar will also have a "Record" button. When you press it, pyro will make sure this tab is open. If an unsaved file was open, the user is prompted to save it.
The Recording Options dialog is then shown
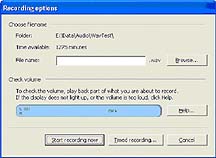
Recording options dialog
Here is a list of the options available in the dialog box:
Folder: Defaults to the folder pyro is currently navigated to.
Time available: Shows recording time in minutes, based on CD-quality audio.
File name: User must enter a name. They will be warned if they press any key that is not legal in a filename.
Browse: Searches for and displays files on your PC.
Record meter: Runs continuously while the dialog is open, showing the incoming audio from the default record device. If either channel clips, a "Too loud" indicator is shown at right.
Help: Launches a "Recording Help" wizard
Start recording now: Closes the dialog and begins recording immediately.
Timed recording: Opens the "Timed Recording" options dialog.
Please note: Clicking either "Start recording now" or "Timed recording" causes the dialog to check whether the filename is valid. If the file exists, the user must confirm before proceeding.
Cancel: Button exits without starting to record
Set timed recording
Click on the "Timed Recording" button to launch the options dialog
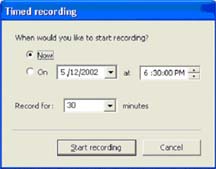
The radio buttons indicate when to start recording. This choice is saved in the registry. The time and date default to the first even half-hour increment of the current time. You may not set a time before the current time, nor set a time more than 1 month in the future.
Enter the length of time you would like to record in the "Record for" dropdown. Space permitting, you will get the choices of 15, 30, 60, 90 and 120 minutes (unless there isn't enough recording time for any of these choices). This time will get saved as a default the next time you use this feature.
You can then hit the "Start Recording" button to confirm this choice. Recording will begin for the time you have chosen.
Your computer must be turned on and will only record from the record source specified by the windows multimedia panel for the specified time.
When you select for an immediate start, pyro will launch directly to recording, clearing any audio view that was previously displayed. You can stop recording by clicking the "Click Here to Stop Recording" button located on the transport or pane.
If you have selected a time in the future you will get a "Waiting to record. Click here to cancel" button displayed in the edit window. Unless you click to cancel, pyro will begin recording at the specified time.
If you would like to record internet radio you must have it selected as the sound source in your windows multimedia panel at the time of the recording. That includes making sure the correct URL is up and running during the recording session.
The maximum recording time is 3 hours.
Once you have finished recording, audio will appear in a waveform and you will have the ability to edit audio.
Edit audio
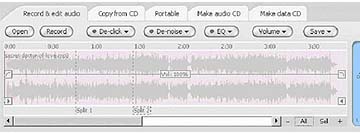
One of the great new features of pyro 2003 is the ability to see your audio files as waveforms and make edits. Once you have recorded your audio file or open a file using the "Open" button, you will see a display that looks like this:
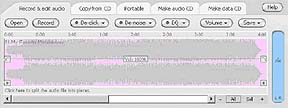
Initial View
The top gray bar represents the ruler, the middle part is the waveform display and the bottom grey area is the splits area. You can zoom in or out of the wave by clicking the "-" and "+" signs located on the bottom right. You can click "All" to revert back to the default setting, which fills up the waveform in the entire display window.
Adjusting volume
Once a file has been opened, a handle will be shown as above with a volume adjustment. The handle will always be drawn at the midpoint of the file as a dark horizontal line with default value of 100%. You can adjust the volume by moving the line up or down. Volume can be adjusted from 0% to 200%. Double-clicking the volume will reset it to 100%. The Volume meter on the right will tell you if you levels are "ok" or "too loud". You can adjust volumes accordingly.
Cropping
The crop handles are located as arrows on the lower right and left sides of the wave. Moving these will crop start & end times of the file. If you move the left crop handle, it will push the left fade handle so it maintains the same relative position. Likewise with the right handles.
Fades
Fade handles are located at the end of the volume bars. These will also be drawn as dark curves. Moving the fade handles will create a fade-in and fade-out. The fade-in will be a fast curve while the fade-out will be a slow curve. This allows for a smooth transition when burning a CD or when you have multiple tracks in the view display.
If you have multiple tracks in the view display, you can also cross-fade by extending the fade handle into the next track. For example, if you have track 1 and track 2. Extend the fade handle at the end of track 1 into track 2. Then extend the fade handle at the beginning of track 2 into track 1. This will create the remix sound done by a lot of DJ's.
Setting Now time
If you click in the time ruler or the waveform area, the "Now" time will be set to where you clicked. If you click outside the cropped region, the "Now" time will be clipped to the cropped region. The transport slider will update when you change the "Now" time.
Creating Splits
Creating splits allows you to slice one track into many smaller pieces, which you can then saves as separate tracks. This is especially useful when you are recording a LP. You can record an entire LP non-stop and then create splits and save them as separate tracks.
When there are no splits, the splits ruler will say "Click here to split the audio file into pieces." Clicking in the splits ruler creates splits. You can select a split by clicking its name in the splits area. Ctrl- or shift-clicking a name will extend the selection (or remove items from the selection) precisely as is done in Windows Explorer. To clear the selection, click in the time ruler or in the waveform display.
To move a split, click and drag its name to the left or right. Press the Delete key to delete all selected splits. You may delete a split by dragging/dropping it off the time ruler. If there is a multiple selection, and you hold down Shift and drag/drop one item off the ruler, the whole selection will be deleted.
Playback
Start playback by clicking the Play button on the transport. Playback will reflect the fades and the volume setting.
Saving
You can save a new file or existing file as a WAV, MP3, or WMA. Additionally, you can save pieces (or splits) as new tracks.
To save splits, choose the "Save Pieces dialog" from the "Save" button on the upper right.
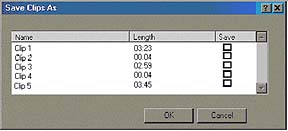
A grid view showing a temporary filename (Split 1, Split 2, etc.) and duration for each split will appear. You can select or deselect any of the splits you created as well as edit the filenames. You may also choose one format to save all the splits. The "Save as" folder will be displayed allowing you to choose the destination folder.
Clean Audio
Another new feature in pyro 2003 is the ability to clean audio. Within the "record & edit audio" tab, there are three buttons for "de-click", "de-noise" and "EQ" effects.
Each button will launch a menu with choices as follows (example shown is for De-Click)
Turn on De-Click
Turn off De-Click
----------
De-Click options…
The first choice turns on the effect. The button lights up. The second choice turns off the effect. The "light" on the button reverts to gray. The third choice both turns on the effect and shows the Options page.
De-Click effect
De-click property page allows you to edit out clicks and crackles. The higher the "Reduction" factor, the greater an effect on the audio file. The "Listen to what's being removed" checkbox allows you to hear only the clicks and crackles being removed. All changes are done in real-time.

De-noise effect
This is the same as de-click, except that we use the Virtos De-Noise Express effect. The property page looks like this:
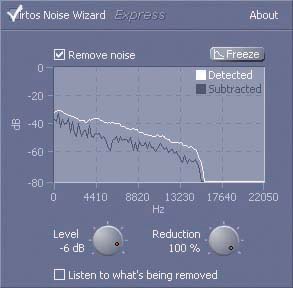
The plugin automatically detects noise during audio playback and displays it in the spectral display. As the audio streams, the plugin creates a "noise profile" which constantly changes in an effort to detect and remove noise accurately. To lock the current noise profile in place so the plugin continues to use that profile instead of adapting, click Freeze. "Level" sets how sensitive the plugin is. The lower the setting, the more sensitive it is. "Reduction" sets how much noise gets removed. The higher the setting, the more noise gets removed. You can also listen to only what is being removed by checking the "Listen to what's being removed" box. All changes are done in real-time.
Graphic EQ
The graphic EQ has 5 bands: Bass, low, mid, high and treble. You can adjust these levels to your own personal listening tastes. All changes are done in real-time.
Saving
When you save the file (or save splits), the plugins will be patched in and the saved file will be processed with effects.