In-depth look at "Snap To Grid" option
Last updated on 3/29/2016By DJ Serg
DJ Serg, is one of today's hottest remix producers, crafting major label dance remixes for X-MiX productions. He also teaches a SONAR based-class on remixing for X-MiX university. Previously, he sent us a on tip on Key Bindings. Here is a new tip that he wanted us to share with other SONAR users:
When working on any Music Production (Remix or Original), at some point you're going to need to move your clips around. In almost every project, you're going to need to do things like: Line up your Accapella track, line up your Loops/Groove Clips, syncopate a drum clip, create fills, extend the intro, add a break, the list goes on and on. While working on projects and moving clips around, I'm always in and out of the Snap Options, constantly changing the settings. Using mouse strokes can sometimes slow me down.
This in-depth look at the Snap options in SONAR 4 and later is going to allow you to spend less time changing the settings and allowing more time for creativity. This will optimize workflow for both beginner and advanced users of SONAR.
NOTE: All the data in SONAR is represented as "Clips". Clips can contain MIDI, audio, or Groove Clips. All settings in the Snap To Grid option apply to all Clips.
The first thing we're going to cover is the Enable/Disable the Snap To Grid Icon. 
(Keyboard shortcut "N" Key will toggle the Enable/Disable)
When off (Icon  is gray): Clips will move freely.
When on (Icon is blue):
Clips will move in “selected increments” relative to the Grid. (Example of “selected increments” would be: Measure, Half, Quarter notes, etc…)
To change the Snap properties (Example A), hold the "Shift" and "N" Keys together or click the down arrow on the Snap to Grid Icon
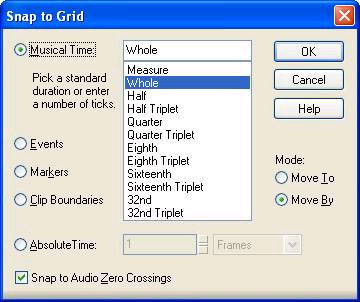
(Example A)
The most used setting is the "Musical Time" set to a note increment like: Whole, Half, Quarter, etc. (this setting will vary depending on the desired clip movement)
The 2nd most used is the "Mode" feature.
The default (and my favorite) setting is "Move By".
With "Move By" selected: Clips will move by the selected increment. BUT, relative to the grid.
In the example below (B1):
The Snap To Grid option is on, with the "Musical Time" set to "Measure" and "Move By" selected. Notice that the clip is placed about a 16th note off on Bar #1.
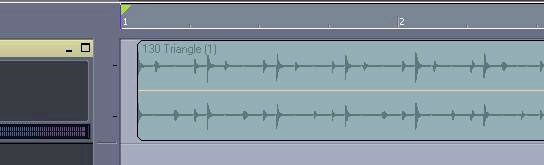
(Example B1)
Now when I move the clip, it will move (relative to the grid) by single measures:
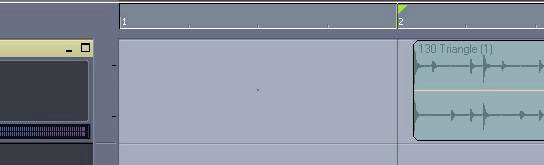
(Example B2)
Notice in the above example (B2) that the clip has move by 1 measure, but is placed at the same time relative to the grip (which is now a 16th off on Bar #2). This is extremely helpful when working with vocal clips. Once you have your vocals lined up with the grid, you can move them around and your vocals will still stay on beat.
The other Mode setting is "Move To".
With "Move To" selected:
Clips will move to the nearest selected increment (in this example: Measure)
In the example below (B3):
The Snap To Grid option is on, with the "Musical Time" set to "Measure" and "Move To" selected.
Now when I move the clip from its original location (See example B1), it will snap to the nearest measure.
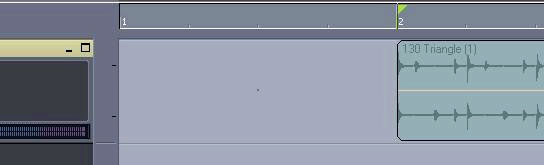
(Example B3)
Notice that the clip has moved to the next measure, and snaps precisely to Bar #2.
Here are some time saving step by step instructions.
Using only keyboard shortcuts
Change the Snap Properties Settings:
- Hold "Shift" and "N"
- Press "Tab"
- Move "Up" and "Down" arrows keys to desired setting
- Press "Enter"
- Change the "Mode" Settings ("Move To/Move By")
- Hold "Shift" and "N"
- Hold "Shift" and "Tab"
- Move "Up" and "Down" arrow keys to desired setting
- Press "Enter"
Here's a cool feature to remember: If the Snap options is disabled, and you want to change the settings and enable snap to grid. Just open the options dialog (Arrow on Grid Icon or Hold "Shift" and "N" Keys), change any settings then click "OK" or press the "Enter" key. That will apply the changes and automatically enable Snap to Grid. (You do not need to enable it first and then change the settings)
NOTE: It's very easy to accidentally move a clip (and not notice) by a smaller setting, like 16th notes. To avoid this, I usually set the Snap To Grid Properties back to "Measure" after every clip movement.
NOTE: All time selections and drag and drop editing operations use the Snap To Grid settings.
Also, the Piano Roll and other views have independent Snap To Grid features and are not affected by changes made to the project Snap To Grid options.