Using the Allen & Heath ZED R-16 as a Control Surface
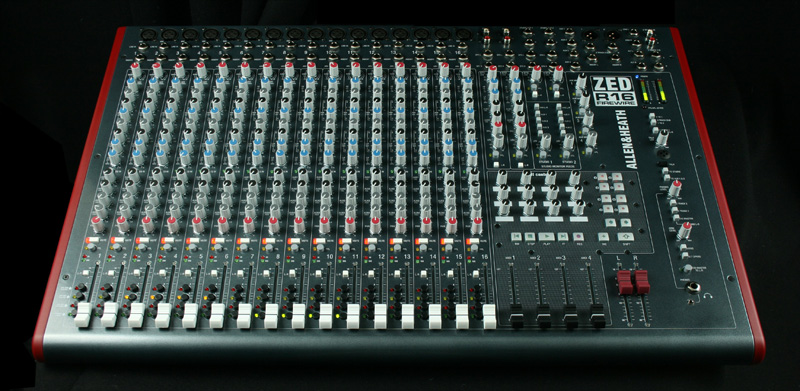
Last updated on 3/29/2016Allen & Heath's ZED R-16 FireWire mixer is a powerful board with very flexible routing and professional features. One of the coolest features about this new board is that most of the faders can send MIDI Continuous Controller (CC) data which means that it can be used as a Control Surface in SONAR or SONAR Home Studio.
In this tip we are going to briefly walk through how to set-up the ZED as a surface as well as share our custom made templates and presets to help you get started. If you are already familiar with control surfaces in Cakewalk applications then use the links below to skip to the section you'd like to read
Basic Set-up | Using Remote Control with a Project Template | Using the Generic Surface
Using the ACT MIDI Controller | How do I Import a Control Surface Preset?
Download the Project Template | Download the Generic Surface Preset
The ZED-R16 can be programmed to send MIDI data on any of one the 16 available MIDI channels. In this tip we have decided to use MIDI Channel 2 so the first thing we need to do is set your mixer to channel 2:
- Power off your ZED-R16
- Hold down the [PLAY] button on the mixer while turning on the power
- Release the [PLAY] button on the mixer
- Press and hold MIDI button [7] on the mixer
- Press and then release the [PLAY] button again
- Release the [7] button
- Switch off the mixer
- Switch the mixer back on - you should now be set to MIDI channel 2
Next - visit Allen & Heath's ZED-R16 website and be sure you have downloaded and installed the latest and greatest drivers for the ZED-R16. I would also highly reccommend saving a copy of their MIDI Implementation Chart as well for reference regarding which control is sending which MIDI message.
I mentioned earlier that the ZED-R16 has very flexible routing and powerful features. One sweet ability of the mixer is to enable and disable the faders from sending MIDI data. This can be super-helpful when your mixing on the board and don't want the track levels to change in your software. However since we want to use the mixer as a control surface we need to make sure that all of the faders are set to send MIDI CC data, to do this do the following:
- Locate the fader for Channel 1
- You should notice that next to each fader is a vertical strip of 4 buttons
- The very bottom button is labeled "FADER = MIDI" depress this button
- The indicator next to it should now light up green, repeat this for all the 15 remaining faders
- Step back and admire how pretty your mixer now looks with all the MIDI indicators lit up
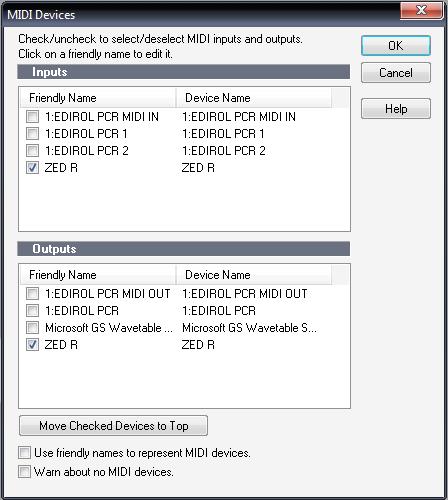
Finally - open your Cakewalk application and let's make sure the ZED mixer is setup so your Cakewalk program can recognize it as a control surface:
- First click Options | MIDI Devices
- Under both the 'Inputs' and 'Outputs' section check the option for the "ZED R"
- Click OK
Now that you have the latest drivers installed, configured your mixer and are armed with the MIDI Implementation chart - let's review how you can use the ZED-R16 to control your Cakewalk-based studio.
Using Remote Control with a Project Template
A powerful feature of SONAR and SONAR Home Studio is Remote Control. This can be used to control the volume or pan levels of a track by assigning the control to a MIDI message. Set-up is pretty straightforward to get started try the following:
- Create a new project with no tracks or busses in it
- Insert a few tracks
- Switch to the Console view by clicking Views | Console
- Right-click on the control (volume, pan and/or send) you'd like to control with your ZED-R16 and choose 'Remote Control'
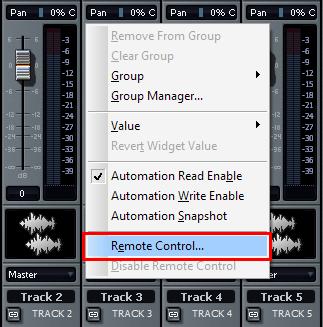
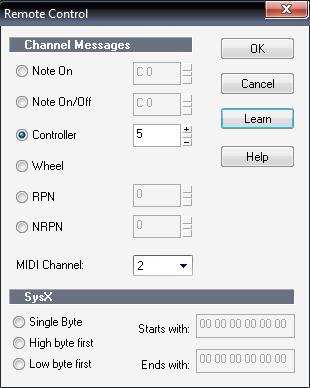
- You will then be presented with the 'Remote Control' dialog:
- Click the Learn button
- Move the fader or MIDI knob on your ZED-R16 that you'd like to use to control this parameter
- Click the Learn button again and then click OK
Now test it out - the fader or knob that you just MIDI-learned should now be controlling that parameter! Repeat the above process for as many controls you would like to learn. Once you have mapped out your control scheme you probably want to save it so you can use it again later. This can be done by saving a template - click File | Save As and for 'Save as Type' choose "Template".
Feeling a little lazy? You can also download the template we made for the ZED-R16 for use with SONAR. This template consists of 16 audio tracks and 4 busses. The 16 white track faders on the ZED are mapped for volume control of the 16 audio tracks in SONAR whilst the 4 the black "MIDI" faders are mapped to control the 4 busses. The buttons and MIDI knobs are not mapped to anything. (we can't do it all for you!).
Download the ZED-R16 Template File (.cwt)
Tip: You can get your new template to show up in the 'New Project' dialog by placing it in the same directory as your other templates. Not sure where to find them, you can check by clicking Options | Global | Folders and checking the file path listed for "Templates: "
Using the Cakewalk Generic Surface Plug-in
The remote control capability of Cakewalk applications is pretty powerful but lacks flexibility - what if your project has more tracks than you have faders to control them? Do the transport (Play, Stop, Rewind ...) feel a little clunky? Well then your next option is the Cakewalk Generic Surface Plug-in.
What is the 'Cakewalk Generic Surface' ? - The Cakewalk Generic Surface is a Control Surface plug-in available for many Cakewalk applications that allows you to use your own MIDI controller as a control surface by mapping the MIDI messages the surface sends to parameters in the Generic Surface interface.
Let's briefly discuss how to set it up with your ZED-R16 and then I'll share our preset with you that you can use as well.
- Create a new project; DO NOT use the template you have created for remote control previously
- Insert 24 tracks into your project - it can be a mix of Audio and/or MIDI tracks
- Click Options | Control Surfaces this will open the 'Control Surfaces' dialog:

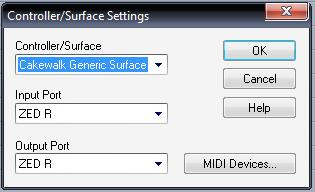
- Click the Add New Controller/Surface button, this will open the 'Controller/Surface Settings' dialog
- For 'Controller/Surface' select "Cakewalk Generic Surface"
- For 'Input Port' and 'Output Port' select "ZED R"
- Click OK to return to the 'Control Surfaces' dialog. Ensure that the little check box under the field "WAI" is checked
- Finally click the Close button, the Cakewalk Generic Surface has now been added.
OK so how do we use and configure it with our ZED-R16? We'll need to bring up the Generic Surfaces Property page so we can configure. To so click Tools | Cakewalk Generic Surface - 1
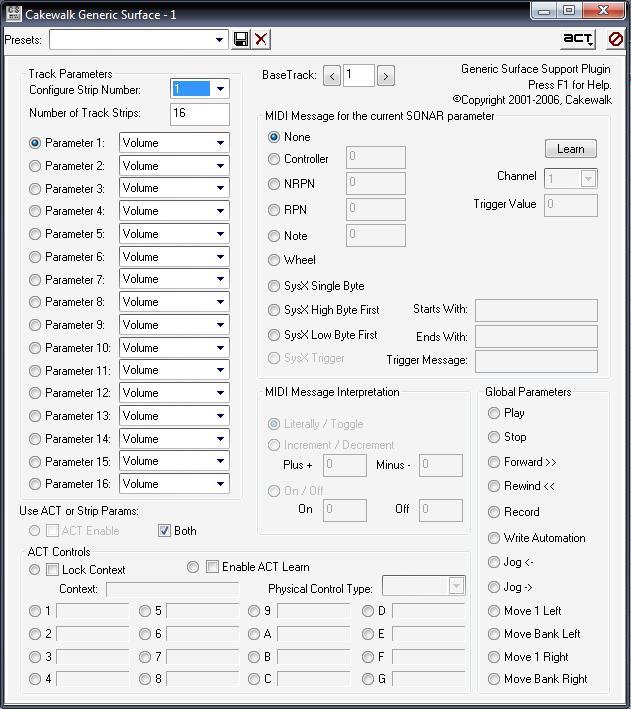
While we can't cover ALL the functionality of the Generic Surface, we can briefly discuss how to set it up with your ZED-R16. If you'd like to learn all the details press the F1 key on your keyboard to bring up the help contents for the Generic Surface. For this exercise we are going to configure the Generic Surface to work with 16 faders of the ZED.
- Set the 'Number of Track Strips' to "16"
- For each track strip you can assign up to 16 parameters using the buttons and drop down boxes for this exercise let's set Parameter 1 to "Volume" and then Parameter 2 to "Pan"
- Next we'll need to configure each channel strip; from the 'Configure Strip Number' drop down box start with "1"
- Then, select 'Parameter 1' and move the fader for channel 1 on your ZED mixer up and down
- Click the Learn button, fader 1 on your ZED should now be mapped to control volume for track 1 in your Cakewalk software
- Now let's set up a pan control, select 'Parameter 2' and then move one of the 12 knobs on the "MIDI Control" section of your ZED mixer. Finally click Learn you should now be able to control both the volume and pan for the first track in your project.
So now what - you have 15 more faders to map. Using the 'Configure Stip Number' drop down, select "2" and then repeat steps 4-6 above. You'll have to map out all of the faders + knobs at least once.
What if my project has more than 16 tracks?
This is where banks or a group of tracks come into play. The Generic Surface allows you to bank configured strips over to control the next group of tracks - let's try it out:
- Under 'Global Parameters' select "Move Bank Right"
- Click the [Right Arrow] button on the ZED, it's located right below the [8] button
- Click Learn on the Generic Surface Property page
- Under 'Global Parameters' select "Move Bank Left"
- Click the [Left Arrow] button on the ZED, it's located right below the [7] button
- Click Learn on the Generic Surface Property page
Now we have mapped bank left and right controls to the Left and Right buttons on your ZED you can use those to bank through the active tracks that are controlled by your ZED-R16.
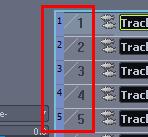
How do I know what track I am controlling?
The answer is Where Am I (WAI) - this is the blue vertical strip located to the left of your track's number. This is used to indicate which tracks are currently controlled by your ZED mixer. Using the assigned bank keys - you can move through banks of 16 tracks to easily control the volume and pan of even the largest projects.
What about Transport Controls - Play, Record, Stop, FF and RW?
You can use the Generic Surface to control these as well!
- Open the Generic Surface Propert Page (click Tools | Cakewalk Generic Surface - 1)
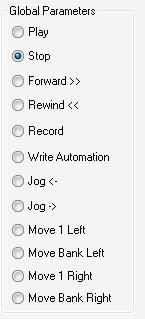
- Locate the 'Global Parameters' section in the lower left corner
- Select the parameter you'd like to map
- Press the button you'd like to map it to on your ZED
- Click the Learn button on the property page
- Repeat for each parameter you'd like to set-up
That's it! You should now have your ZED configured to operate the Transport of your Cakewalk application and control volume for up to 16 tracks per bank. Now get creative - the ZED-R16 has 12 knobs and 8 (16 w/shift key!) buttons that you can map to various parameters.
To get started - you can also download the preset we made. In this preset the 16 faders are set-up to control track volume, the 12 knobs will control track pan for the first 12 tracks in a given bank and the transport + bank controls have been set-up as well.
Download the Cakewalk Generic Surface Preset
How do I import a control surface preset?
Active Controller Technology (ACT) is one of SONAR's most powerful features. With ACT you can use your MIDI device to control track and plug-in parameters. So for example if you wanted to use the 16 faders of your ZED to control filters in your favorite soft-synth ... you could do that! ACT works by allowing you to assign and control parameters of the window that is currently in-focus. We're going to briefly explore how to set-up your ZED to use ACT, if you'd like to read the full details and information check out the ACT help contents available by pressing F1 when the ACT property page is open. Before you can get started using it however you will need to add the 'ACT MIDI Controller' to your project. Set-up is similar to the process we used for the Cakewalk Generic Surface.
- Click Options | Control Surfaces
- Click the Add New Controller/Surface button
- When presented with the Controller/Surface Settings dialog, select "ACT MIDI Controller" for 'Controller/Surface'
- Set both your 'Input Port' and 'Output Port' to "ZED R"
- Click OK
- If you have any other control surfaces present that are you using the ZED R MIDI ports you will need to remove them by selecting them and then clicking the Delete Controller/Surface button
- Click Close
Now that we have added the ACT controller, we need to set it up so we can control some parameters with it. To get started click Tools | ACT MIDI Controller - 1 You will be presented with the ACT Controller's property page.

- In the lower left corner of the ACT panel check the option for 'Enable'
- ACT works kind of like a translator - to get started we'll need to map each of the Cells in the ACT panel to a MIDI CC
- You should notice that the ACT panel has 4 groups of 8 cells. Additionally there is also a bank selection to give you even more mapping options
- To map cells to a fader or knob on your ZED:
- Click in the top portion of the first cell you'd like to map - it will display "MIDI Learn"
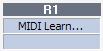
- Move the pot or fader you'd like to map to that cell
- repeat the above process for ALL the cells in the ACT panel.
Tip: Once you've mapped each cell you can save it as a preset by typing a name in the box across the top and clicking the save button. It looks like a little disk.
OK so how do I use it?You might notice that next to the 'Enable" check box is a text box that displays whatever the in-focus window is. The ACT panel will show all of the parameters you can control from the in-focus window. Let's try controlling the parameters of a software instrument (be sure you have mapped all of the cells first using the steps above!).
- Open your favorite instrument (I'm using Rapture in this example)
- Click the ACT button in the upper right corner of the instruments interface:

- Using your mouse move 2 parameters on the plug-ins interface
- On your ZED, move either two faders or two of the knobs
- Click the ACT button again.
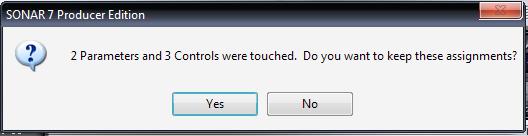
- If you did it correctly you will get a pop-up window stating what parameters and controls were mapped. Click Yes to save the assignments
Using this process, you can map your physical controls on the surface to the control strip parameters and the parameters in your instrument you desire. When the process is complete, you can save this as your own custom ACT preset to recall at any time.
Still feeling lost? ACT is super easy once you have the cells in your ACT Property Page set-up, but if you're having trouble or need some more guidance download our ACT Setup .pdf
How do I Import a Control Surface Preset?
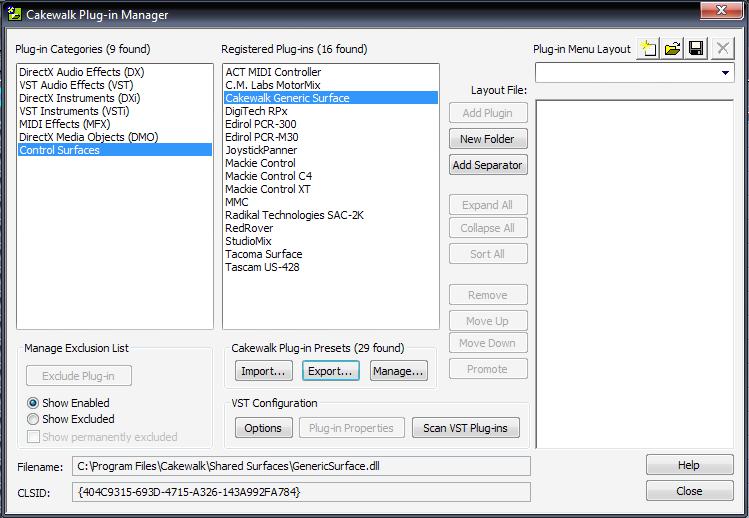
- Open the Plug-in Manager by clicking Tools | Plug-in Manager
- On the left under 'Plug-in Categories' select the option "Control Surfaces"
- In the middle under the section 'Registered Plug-ins' select the surface for which you'd like to import a preset (.spp file)
- Click the Import... button and then browse to the location on your computer where the preset file is located
- That's it! Now the next time you open up that control surface you can select the preset configuration from the 'Preset' drop-down menu