V-Studio 100 Firmware Update Instructions
Last updated on 3/31/2016The information in this article applies to:
- V-Studio 100
Updating using a USB cable | Updating using a SD card
- Download and unzip the most recent firmware update from the Updates and Drivers section of the V-Studio 100 Support Page.
- In Windows this can be done by right-clicking on the folder and selecting 'Extract All'.
- In Mac OSX this can be done by double-clicking on the folder.
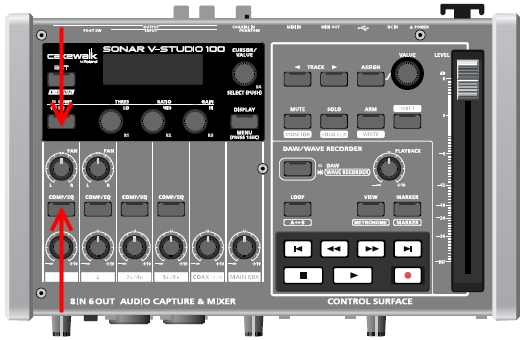
- Turn on the VS-100 while holding down the Compressor/EQ setting button and COMP/EQ button for channel 1. These buttons are indicated with arrows in the image below.
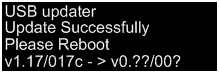
- The version of the current system software is displayed. If the indication is "v1.17/017c" (as shown below) then the update is necessary.

- Use the USB cable to connect the VS-100 to your computer.
NOTE - Windows XP users: If the Found New Hardware Wizard is displayed, please see steps 6-12 on page 13 of the VS-100 Getting Started Guide.
- When the USB connection is detected the VS-100 hardware, the following screen will appear:

- On your computer, locate the firmware update you have downloaded. Navigate into the "...Updater" folder for your operating system and double-click "UpdSMF."
- In the "MIDI Out Device" field, choose "CONTROL(VS-100)" (on a Mac, choose "VS-100 C").
- Click the [Path] button (on a Mac, the [Select...] button), and in SMF Path (on a Mac, SMF Folder), specify the folder location that contains the update files (_00001.mid--end.mid). This folder should be titled “USB Update Files” and will be in the "Update Files" folder included with your firmware download .
- Click the [Scan SMF] button (not required on a Mac), and verify that the update files (_00001.mid--end.mid) are shown in the file list.
- Click the [Send] button. File transmission will begin. The transmission status is shown by the transmission counter (as shown below).

- When transmission of the program has finished, the process of writing the program into the VS-100 will begin. IMPORTANT: do not power off the VS-100 until the update is complete, doing so may damage the unit.


- When the program has been updated successfully, a screen like the following will appear with the words “Please Reboot” blinking.
- Verify that the updated version is displayed. This completes the update procedure.
- Turn the power of the VS-100 off, then on again.
Updating using a SD card
Ensure that the VS-100 is configured so that its SD card slot can be used as a USB mass storage device when connected to your computer. To configure the VS-100 for Storage mode:
Hold down the Display/Menu button for at least 1 second.
Use the Cursor Value/Select(Push) rotary encoder and scroll down to Storage.
Push the Cursor Value/Select(Push) rotary encoder.
Turn the Cursor Value/Select(Push) rotary encoder so that the menu reads On.
Push the Cursor Value/Select(Push) rotary encoder again and push the Display/Menu button to exit.
Connect the VS-100 to your computer using a USB cable and power the unit on.
Note: if the unit was already powered on during the above steps, simply remove the USB cable and then reconnect the USB cable from the rear of the VS-100.
- On your computer, navigate to the SD card to explore its contents.
- In Windows this can be found by going to Start > My Computer and looking for "Removable Disk" under the Devices with Removable Storage section.
- In Mac OSX this can be found on your desktop as a mounted hard drive, in most cases it will be titled "No Name".
- Download and unzip the most recent firmware update from the Updates and Drivers section of the V-Studio 100 Support Page.
- In Windows this can be done by right-clicking on the folder and selecting 'Extract All'.
- In Mac OSX this can be done by double-clicking on the folder.
- Navigate into the unzipped firmware update folder you downloaded and locate "vs100upd.dat". This file can be found in the folder titled "SD update files" in the "Update Files" folder of your download.
- Copy the "vs100upd.dat" file to the SD card's contents (as explained in step 3).
- Turn off the VS-100 by pressing the power button the back of the unit.
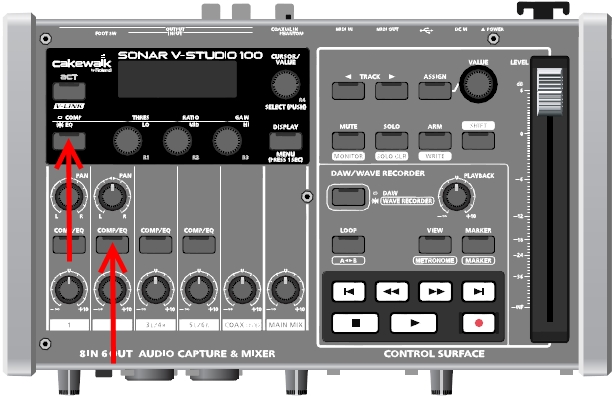
- Turn on the VS-100 while holding down the Compressor/EQ setting button and COMP/EQ button for channel 2. These buttons are indicated with arrows in the image below.
- If the SD card is not currently inserted in the VS-100, a message will appear indicating so like the image below.

- Insert your SD card into the VS-100 and the update will start automatically. IMPORTANT: do not power off the VS-100 until the update is complete, doing so may damage the unit.
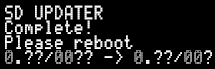
- When the update is complete, a message will display indicating so like the image below.
- Power off the VS-100 and power it back on.
- You can verify the current firmware during start-up, it will be displayed on the VS-100 splash screen.
- Turn storage mode off to continue recording.