SONAR 2015 Dorchester Update Notes
Last updated on 3/7/2016This article was adapted from the SONAR Dorchester Update PDF.
The SONAR Dorchester update includes the following:
- Smart Mute/Solo Drum Map Functionality
- Mix Recall Synth Rack Support
- Core MIDI Engine Improvements
- Scrolling with Plug-In Windows and MultiDock
- VocalSync Noise Filter
- CA-X Guitar Pedalboards
- Anderton Synthetic Impulses
- KickMaster FX Chain
- Tutorial: Bark of Amp
- Fixes and Workflow Enhancements
How to Download Dorchester
Open the Cakewalk Command Center, then download from the following locations:
- Pedalboards, Anderton Synthetic Impulses, and Kickmaster: Anderton Collection
- Everything else: The core SONAR Artist, Professional, or Platinum category
Smart Mute/Solo Drum Map Functionality
Artist, Professional, Platinum

When you mute or solo normal or split virtual instrument tracks, SONAR automatically manages muting or soloing the related set of audio/MIDI tracks. However, this solo/mute logic did not take into account tracks that were routed through Drum Maps. One of the most-requested Drum Map features was the ability to use the same solo and muting logic as other instrument tracks, hence this update.
Mix Recall Synth Rack Support
Artist, Professional, Platinum
Here’s another response to a community ”power user“ feature request: the ability to load Mix Scenes without loading the settings of synths in the synth rack.
This feature is handy because sample-based instruments like Rapture Pro or Kontakt may need to load large amounts of sample data, even sometimes in the Gigabyte range. This can take quite a bit of time with synth/sampler-heavy projects, so letting synth settings persist when recalling a mix can speed up the mix recall process considerably.
To control this feature, there’s a “Synth Rack” check box in the Mix Recall advanced preferences. Check it to recall synth rack parameters, or uncheck if you would prefer the settings to persist.

Core MIDI Engine Improvements
Artist, Professional, Platinum

SONAR now incorporates a new architecture for MIDI note management in software synths, because certain soft synths require an exact match of Note-On and Note-Off messages—insufficient Note-Off messages can lead to stuck notes and reduced voices on samplers. SONAR now explicitly counts all Note-On messages and issues an exact number of Note-Off messages to each synth when using transport functions. This provides more robust playback with all virtual instruments, including ones that previously had been prone to stuck notes. This isn’t anything you need to adjust or enable; it “just works.”
Also, if a MIDI track in previous versions of SONAR had a forced channel assignment, that channel would be applied to all channelized MIDI events when bouncing MIDI clips or saving a Format 1 Standard MIDI file. By default, SONAR will no longer re-channelize MIDI events during bounce operations. However, you can override the default behavior by adding the following line to the [WinCake] section of the Cakewalk.ini file:
[WinCake]

RechannelMIDI=1
1 = Re-channelize MIDI events
0 = Do not re-channelize MIDI events when bouncing MIDI data
Scrolling in Plug-in Windows and MultiDock
Artist, Professional, Platinum
The Dorchester release introduces scrolling functionality for plug-in windows. Horizontal and/or vertical scrollbars appear when the plug-in window is smaller than the plug-in’s graphic user interface (GUI). The same functionality is available when a plug-in is inserted in the MultiDock.

Horizontal and vertical scroll bars have appeared in the MultiDock to accommodate Guitar Rig 4’s large GUI.

Scroll bars can also appear with windows for individual plug-ins
VocalSync Noise Filter
Platinum
There are plenty of scenarios where dialog needs to be replaced due to extraneous noise. However that noise can interfere with the alignment process, so VocalSync now offers a Noise Filter that detects and optimizes noisy audio clips. Note that this feature is intended only for dialog, not musical vocals, and how well it works depends on the type of noise that needs to be filtered.

To use this feature, select only the problematic section and adjust VocalSync as you normally would to align the dub and guide clips as closely as possible. Then, click on the NF button. The VocalSync knob now becomes a Noise Filter control; releasing the mouse causes a re-analysis, and applies the Noise Filter to the guide track to minimize the chances of interpreting the background noise as speech to be processed. You can then continue to try different settings of the Noise Filter control to hear what works best.
After optimizing the dialog sync to the guide track, click the Render button to maximize the sound quality.
CA-X Guitar Pedalboards
Artist, Professional, Platinum

When you want a produced electric guitar sound and you want it fast, these take even less time to get up and running than the CA-X Amps. Drag, drop, play—and get creative. You can always craft a more specific sound later on by replacing these with CA-X amps or other amp sims, but the CA-X Pedalboards will get you started—and in many cases, be all you really need.
There are two basic pedalboards, Clean and Crunchy. They’re identical except that the Crunchy pedalboard has a fuzz module with bypass switch, while the Clean pedalboard incorporates the Vocal Mode button from the CA-X Acoustic Piezo Amp along with a Bass tone control. The differences among presets for the two types are in the control settings, not the pedalboard modules. And of course, you can modify the presets and save them to create custom sounds. Modules and controls in common with both pedalboard types include:
- Gate enables or bypasses a gate.
- Sustain affects compression Threshold, Gain, and Attack to increase the sustain amount and character as you turn the control clockwise.
- Brighten adds a high frequency boost and midrange cut.
- MorphTone is an unusual tone control that increases the high frequency response and dips response at 1.2 kHz when rotated clockwise, with the reverse response when rotated counter-clockwise.
- Chorus On enables or bypasses the chorus effect.
- Chorus controls the rate.
- Echo On adds a 250 ms echo effect.
- Reverb increases the amount of the reverb effect when turned clockwise.
- ADT On enables/disables the doubling/widening effect.
- ADT sets the amount of the ADT (doubling) effect.
For the Crunchy pedalboard:
- Fuzz On enables/bypasses the fuzz effect.
- Fuzz determines the amount of distortion.
For the Clean pedalboard:
- Vocal Mode compresses and lowers the level of the midrange in the vocal range.
- Bass is a bass shelf control that can boost or cut 9 dB starting at 300 Hz.
The Crunchy Pedalboards

Crunchy Rhythm is for those bluesy, vintage-sounding chord riffs. It’s well-suited to all pickup combinations.

Rock Lead is a processed, smooth, highly distorted lead sound. The character is quite different depending on your pickup choice.

Power Rhythm lets the rhythm guitar chords dominate their space. This one works really well with the neck pickup, and loves humbuckers.
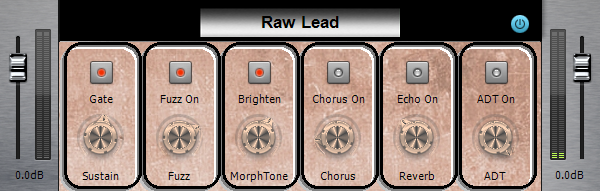
Raw Lead is an unpolished, dirty type of lead sound. It’s optimized for the bridge pickup.
The Clean Pedalboards

Basic Rhythm is just that—a foundational, basic rhythm guitar sound. Use with any pickup combination.

Chimey Arpeg is optimized for arpeggiated picking, and gives a sweet sound with the bridge pickup. It’s not as well-suited for playing full chords, because the sound is somewhat thin.

Jazz Rhythm is a full, more muted sound. This is optimized for the neck pickup.

Pure Lead is a clean, bright lead guitar sound. The bridge pickup is recommended for this preset but feel free to experiment. It also works well with single-coil pickups.
Where to Find Them
To insert any of the CA-X Pedalboards into a project, right-click on an FX Rack and select Insert FX Chain Preset… Go to C:\Cakewalk Content\SONAR <Artist/Professional/Platinum>\FX Chain Presets if it doesn’t open automatically. Open the CA-X Amps <SONAR/Producer> then the CA-X Guitar Pedalboards folders. Finally open the pedalboard FX chain itself.
Anderton Synthetic Impulses for REmatrix Solo Convolution Reverb
Professional, Platinum

The beauty of convolution reverb is that it can accept any WAV file as an impulse. In the Braintree update, Dan Gonzalez’s NYC Showroom Samples showcased how to create highly realistic, and musically useful, room sounds with Overloud’s REmatrix Solo. However, sometimes an “idealized” sound that is to sound as CGI is to images—something ethereal and “perfect”—is what you want. That’s what these 72 impulses are all about.
For example, the female vocals in a lot of electronic trance music typically have reverb. But while the rest of the track will often have an otherwordly quality, the voice gets brought back to earth when it’s put into a room. Algorithmic reverb, like Breverb or Softube’s TSAR-1, can give a more synthetic sound but it imparts a different quality compared to convolution reverb.
It’s been known for years that convolving white noise with audio adds a reverb effect to the audio, but some feel this produces a somewhat bland reverb that lacks character. However, processing the noise creates much more useful results. The impulses in this collection are based on pink noise to give frequency shaping that’s more like a real acoustic space, with additional automated lowpass filtering on some impulses to give damping. The two channels have different pink noise signals to avoid correlation
Where this approach really shines is with backwards reverb. Reversing room impulses does indeed sound “backward,” but there’s usually a certain graininess—the same qualities that make the impulse sound like a real room keep the backwards reverb from being a smooth stream of sound. For sound design, the long reverse reverb impulses in this collection are especially useful.
About the Impulse Names
- Number: The number is the approximate duration in milliseconds.
- R: Names that start with an R are reverse (backwards) reverb impulses.
- Fast Damped: The decay or attack follows a deep logarithmic curve that rolls off highs at lower amplitudes. This gives the most realistic “standard” reverb sound. With reverse Fast Damped reverb, there’s more apparent delay before the reverb kicks in because it takes longer for the level and brightness to ramp up.
- Slow Damped: The decay or attack follows a shallow logarithmic curve that rolls off highs at lower amplitudes. With standard reverb, the tail stays louder longer, but the damping gives an “acoustic space” feel. With reverse reverb, the sound takes longer to kick in than the Slow version, but more rapidly than the Fast or Fast Damped versions. As with Fast Damped, with reverse impulses it takes a while for the brightness to kick in.
- Fast: This is like Fast Damped but without damping. With standard reverb, this curve follows a typical room decay but the highs stay constant during the decay, providing a bright sound. With reverse reverb, this option takes longer than the slow options before the reverse “tail” becomes apparent.
- Slow: This is like Slow Damped but without damping. With standard reverb, the tail stays louder longer, and because there’s no damping, the sound is brighter. This contributes a more dramatic reverb sound that “blooms.” With reverse reverb, this option gives the fastest transition to the rising reverb effect.
The effect of these different types is most obvious with longer reverb times, and more subtle with shorter reverb times.
Bonus impulses: With the longer reverse impulses, reducing the REmatrix Solo Time control removes the “snapping” sound to higher levels at the end, which produces a more standard reverb sound but with an attack time. These reverbs can be very useful and sound quite authentic.
Loading Custom Impulses
To load custom responses, click on the down arrow inside the IR window, select User from the drop-down menu, and then click on Import.

Find a response to use, then double-click on it. After it’s loaded, you’ll see a confirmation screen. You can also select multiple impulses via Shift+click or Ctrl+click, and load them all at once.

Click on Done. Now when you select User, as you did for importing, you’ll see any IRs you’ve imported and can choose from them.

Applying the Impulses
These are useful with all kinds of signal sources including tuned and untuned percussion, drums, voice, guitar, and wind instruments. They’re different from both standard room impulses and algorithmic reverb sounds, so experiment to find out what works best.
Auditioning the Impulses
There are 72 impulses, which is a lot to add to REmatrix Solo if you don’t want to use them all. If you’d prefer to audition them to find out which ones are “keepers,” do the following
- Navigate to C:\Users\Public\Documents\Overloud\REmatrix Solo and open the folder. If you’ve loaded any custom impulses, REmatrix Solo combines all the user IRs into one big file named userIRs.rir which is located in the REmatrix Solo folder.
- To prevent the User menu from getting too unwieldy, you can rename this file (e.g., userIRs_original.rir) so any existing files don’t appear, then experiment with loading the new impulse responses. This will create a new userIRs.rir file.
- Note which ones are your favorites, then delete the userIRs.rir file, change the original .rir file back to userIRs.rir, and re-load only your favorites. (Note that if you open SONAR with a project that uses impulses from the userIRs.rir file and the file is not present, REmatrix Solo may crash. Therefore, it’s best to do this auditioning process with a fresh SONAR project.)
KickMaster FX Chain
Artist, Professional, Platinum

While intended originally to process standard kicks into becoming EDM monsters, over time this Anderton Collection FX chain evolved to handle various types of kick drums and musical genres—and now it’s ready to become part of the Membership program. Note that it’s also useful for parallel processing with drums when you want to add some “trash” to the dry drum sound. The adventurous can also try it with bass.
The Controls
Dist On/Off enables or disables the Distortion section (Distortion and Hardcore controls).
Distortion sets the overall amount of distortion and is the “master” distortion control.
Hardcore changes the distortion character. Turn it up slightly to add depth, turn it up further to add artifacts.
Near/Far places the kick more forward or further back in the mix.
Thud controls the kick depth.
100/250 Hz sets the Thud frequency.
Beater emphasizes the beater hit.
Broad/Sharp sets the resonance for the Beater filter.
Click emphasizes the highest-frequency kick components.
Tighten is a unique control that enables broad midrange compression while leaving the highest and lowest frequencies alone.
Room adds ambience to the kick.
Room Size changes the ambience character and depth.
Where to Find It
To insert the KickMaster into a project, right-click on an FX Rack and select Insert FX Chain Preset… Go to C:\Cakewalk Content\SONAR <Artist/Professional/Platinum>\FX Chain Presets if it doesn’t open automatically. Open the Anderton Collection then the Drums folders. Finally open the KickMaster.fxc file.
Tutorial: Bark of Amp
Professional, Platinum
Find the Bark of Amp tutorial with the SONAR tech tips.
Fixes and Workflow Enhancements
Artist, Professional, Platinum
We greatly appreciate your partnering with us in SONAR’s development process. Find the Dorchester fixes and workflow enhancements in their own knowledge base article.