SONAR 2015 Cambridge Update Notes
Last updated on 3/7/2016This article was adapted from the SONAR Cambridge Update PDF.
The SONAR Cambridge update includes the following:
- Onscreen Virtual Controller
- Mix Recall Track/Bus Output Routing
- New ProChannel module: “Panipulator” from Boz Digital Labs
- Phasor Constructor FX Chain
- Audio Import and Export Improvements
- Dimension Pro Expansion Pack: Gibson Les Paul Gold Top
- Fixes and Workflow Enhancements
How to Download Cambridge
Open the Cakewalk Command Center, then download from the following locations:
- Panipulator: Boz Digital Labs ProChannel Collection
- Gibson Gold Top Expansion Pack and Phasor Constructor: Anderton Collection
- Everything else: The core SONAR Artist, Professional, or Platinum category
Onscreen Virtual Touch/Mouse/QWERTY MIDI Controller
Artist, Professional, Platinum
The Onscreen Virtual Controller works just like a physical MIDI keyboard controller. It’s actually available in two flavors, a multi-point, polyphonic touch model you can play directly on your screen…

…and one you can control with your mouse or a QWERTY keyboard. Note that the physical key positions are always the same, regardless of your keyboard layout (QWERTY, QWERTZ, AZERTY, Dvorak, etc.).

SONAR automatically detects whether or not you are using a touchscreen, and sizes the Virtual Controller accordingly. The optimum size is displayed for either touch or mouse input, regardless of screen resolution. Both don’t just generate notes, but also let you control velocity, modulation, sustain, and jump octaves to cover the entire 88-note range of standard keyboards.
Of course, mobile use isn’t the only application. Sometimes when auditioning synth patches it’s easier to hit a few keys on your computer compared to running over to a keyboard, setting up its USB connection, and so on. The touch experience is particular handy for those with touch screens; for songwriters, the onscreen keyboard is a great way to record a melody line (or chord progression) before the inspiration vanishes.
Using the Virtual Keyboard
It’s easy to open the keyboard: look under the Views menu for Virtual Controller/Keyboard, or call it up by typing Alt + Shift + 0. To use the touch screen’s “virtual mod wheel,” tap a key and while holding it, slide up for more modulation, or down for less. The mod wheel value latches to the last state when you remove your finger from the key.
For the touch keyboard, velocity works in a way similar to piano keys—the closer you touch to the bottom of the key, the higher the velocity. Tapping at the top of the key gives lower velocity. For the QWERTY keyboard, you can set velocity manually.
Mix Recall Track/Bus Output Routing
Artist, Professional, Platinum
See that new check box in Mix Recall? It may be small, but it’s powerful.
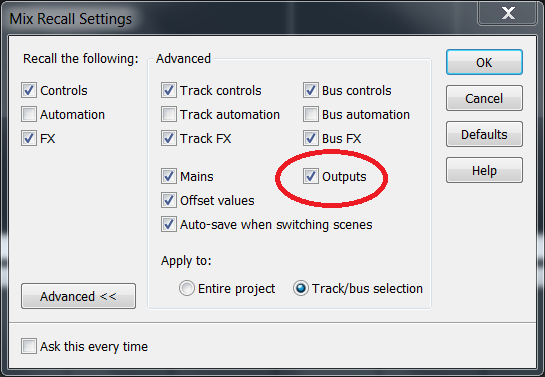
By checking Outputs, Mix Recall will now save and recall all your track and bus output settings, making it easy to recall complex mixes involving multiple sends and outs. And don’t forget that in conjunction with last month’s addition of Mix Recall templates, it’s now easier than ever to recall what’s essentially a ready-to-go mixer setup.
Configuring the Mix Recall Outputs Setting
To configure Mix Recall settings, either:
- In the Control Bar’s Mix Recall module, click the Mix Recall drop-down menu, then click Mix Recall Settings.
- In the Control Bar’s Mix Recall module, right-click the Recall Previous Scene button.
In the Mix Recall Settings dialog box, click the Advanced button to show all options, then select the Outputs check box. When selected (default), a Mix Scene recalls track and bus outputs. Otherwise, a Mix Scene ignores these assignments.
Boz Digital Labs “Panipulator” ProChannel Plug-In
Professional, Platinum
As Boz Millar says, “Even though you spent considerable time and effort getting your mix to sound amazing on your monitors, there’s still one very important question: What will it sound like playing at a theme park? Or at the dentist’s office? Or on your old radio? What if they wired one of the speakers backwards, or out of phase, or are even missing a channel?

“As much as we’d like to think that everyone is listening to our music in stereo, the truth is that many people are listening in less than ideal environments. Panipulator lets you emulate what your mix will sound like in those environments so you can be sure that your mixes will translate across a wide variety of systems.
“What will your mix sound like summed to mono? Flip a switch to find out. What if someone wires their system so that they can hear only the left channel? Flip a switch to hear what that sounds like. What if they reverse the wiring on one of their speakers? Flip a switch to find out to hear how that will affect your song. These are all common scenarios, and the last thing you want to do is find out is that your mom’s voice, that you thought was buried in the mix, pops out when played over the loudspeakers at Nordstrom.
“Panipulator will barely make a dent in your CPU usage, so there is no reason that this plug-in should not be a default on every single song you mix.”
The Controls
Flip LR reverses the left and right channels.
L Polarity reverses the left channel’s polarity—no soldering iron or re-wiring required.
R Polarity reverses the right channel’s polarity.
Mono provides the same signal over both speakers, but is extremely flexible thanks to a virtual rotary control that chooses among:
- L+R 0 dB = no center channel output drop
- L+R -3 dB = -3 dB center channel drop
- L+R -6 dB = -6 dB center channel drop
- L only = sends the Left channel to both speakers
- R only = sends the Right channel to both speakers
Applications
- In addition to real-world scenarios that might mess with your sound, a lot of club systems sum to mono on purpose—so if you’re doing EDM, it’s crucial to check for mono compatibility.
- Many engineers like to start off a mix in mono knowing that if they can create an open-sounding mix in mono, it will sound even more spacious in stereo. This is especially true when you need to do a “reality check” on bass.
- Anything done for TV or radio should definitely be checked for mono compatibility.
- The ability to reverse left and right channels makes it easy to hear the difference between a drum kit from the player’s position (hi-hat on left, toms on right) or audience position (hi-hat on right, toms on left).
- Panipulator is also useful for processing. For example, does a kick drum hit push your speaker out, or pull it in? Some engineers swear they can hear the difference, so simply reverse the polarity if the speaker pulls in.
Where to Find It
- Open the ProChannel itself, either in the Inspector or in the Console view, and right-click on the blank grey space at its top or in the header of one of the modules that is already present.
- Select Insert Module > Panipulator.
SONAR will automatically scan the Panipulator ProChannel module after it installs and it should be available without further action. However, if SONAR is set to a manual VST scan, first open the Edit menu> Preferences > File – VST Settings and click the [Scan] button.
Phasor Constructor FX Chain
Artist, Professional, Platinum
This avoids the stereotyped whoosh-whoosh-whoosh of conventional phasers, because the world has enough of those already. In fact there isn’t even an LFO—this is designed for manual automation, or drawing a periodic automation pattern to drive it (as described at the end).
The controls are a bit unusual, but you’ll be able to obtain sounds you haven’t heard before from other phase shifters.

The Controls
4/8 Stages chooses either four- or eight-stage phase shifting, in conjunction with the Timbre control.
Timbre is a multipurpose control.
With 4 stages selected:
- Full counter-clockwise gives the deepest negative notches.
- Turning clockwise makes shallower notches until at center, there are no notches.
- Continuing to turn clockwise makes sharper peaks with very broad notches.
With 8 stages selected:
- Full counter-clockwise gives the deepest negative notches.
- Turning clockwise makes two of the notches shallower until at center, Phasor Constructor becomes a four-stage phaser.
- Continuing to turn clockwise increases the amplitude of two sharp peaks while increasing the depth of two sharp notches.
Motion produces subtle stereo placement changes; the lower the Stereo control, the greater the effect. (With Stereo up full, Motion has no effect.) This is most noticeable on headphones, and is fun to vary with a periodic waveform.
Resonance overlays a resonant effect. It does not make the notches or peaks more resonant.
Stereo adds width to the imaging when you turn it clockwise.
Freq varies the phase shifter’s center frequency.
Tame Peaks is a unique feature. Phase shifters tend to accentuate certain frequencies during their travel, which can be cool but can also be problematic if the peaks line up with a percussive sound. This button reduces peak levels, which can also make the phasing effect seem more prominent.
Tone Freq sets the frequency range affected by Tone Boost over a range of approximately 70 Hz to 4.2 kHz.
Tone Boost boosts at the Tone Freq frequency. Full counter-clockwise is a flat response, maximum boost is + 9 dB. The action is very gentle—almost “Pultec-like”—but can help a track stand out a bit while mixing.
Modulating the Frequency Manually
- Click the W button for the track with the Phasor Constructor.
- When the W button background is red and the transport is playing or recording, SONAR will record any changes you make to the Phasor Constructor’s controls.
Modulating the Frequency with a Periodic Waveform
- Right-click on the Draw button in the toolbar and choose the waveform.
- Choose the desired Snap value to create a curve that syncs to the tempo. Snap doesn’t actually have to be enabled.
- Open an Automation Lane. From the drop-down menu, choose Phasor Constructor > Freq.
- Click on the automation with the Draw tool. Drag up or down to set the amplitude. Drag across to draw the waveform. You can change the amplitude while you draw by dragging up or down.
Where to Find It
To insert the Phasor Constructor into a project, right-click on an FX Rack and select Insert FX Chain Preset… Go to C:\Cakewalk Content\SONAR <Artist/Professional/Platinum>\FX Chain Presets if it doesn’t open automatically. Open the Anderton Collection then the Processors folders. Finally open the Phasor Constructor.fxc file.
Audio Import and Export Improvements
Artist, Professional, Platinum
As SONAR continues to gain ground in pro studios, the ability to import and export both the latest file formats as well as legacy formats becomes more important. With this release, SONAR has more import and export options than ever before—and more than most other DAWs.
Export Options
Here are the default file format export choices:

Three of these defaults are new to SONAR.
RF64: The traditional WAV format does not allow file sizes that exceed 4 GB. SONAR already included Sony’s W64 format, which removes this limit. The European Broadcast Union specifies the BWF-compatible RF64 format for use with large file sizes (up to approximately 16 Exabytes). The format can also store up to 18 surround channels along with a stereo mix channel and various bit streams of non-PCM-coded data such as Dolby AC3, DTS, MPEG-1, etc.
Ogg Vorbis: This lossy data compression format is a royalty-free alternative to the MP3 format, and is generally considered to give higher quality than MP3 files using the same bit rate. Ogg Vorbis defaults to variable bit rate encoding, can support up to 254 channels, and works with sampling rates from 64 kbits to 500 kbits per second.
WaveX: This stands for WAV extensible, and includes headers that can be used to specify various surround specifications and formats. Also, for those who own the optional MP3 encoder, the MP3 export capabilities have now been enhanced to include variable bit rate operation.
Also, for those who own the optional MP3 encoder, the MP3 export capabilities have now been enhanced to include variable bit rate operation.
Import Options
Here are the current default file format import choices:

Additional Formats, Too
SONAR now supports not just the default file formats, but all the file formats available in the libsndfile library (mega-nerd.com/libsndfile).
Libsndfile provides a large list of file formats, some of which are relatively obscure and not useful to most SONAR users. As a result, although SONAR intentionally excludes various formats from being listed in the Import Audio and Export Audio dialog boxes, SONAR installs a file named libsndfile-exclude.txt that lets you specify which audio file formats should be visible in SONAR.
To add formats, locate the libsndfile-exclude.txt file in C:\ProgramData\Cakewalk\SONAR . Simply “uncomment” any items in the exclusion list, and SONAR will list them the next time you open the Import Audio or Export Audio dialog box. However, note that SONAR has been tested only with the default formats listed in the Import Audio or Export Audio dialog boxes. Some excluded formats may or may not work properly, especially on import.
Tip: Instead of editing the libsndfile-exclude.txt file in C:\ProgramData\Cakewalk\SONAR <Artist/Professional/Platinum>, copy the file to %APPDATA%\Cakewalk\SONAR <Artist/Professional/Platinum> and edit it there. SONAR will then use the per-user app data version of the file to ensure your changes are preserved the next time you update SONAR.
Dimension Pro Expansion Pack: Gibson Les Paul Gold Top
Platinum

The Gibson Gold Top Expansion Pack derives its programs from 50 samples of individual notes, played through the neck pickup of a ’57 re-issue Les Paul Gold Top guitar. In addition to capturing the guitar’s rich neck pickup tone, additional programs take advantage of Dimension Pro’s processing options to go beyond guitar.
To cover “dropped D” tunings, the guitar’s low E string was tuned down to D, thus allowing for samples at D and D# without electronic transposition.
The samples are unlooped and presented as naturally as possible. However, they’re not only suitable for playing with MIDI guitar or for obtaining guitar voicings; when played with keyboard voicings, you’ll hear tones that you won’t hear from other synths or samplers.
30 programs showcase the potential of this expansion pack. Three 12-string guitars result from mapping samples to create a virtual Les Paul Gold Top 12-string, with one emulating a classic 12-string sound from the 60s. In addition to basic, unadorned guitar tones there are various versions with chorus, mutes, jazz guitar, mod wheel wah, fifths, and power chords. Bonus programs include ten keyboard synth sounds, and eight basses derived from transposing guitar notes downward.
For most guitar-oriented programs the mod wheel serves as a tone control, although for some programs it provides a wah effect and for one, brings in a slapback echo. For programs with the “Synth” prefix, the mod wheel controls vibrato except for HarpsiBright (alters tone) and Wurly Piano (controls tremolo). Note that if a program name contains MW, that means the mod wheel does something more than just tone or vibrato. Wiggle the wheel—or slide your fingers along the keys of your new on-screen touch keyboard controller—to hear what it does.
Selecting and Playing the Programs
Open Dimension Pro. Click in the Program Browser field to open the browser, then press F5 to refresh the program list. This can take a while if you have lots of programs; be patient.
In the “Gibson Gold Top” category, you’ll now find the 30 related programs. Click on a program to play it.
Furthermore, these programs can acquire an extra aura of authenticity when played through the CA-X Series amp sims. The clean amps are particularly appropriate for the 12-String programs, but also try running the synth sounds through various amps—you might be pleasantly surprised. Remember that amps and processing are a large part of a guitar’s sound, so give your sims and plug-ins some exercise with these programs.
Specifications
- 63.4 MB of 44.1kHz/24-bit mono samples
- All samples unlooped (except for one used for special effects)
- Each note sampled individually, and recorded direct into a TASCAM US-4x4 audio interface
- Covers the full Les Paul note range, as well as dropped D
- 30 programs, including guitar, bass, and keyboard sounds
- Mod wheel serves as a “tone control” for most guitar programs, or controls vibrato for most synth programs
- Recording, editing, and sound design by Craig Anderton
- ’57 re-issue Les Paul Gold Top made by Gibson’s Custom Shop division
Troubleshooting
If your Dimension Pro folders are not in the default locations or have been moved, you might receive an error message saying one or more .sfz files can’t be found. Note the .sfz file name(s) shown in the error message(s), then dismiss any error messages.
After the program has loaded, click the E1 (Element 1 select) button, then click in the Load Multisample field (just below the four Element select buttons), navigate to the folder containing the multisamples, click on the missing .sfz file, then click open.
If there’s more than one missing file, the first error message shows the .sfz file that should be in Element 1, the second error message shows the .sfz file that should be in Element 2, and so on.
Save the program so it will remember the correct .sfz file location in the future.
Fixes and Workflow Enhancements
Artist, Professional, Platinum
You talk, we listen. Most of these are a direct response to reports and feature requests from the community. Find the Cambridge fixes and workflow enhancements in their own knowledge base article.