BREVERB SONAR - "2013: A Space Design Odyssey"
Last updated on 3/18/2016by Dan Gonzalez
Introduction
Mix engineers that have had their time behind a board can pick out the misuse of Reverb when they hear it. Just like with anything, applying the proper Reverb requires more time than just scrolling through the presets of the basic Hall, Room, and Plate algorithms.
Overview
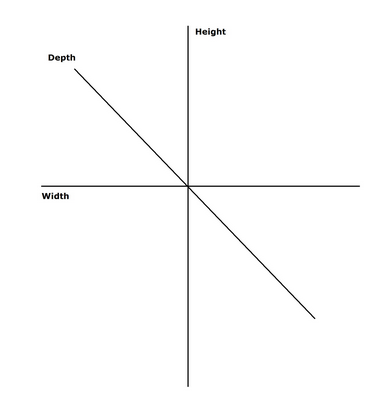
Music tends to have a significant three-dimensional experience to it. This concept requires the understanding of width, height, and depth. The best way to understand this is to find a pair of large studio headphones and listen to some billboard topping hits that have dense and complex instrumentation. Grab a sheet of paper and draw two lines intersecting as well as one diagonally through the middle. Label them “Width”, “Height”, and “Depth”. Make a few copies of this sheet and as you listen to the music observe where the instruments sit in the mix. Mark the Toms, Snare, Kick, Vocals, Guitars, Keys, Backing Vocals, Bass, Strings etc. in their respective places on this XYZ plane. Once finished compare and contrast the different songs you listened to and you may notice how different each song turns out. Take one of your own mixes and do the same. You may learn something about your own techniques.
|
|
What does this little art project have to do with Reverb? Well, creating space is where the struggle begins.In UseThe company Overloud has released a wonderful new version of their product “BREVERB SONAR”. The company asks customers to think of their ideal studio. In short they suggest that BREVERB SONAR could replace the "classic white 80's unit" found in most major recording studios. That device is the Lexicon 480L which was and still is an iconic unit in many studios. BREVERB SONAR picks up right where that Lexicon unit left off as far as sound and use is concerned. Without realizing it I began to operate BREVERB SONAR with ease from my former understanding of how it's predecessor worked. The whole fader-soft key interface is much friendlier than an attempt to understand how and why some other companies include a real time diagram of how reverb interacts with incoming sound. This unit is the perfect candidate for understanding how to apply reverb to enhance your mix. |
General Mixing
Before applying any time based effects to a mix I typically will gather the stems in a simple levels and panning mix. This helps set some relatively even levels before applying and EQ, Compression, or Reverb.
I started the mix by raising the Kick Drum signal to an optimum decibel level. The rest of the Drumset was easy to place because of the minimal microphone usage. Afterwards, I bumped up the High Hat in the drum mix a tad because without it the song felt sluggish and choppy. After this I added the Bass signals to the track. Stylistically this song is of the Dub/Reggae/Pop genre so the Bass’ tone is quite heavy in the low end with less clarity in the high end.
After setting the rhythm section to my liking I added the Vocal track. The voice is the most important aspect of this style so getting it even with the rhythm section was my priority. Afterwards I gently brought in the acoustic guitar under the vocal and panned it to my liking. There are three signals for the Acoustic Guitar: The direct signal from the Acoustic Guitar's pickup and a tightly placed 57 and 421 configuration directly over the sound hole. This allowed for narrow panning scheme between the three different signals without feeling too unnatural.
Bussing
Understanding how Reverb can be used to enhance the spatial tone of a mix first requires some setup within your respective DAW. I started by adding as many Buses as I felt necessary for the instruments that needed work. In this particular mix I set up five buses and labelled them: Snare Bus, Drum Bus, Vocal Bus, Guitar Bus, and Distance Effect. Each one had an instance of BREVERB SONAR loaded with all of the faders pulled downward. (By habit I never start with my faders up before I listen to them) The instrumentation of this track is somewhat simple by design so setting up these five buses was more than plenty for my purposes.
Acoustic Guitars
BREVERB SONAR’s power is reflected in the parameters it displays for the different algorithms of Hall, Plate, Room, and Inverse. Given the nature of the song I decided that using the Plate and Room algorithms were best suited for this style.
Routing
All three Acoustic Guitar tracks were sent to the Guitar Bus and panned accordingly to match the way they sat in the mix.
SONAR adds a Stereo Bus by default. This automatically gives you the option for panning any sends that are added to the “Sends” section of your tracks in the Console View.The concept is the same in every DAW but the setup and routing may vary.
On first listen everything seemed too up close. The Drums, Bass, Vocals, and Acoustic Guitars are competing for the same space. BREVERB SONAR can be used multiple ways to alleviate this problem.
To rectify the clashing of all these instruments within this space I added some ambience to the Acoustic Guitars to set it below the Vocals. This provides a small level of separation from the Vocal track so that it sits under it and not directly in the way of it.
Using BREVERB SONAR’s Parameters
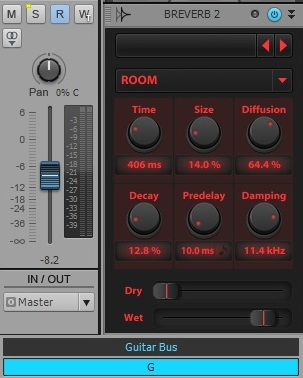
I was relying on the Size, Predelay, and Decay parameters within BREVERB SONAR to create this sensation of depth. The outcome is subtle but effective. By nature, the Room reverb is somewhat shorter than say a Hall or Cathedral reverb algorithm. According to Overloud the Size parameter at 100% emulates the sound of a large studio room. In setting the Size to 14% the “Room” that I created sounded like a smaller isolation booth. I don’t want to this instrument to be drowning in Reverb so picking the Room is the ideal setting.
I will be including examples of the Reverb parameters at their final levels and then a comparison of what that parameter would sound like if applied overzealously.
Next I reached for the Predelay parameter. Predelay is the time between when the input signal hits BREVERB SONAR and when the signal’s Early Reflections are audible. When you stand in a room and clap your hands the first thing you hear is the room bouncing the sound back to your ears. Since this is an initial reflection of sound the technical term “Early Reflections” was given to it. Small rooms retain barely any discernable Predelay. On the contrary, if you were to clap your hands between two 40ft tall brick walls set 800ft apart over concrete then you would notice an obvious delay in the initial reflection of the sound of your clap. Setting Predelay to 10ms allowed for an almost inaudible amount of time before the signal acquires the sound of the room. This is ideal for replicating an intimate space.
Lastly, setting my Decay to 12.8% warrants a shorter and tighter sound. At 12.8% only the early reflections are audible but if I were to increase the percentage of this parameter you would begin to hear what is called “Late Reflections”. They happen after the initial reflections and before the sound of the body of the reverb is audible.
I have found that inserting a HPF on your Reverb always cleans up any unnecessary rumbling that may exist within the track so I applied a filter at 141Hz to clean up any muddy tones that the Reverb may create.
Final Settings
Distance effect using Pre Fader Sends
There is a small acoustic lead guitar part in this song that the artist wanted to be set far back into the mix. He suggested that we make it sound far away and distant. Using BREVERB SONAR and setting up a Pre Fader send I was able to emulate this type of sound.
Usually the Sends section in dependent on two things:
- The level of the send
- The fader level of the track
Within just about every DAW and/or mixing board there is a setting on the Sends sections called “Pre”. Within SONAR this setting is enabled when the “Post” button on the send is deactivated. By enabling “Pre” the sends will bypass the fader level of their current track. This is highly effective in the event that you would like to send a signal to a reverb and isolate just the reverberated signal. BREVERB SONAR includes a separate Dry and Wet signal on their module but for the purpose of this article we will be make sure that “Dry” is always set to 0 and sent to a separate bus.
I inserted a Pre Fader send onto the track that had the Acoustic Guitar Lead part. The buses that I routed it to was the “Distance Effect” Stereo bus. Afterwards I muted the audio track so that the Reverb was isolated and no dry signal was present.
Vocal
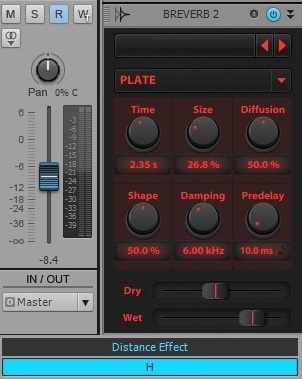
The Vocal for this song was recorded in the same space as the Acoustic Guitar. Given that these signals are somewhat similar in distance I figured the best way to mix them would be to apply a longer and more noticeable Reverb to the Vocal track. I also used a Plate instead of the Room setting in order to introduce varying types of Reverb.
Using BREVERB SONAR’s Parameters
The Time parameter within BREVERB SONAR is the total amount of milliseconds that an incoming signal’s reverberation tail exists within a space. In this instance the tail of the Reverb is set to 1.49s which is relatively longer in comparison to the space created for the Acoustic Guitar.
Secondly I increased the the Size parameter to 31.6% in hopes that it would create a larger reverberant space for the Vocal to sit in. At the same time I dialed in a Predelay setting of 30ms. This allows for the Vocal to sit higher and slightly further back in the mix. If you close your eyes and listen to the Vocals with the Acoustic Guitar you will notice that Vocal has a bit of a Reverb tail to it. Now there is an apparent divide between the two instruments. They do not sit in the same space competing with one another nor do they seem to share the same space.
Snare Drum
I separated the Snare from the rest of the Drumset by dedicating a single stereo bus to it. This helps me control the space that I created for the Snare without subjecting the rest of the Drumset to the same tonal space. The High Hat and OH tracks were panned accordingly to match the mix. This is important because if the tracks were not panned they would clutter the center of the mix. Some would call it “mono-ing out”.
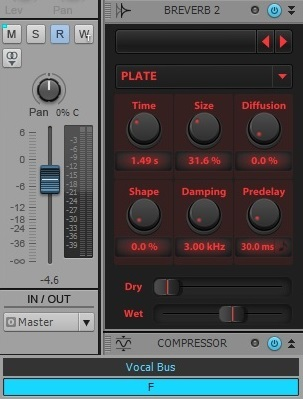
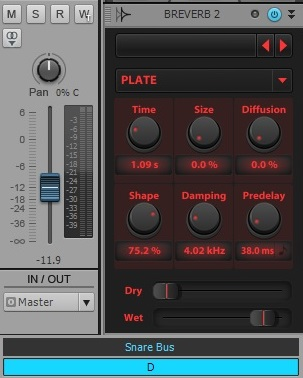
The Time, Shape, Damping, and Predelay parameters allowed me to generate the reverberant space that I was looking for. I needed something more on the bright side that did not get in the way of the vocal and gave the Snare the slightest bit of sustain that it needed.
I set the Time to 1.09s and the Predelay at 38ms. These two settings gave me an appropriate length of time for the Reverb to present itself after each Snare hit resolved and before each other hit began. In short, I did not want to have too much Reverb overlapping each hit.
Once these were defined properly I needed to fashion the tone of the Reverb. The Damping parameter on most Reverbs is measured in frequency and attenuates certain types of reflections given the frequency it’s set to. In BREVERB SONAR the Plate algorithm’s Damping parameter attenuates the overall high end of the Reverb. As you increase the parameter you will notice how more and more frequencies begin to cut through in the high end. I specifically set this to a lower setting at 4.02khz to attenuate many of the higher frequencies. I did not see it fit to have such a shearing sizzle on the Snare Drum.
Lastly, the Shape of the snare drum warranted a setting of 75.2%. Each and every sound that you hear throughout your day has it’s own contour. Some sounds gradually build in sound and sustain for long periods of time. Other sounds can be short and staccato with barely any sustain at all. This contour is called an Envelope and every sound that is audible has it’s own.
When adjusting the Shape parameter on BREVERB SONAR you want to take into account the type of Envelope you are dealing with. This parameter will add ambience to your tone and for the moment this is exactly what I wanted. Once I cranked this up I swept the entire low end of the Reverb using the EQ and gingerly mixed it in under the Snare.
The Snare Reverb is somewhat of a marriage between BREVERB SONAR and the supplied EQ. I wanted something smooth and just barely noticeable so I figured out the aforementioned setting using BREVERB SONAR and then used the HPF on the EQ to sweep the entire lower spectrum of the Snare signal to 700.7Hz. This filtered out any aggressive tones and lower attack that will be present in the Reverb tail for the Snare.
Rest of Drum Set
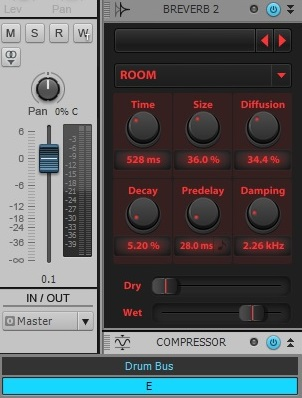
The rest of the Drum Set had the following setting for BREVERB SONAR applied:
- Time: 528ms
- Size: 36%
- Diffusion: 34.4%
- Decay: 5.20%
- Pre-delay: 28.0ms
- Damping: 2.26kHz
The recordings of the Drums were done within a highly reverberant space. This lends the engineer many options for room microphones at very large distances. This is something that many engineers get excited about. Within this tracking session two microphones were placed far away from the drum kit at a right angle aimed at the snare drum. These were about 20-30ft away. This microphone placement captures the sound of the room that the drums were recorded in.
When mixing this track it was very apparent that the recording of the Room Microphones was not going to fit this style. If I was recording a heavy rock album or some drums that were going to end up in a sample library then I would have kept this recording in the final mixdown. Instead I created another space that was less aggressive and more conducive to the style the band was looking for.
The goal of the these settings were to produce a room sound for the Drums that was not as clangorous and ambient. How do you think they compare? Close your eyes and listen.
All in all BREVERB SONAR is one of the most powerful tools on the market for creating space and depth within your mix. Challenge your own mixes with the knowledge present in this article and hopefully you can apply some of these practices at a later date.
Examples: