Recording and Editing with Pyro 5, Pyro 2004 and Pyro Plus
Last updated on 3/23/2016Looking for an all-in-one program to record, edit, EQ, remove vinyl noise, pops and clicks? How about a program that can do all the above that was designed from the ground up for musicians by musicians? If you’re using Pyro 2003, please click here for recording instructions: http://www.cakewalk.com/Tips/August02_LP2CD.asp
Getting started
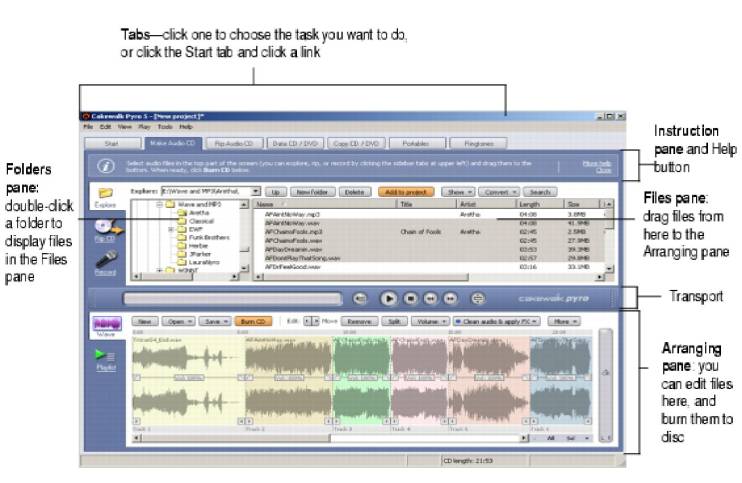
Let's first take a look at the Pyro 5 interface. Pyro 2004 and Pyro Plus may look a little different, but the overall layout is the same:
After we have familiarized ourselves with the interface, we will need to make the connections to the computer.
Recording from a Turntable: Selecting outputs on your stereo
Nearly every stereo has at least one stereo pair of outputs (we'll call them jacks from here on out) you can use for recording. They usually are RCA outputs (the standard type used to connect your stereo components) RCA jacks look like this:
RCA jacks are always color coded in white and red or black and red. Red is always the right channel. Any of the following RCA jacks are acceptable for sending signal to your PC:
- Tape Out--usually connected to your cassette deck.
- Tape 2--a second tape deck output.
- Aux Out--an all-purpose output.
- Zone 2, 3 etc.--used for multiple room setups.
- And others (CDR, Video), consult your stereo's documentation if you have any questions.
If you have purchased the Audio Technica AT PL50, which includes Pyro, please click here to download the manual and setup instructions: http://www.audio-technica.com/cms/resource_library/literature/0fb01429606842cf/at_pl50_om.pdf
Now that you've found the output jacks on your stereo or LP Player, let's select the right cables and adapter.
Recording from a Turntable: Selecting your cables and adapter
You need the following:
- A pair of RCA cables
- A Y-adapter: 2 RCA jacks to 1 1/8" stereo plug

Follow this procedure:
1. Plug the cables into the RCA jacks you have chosen to use on your stereo.
2. Plug the other end of the RCA cables into the RCA end of the stereo Y-adapter.
Note: If you have a "professional" sound card, you will need to get two RCA to 1/4" mono phone plug adapters.
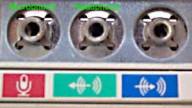
3. Plug the 1/8th inch Y-Adapter to the Line-in of your sound card located in the back of your PC. The Line in (Blue) should have the symbol pictured below.
Setting up Pyro to receive signal
First, click on the Microphone icon. This brings up Pyro’s recording view.

Start playing the LP or stereo as a test. If you don’t see the meters moving, you probably don’t have the Windows Mixer set up correctly. Click the “Tips” button to the right of the “Check Volume” meter for a shortcut to the Windows Volume Control. You can also go to Start | Programs | Accessories | Entertainment | Volume Control.
The Windows Mixer
The Windows Mixer controls the volume levels of your sound card inputs, and it also can mute any input or output.
To open the Windows Mixer, click the Open Windows Mixer button at the bottom of this dialog.
The Windows Mixer looks like this:
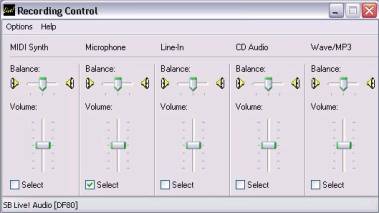
When you open the Windows Mixer it may be labeled Play Control or Recording Control. We want to see the Recording Controls.
To view the Recording Controls:
1. Click the Options menu and select Properties.
2. The Properties dialog appears.
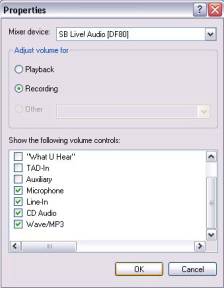
3. In the Adjust Volume For section of the Properties dialog, select the Recording radio button.
4. In the Show the Following Volume Controls section, the Line-in and Microphone options should be checked. If they are not, check them.
5. Click OK.
6. The Recording Controls now appear in the Windows Mixer.
7. Check the input you want to use, either Line In or Microphone.
Selecting an input:
Unless you are using a microphone, you should use the Line In. If you are using a Microphone, use the Microphone input. Make sure you are selecting the input that you are connected to. If you are unsure which input to select, consult your sound card's documentation.
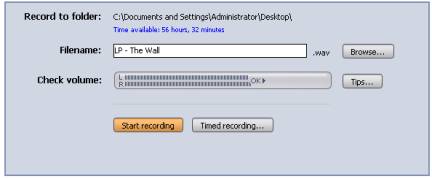
Beginning to record
1. Enter the file name of this particular recording.
2. Click the Browse button to choose any folder on your hard drive for the wav file’s location.
3. Adjust the input level (Line in slider in the Windows Mixer) until you reach the OK point.
4. Click the “Start Recording” button and start up the LP, cassette player or stereo.
5. Click “Stop Recording”.
Note: There is no Pause button while recording in Pyro. You'll either have to stop and start a new file for the 2nd side or cut out the silence after you finish recording both sides.
Editing the Recording
Once the recording is finished the waveform will appear below.
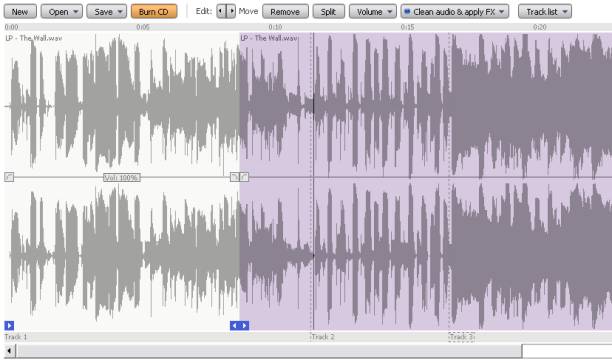
Now you can add your track markers by clicking on the gray bar below the waveform. If you add one too many Track markers you can remove them by dragging and dropping them off of the screen.
Use the “Crop Handles” (small blue arrows) in the lower left hand corner of the waveform to trim out any silence at the beginning or ending. Use the “Split“ button to cut the waveform.
Use the Volume bar to bring up the overall level of the entire project, or go to the “Volume” button and select “Set Volumes automatically”. This will bring the bar in ach track to nominal level.
Some handy shortcuts when editing:
S - Split
Del – Delete
W – Rewind
Space – Play and Stop
Ctrl+Left and Right Arrow keys will zoom in and out
Left arrow - Previous track
Right arrow - Next track
< Rewind gradually (note: no shift key required)
> Forward gradually (note: no shift key required)
Finishing Touches:
The only thing left to do is to do is click the “Burn CD” button. If you feel like you need to polish the recording even more, you have the option to use DirectX effects or “plugins”. Please click here for a tutorial on using Effects in Pyro: http://static.cakewalk.com/support/knowledge-base/images/reader.aspx?ID=2005270