Audio Tutorial-setup/Record/Playback
Last updated on 2/16/2012- SONAR
- SONAR LE
- Music Creator
- SONAR Home Studio 4
To record digital audio, you need to connect your instrument or microphone preamp to one of the inputs on your sound card. Some sound cards have preamps built in. In this case you can plug your microphone directly into the input. The reason you need a preamp is because microphones usually provide a very low signal. A preamp raises it closer to the proper recording level.
If you have never connected an instrument or microphone to your sound card, you may want to read the section entitled "To Connect an Electric Guitar to Your Computer" in the SONAR LE Help Files. (Click the Help menu in SONAR LE, or push the F1 key while in the program to access the Help files.)
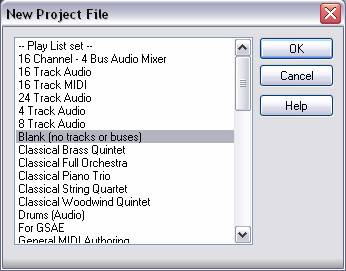
Let's open a new project for this tutorial.
1.Select File | New from the menu.
2.Select the "Blank (no tracks or buses)" template and click OK.
Let's set up a track for recording digital audio:
1.Insert a new track by going to Insert | Audio Track. As an alternative you can also create a new track quickly by doing the following: in the Tracks pane, right-click wherever you want to insert a track, and choose Insert Audio Track from the popup menu.
2.You will need to expand the new audio track in order to view its properties. There are a few ways to do this:
a.Grab the bottom of the track and expand it vertically by dragging downward.
b.Hold down the Ctrl key and tap the Down Arrow until the properties are displayed.
c.Hit the F key to fit all of the tracks to the screen size.
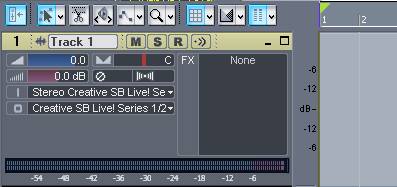
3.In the track's Output field, click the dropdown arrow and select an audio output from the menu. You will usually choose 1 & 2, because these are most commonly the outputs that speakers or audio monitors are connected to.4.In the track's Input field, choose the audio input that your instrument or microphone is connected to. If you would like to record a stereo track select "stereo". Some audio interfaces refer to their stereo inputs as pairs, like 1/2, 3/4 or 5/6. Most often left channels are represented by odd numbers and the right ones are represented by even numbers.
Before trying to record, you may want to check and adjust the audio input levels. If your input is too low, it will be lost in the background noise. If it is too high, it will overload the input channel and be distorted. The idea is to try to get the input level to rise as high as possible, but without ever reaching the maximum. That way, you get the strongest possible signal without distortion, as any digital distortion that occurs in this process is not repairable.
To check the audio input levels:
1.Click the Arm button
in your new audio track. It will turn red to let you know that the track is now record enabled. Arming a track tells SONAR LE where you want to record material. It also turns the track's playback meter into a record meter. Every track you would like to record on needs to be armed first.
2.Perform as you would if you were recording. Watch the meter respond to the sounds you produce. If the meter does not respond, you may need to raise the volume of your instrument or preamp. Also, make sure that the Audio Engine button
in the Transport toolbar is depressed.
If the meter never even comes close to the maximum, increase the input level. If the meter even occasionally reaches the maximum, decrease the input level.
![]() = Input may be too low.
= Input may be too low.
![]() = Input is too loud.
= Input is too loud.
When you are using WDM drivers this is done using the Windows mixer. You can access the Windows mixer by going to your Start Menu, choosing All Programs, Accessories, Entertainment, and then Volume Control. When the Volume Control mixer opens go to Options | Properties. Click on "Recording" and hit OK. The window title should now be "Record Control". This is where you can adjust input levels.
If you are using your sound card in ASIO driver mode the Windows mixer will not work. You will need to go to Options | Audio in SONAR LE and click the "General" tab. Now click on the "ASIO Panel" button. Your sound card's properties page will open and you will be able to adjust levels there. You may need to refer to the device's documentation for details.
NOTE: You can see whether you are using WDM or ASIO drivers by going to Options | Audio and clicking on the "Advanced" tab. Look in the "Driver Mode" field.
If you still don't see any movement of the audio meters, you may have an audio input problem. Try reading "I Can't Record Any Audio" in the Help Files.
Now that everything is set up, let's record something!
1.Set up the metronome for a 2 measure count-in. This is done in Options | Project under the "Metronome" tab. For details, see "Setting Up the Metronome" in the Help Files.
2.If you followed the previous steps correctly, the track is already armed for recording. The Arm button
on the track should be red. Again, if you don't arm a track SONAR LE won't know where to put the audio and the record button will not be available
.
3.In the Transport toolbar, click Record
, or press R on your computer keyboard.
4.You'll hear two measures counted in by the metronome, then recording will begin. Go ahead and perform!
5.When you finish recording, click the Stop button
, or press the Spacebar. A new clip will appear in the Clips pane.
Let's play back your performance. Do the following:
1.Disarm your audio track by clicking its Arm button again
2.To return to the start of the project, click the Rewind button
or hit the W key.
3.Click Play or press the Spacebar. The recording of your performance should play back.
4.If you would like to try again or if the level is not right, make any adjustments necessary and record your track again.
To delete your performance and try again:
1.Choose Edit | Undo Recording to undo your recording, or press Ctrl+Z.
2.Click Rewind3.Arm your track again.
4.Click Record
5.When you finish recording, click the Stop button
Alternatively, you could insert a new audio track to record your next attempt. This way you can save your previous performance. Just remember to "mute" ![]() the original take. Doing so will keep it from playing back while you lay the next track.
the original take. Doing so will keep it from playing back while you lay the next track.
Now that you understand the basics of tracking, we should talk about some more advanced audio features.
SONAR LE has a feature called "input monitoring", which allows you to hear any instrument that is plugged into your sound card whether you are currently recording the instrument or not. This allows you to apply FX non-destructively and hear them while you play. For example: You can hear heavy reverb while you record a guitar track. But later, if you decide that the track, within the entire mix, would sound better with no reverb at all, this feature gives you the flexibility you need to simply remove or replace the audio effect.
You can hear your instrument, including any real time FX, whenever input monitoring is enabled and the Audio Engine button ![]() in the Transport toolbar is depressed. You can enable or disable input monitoring on an individual track by clicking the track's Input Echo button, and you can enable or disable input monitoring on all tracks at once by clicking the Input Echo button that's on the Playback State toolbar (to display this toolbar, use the View | Toolbars | Playback State command).
in the Transport toolbar is depressed. You can enable or disable input monitoring on an individual track by clicking the track's Input Echo button, and you can enable or disable input monitoring on all tracks at once by clicking the Input Echo button that's on the Playback State toolbar (to display this toolbar, use the View | Toolbars | Playback State command).
Caution: If you have any kind of a loop in your mixer setup that causes the output of your sound card to be fed back into the input, you can get feedback, and input monitoring can make it very intense because both the direct signal and the processed signal are coming out of your sound card. Turn your speakers off whenever you enable input monitoring, and then try turning them up very gradually to try it out. If you hear feedback, click the Audio Engine button
Each SONAR LE project has parameters that specify the sampling frequency and bit resolution for all digital audio data in the project. It is a good idea to set these before starting any major projects.
To set the sampling rate and bit depth:
1.Choose Options | Audio to open the Audio Options dialog box and click on the "General" tab.
2.Under "Default Settings for New Projects", select a Sampling Rate. You can also set the Audio Driver Bit Depth. For CD-quality sound, use 44100 Hz as the Sampling Rate and 16 bit as the Bit Depth.
3.Click OK.
The drivers for most sound cards use 16 or 24 bits to handle the data and calculations for audio processing. You can sometimes get better sound quality by recording at 96 kHz/24bit and converting to 44.1 kHz/16bit when you export your final mix. But keep in mind that 24 bit audio uses much more memory than 16 bit audio, and in some cases can strain your computer's storage capability and speed of operation.
Lower sampling rates and bit depths will save disk space but will result in lower quality audio. So again, before embarking on any major projects, try a few different configurations to determine which one best suits your needs. Your sound card's documentation may also have some good advice on choosing the appropriate settings.
You should be ready to tackle a few projects on your own. If you find this sort of tutorial helpful be sure to use the Help file built into SONAR LE. The Help files are context sensitive, meaning if you open the Help file while you're in the Options menu | Audio settings page the Help file opens and displays information pertaining audio settings.