Project5 Version 2 - The Editor
Last updated on 3/18/2016The information in this article applies to:
- Project5 Version 2
The Editor is where you create new MIDI patterns (you can also create MIDI patterns by recording in the Track view), edit patterns (including pattern automation), and save patterns to your patterns folders. You can also edit Groove clips in the editor.
The Editor has three modes:
- Step mode--this mode models a hardware step sequencer, allowing you to create and edit MIDI patterns on a grid. In Step mode, you can draw notes (always of a fixed length) with the mouse and also do Step Recording, but not real-time recording
- Free mode--in this mode, the Editor displays a traditional piano-roll style editing surface, which allows any note length. In Free mode, you can draw notes with the mouse, and also do both Step Recording and real-time recording.
- Groove clip mode--when you double-click a Groove clip (ACIDized clip) in the Arrange pane, the Editor becomes a Groove clip editor.
Click the Step or Free fields in the Editor menu  to change the Editor to Step mode, or back to Free mode.
Here's a picture of the Editor:
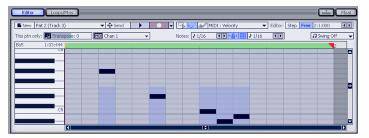
The Editor has the following controls:
Float/Dock Button

To Float or Dock the Editor:
- Click the Float/Dock button that's in the upper right corner.
Or
- Double-click the left border
To Resize the Editor:
- Drag any border or corner.
Note: when the Editor is docked, dragging its upper border changes the size of the Arrange pane.
Show/Hide Button

Click this button to show or hide the Editor and the Loops/Ptns tab.
New Pattern Button

Clicking this button creates a new empty pattern, and automatically loads the pattern into the Arrange pane at the Now time on the selected track. The new pattern is one measure long by default, but you can change this by using the Options-Default Step Size for Step Sequencer command, together with the Options-Default Step Count for Step Sequencer command. For example, if you chose a default step size of 16th notes, and a default step count of 32 steps, that would create a pattern of two measures in 4/4 time.
Pattern Menu

The Pattern menu, located the in upper left corner of the Editor, displays the name of the current pattern. You can rename the pattern by double-clicking the pattern name.
Clicking the dropdown button in the Pattern menu displays these options:
- Open Pattern--opens the Open Pattern dialog to the default directory for patterns. Navigate to the directory you want and select a file to open in the Editor.
- Save Pattern--opens the Export Pattern dialog, enabling you to name and save the pattern to the folder where you store patterns.
- Duplicate Pattern--copies the current pattern under a new name, so that any editing you do to the new copy doesn't affect the original.
- Automatically send new patterns to track view--if this option is enabled, every time you click the New Pattern button, Project5 automatically places the new pattern on the highlighted track at the Now Time.
- In Use--opens a menu of patterns that are currently in use in the current project.
- Not In Use--opens a menu of patterns that have been used in the current project, but were deleted from the Arrange pane.
Send Pattern to Track Button

Click this button to place the pattern that's currently displayed in the Editor on the highlighted track at the Now Time.
Pattern Preview Button

Click this button to play the pattern that's currently displayed in the Editor. The pattern plays back through whatever instrument is currently selected in the Track view. You can set the time where playback begins in the Editor by double-clicking in the Editor's Time Ruler, which moves the Edit Marker to the location you double-clicked.
Record Pattern Button

Click this button to record a new pattern by either live or step recording in the Editor.
Click the dropdown arrow on the Record Pattern button to choose recording options. Choose any or all of these three options:
- Constant Velocity--when this option is checked, recorded notes are not affected by velocity changes from the MIDI controller. Note velocities are all set to 100.
- Overwrite--when this option is checked, current note data is overwritten by new note data.
- Step Record--when this option is checked, the recording mode is set to Step Recording. Step Recording means that instead of recording notes that you play at the time the notes were played, Project5 records notes of exactly the same length, one after another, each time you play your MIDI controller, no matter how much time has passed since the last note was entered. The note lengths are determined by the Notes menu setting.
Tools
The Editor has three tools to help you create and edit patterns.

- The Select tool is an all-purpose tool for selecting data, however you can use the Note tool when you just need to select an individual object without dragging it. Pressing T on your keyboard toggles which tool is active (including the Select tool).
- Use the Note tool to draw notes in a pattern. The note length menu determines the length of the notes you draw.
- Use the Automation tool to draw automation in a pattern. Select an automation parameter to draw or edit in the automation edit menu in the Editor.
Automation Menu

The automation menu is just to the right of the Auto tool (Automation tool). Clicking the dropdown arrow on the automation edit menu displays a menu of automation editing options:
- Outputs--choosing this option displays a menu of parameters that are specific to a particular output of the currently-selected track. If the instrument in the selected track has multiple outputs, the menu will show parameters for each output.
- MIDI--choosing this option displays a menu of standard MIDI continuous controllers that affect all the outputs on the selected track.
- DXi--choosing this option displays a menu of parameters that are specific to the instrument that is loaded into the selected track.
- Effects--choosing this option displays a menu of parameters that are specific to the selected effect on the selected track.
- Arpeggiator--choosing this option displays a menu of parameters that control the Arpeggiator on the current track.
For more information, see Automation.
Editor Menu

Click the Step or Free fields in the menu to change the Editor to Step mode, or back to Free mode. Also, you can click the left or right arrows in the menu to set the length of the current pattern. See Creating Patterns in Step Mode and Drawing Notes In Free Mode for more information.
This Ptn Only Menus

By default, all copies of a pattern in the Arrange pane are identical except for their MIDI channel and transposition. The Transpose and MIDI Ch menus allow you to change the transposition and MIDI channel of a particular instance of a pattern. Double-click the instance of the pattern where it appears in the Arrange pane to display the instance for editing.
- Transpose menu--this menu lets you transpose just the current instance of a pattern (the pattern in the Arrange pane that has the black border). The field lists the number of half-steps up (+) or down (-) that the current instance of the pattern is being transposed.
If you use copies of this pattern in other parts, the Transpose menu is independent for each copy.
Select a pitch offset for the current instance of the pattern. The range is from -127 to +127 for a MIDI pattern or -24 to +24 for a Groove clip. You can double-click the value, type a number, and press Enter if you don't want to click the up and down arrows. The transposition value is displayed in parenthesis next to the pattern name
- MIDI Ch menu--this menu allows you to choose which MIDI channel that the displayed pattern plays back through, and also sets the channel that the Editor's keyboard display uses when you click the keys. Choosing different MIDI channels for a pattern allows you to access different sounds on different channels of a multi-timbral instrument.
Note : the Track Inspector has a menu for each track or track layer called the Send to MIDI Channel menu. This menu overrides the MIDI channel that you assign to a pattern in the Editor, forcing all patterns on a track or track layer to play on the MIDI channel that's listed in the Send to MIDI Channel menu. To disable the Send to MIDI Channel menu, set the menu to None.
Notes Menu
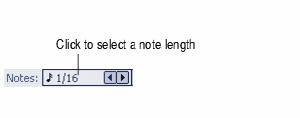
Controls the length of the current step-recorded note, or of notes that you draw with the Notes tool. You can select a new length at any time.
Link

The Link button forces the Snap to Grid button resolution and the Notes menu value to be the same. For example, if you change the Notes menu setting then click the Link button, the Snap to Grid resolution will follow the Note Length setting.
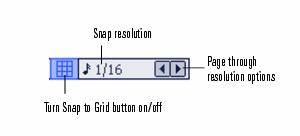
Snap to Grid
In Free mode, the Snap to Grid setting sets the precision at which notes can be entered and edited, and also sets the time interval that the Now Time moves when you double-click in the Editor's Time Ruler. The Snap to Grid control is not visible in Step mode, because the Snap to Grid is always on in that mode, and is set to whatever duration the Notes menu is set to. A snap resolution of 1/2 means that entered notes and notes you drag and drop in the Editor "snap" to the nearest 1/2 note boundary. The snap resolution in the Editor ranges from measures to 1/128th notes. The default is 1/16th. You can override the snap resolution setting by holding the Shift key while dragging notes. When the Snap to Grid button is disabled, or when you are overriding it, data moves by ticks. Project5 divides each beat into 960 ticks.
Swing Note-size Menu

When the swing note-size menu has a note size displayed, patterns of consecutive 8th notes, 16th notes, or 32nd notes play back with a swing feel, instead of a straight feel. You control the strength of the swing effect for each project by dragging the Swing Strength control that's in the Main Control view.
Keyboard Display
The keyboard display, which is on the left side of the Editor. lights up to show what pitches you're playing on a MIDI keyboard. It also gives you a visual reference for pitches while you're drawing notes with the Note tool.
Cursor Display
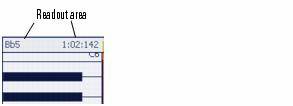
At the very top of the Keyboard Display is the Cursor Display, which shows a readout of the vertical and horizontal coordinates of whatever tool you're using in the Note pane, both while the tool is moving and while it's not.
Time Ruler
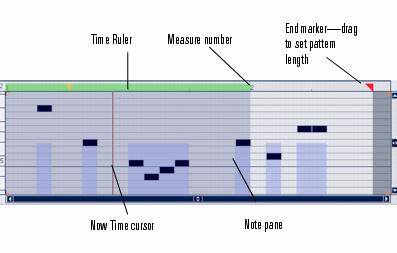
The Time Ruler in Free mode shows measure numbers and beat boundaries. The Now Time cursor (vertical black line) moves through the Note pane during playback to show you where the Now Time currently is in your pattern.
In Step mode, the Time Ruler has no measure numbers. See The Time Ruler in Step Mode for more information.
Note Pane
This is the pane where you display and edit patterns.
Zooming and Scrolling
You can zoom and scroll in all modes of the Editor (see Zooming and Scrolling in the Editor).
The Now Time
The Editor has its own Now Time, which is independent of the Now Time in the Arrange pane. The Editor's Now Time marks the point in a pattern at which playback is taking place, or where playback is currently stopped. The vertical cursor in the Editor is a graphical display of the Editor's Now Time position. You can set the Now Time in the Editor by double-clicking in the Editor's Time Ruler.
Trans "n" % (in Groove Clip Mode Only)

When you double-click a Groove clip in the Arrange pane, the Editor changes to Groove clip mode, displaying the Groove clip with a series of transient markers. The Trans Detect control senses transients in your audio pattern and assigns a marker at the beginning and end of each transient that it finds. As the you increase the sensitivity (by using larger numbers) smaller transients are detected and the number of markers increases.
Slice Division Menu (in Groove Clip Mode Only)

The Slices Division menu sets the resolution for the creation of markers, or the "slicing" of the looped clip. This menu uses transients or note lengths, so the settings are:
- Transient Only
- Whole 1/1
- Half 1/2
- Quarter 1/4
- Eighth 1/8
- Sixteenth 1/16
- Thirty-second 1/32
The automatic markers appear at the note resolutions according to the slider setting. At the eighth note setting, there are eight markers per measure.
This control works well for slicing audio that has more subtle changes in volume with few dramatic transients.
The markers in a Groove clip preserve the timing of the audio at that moment. Too few or too many markers can cause unwanted "artifacts" when a Groove clip is stretched.
Restore Markers (in Groove Clip Mode Only)

The Restore Markers tool restores all automatically generated markers to the original position and enables all those that were disabled. Manually created markers remain as is.
Beats in Clip (in Groove Clip Mode Only)

The number of beats in the clip.
Transient Markers (in Groove Clip Mode Only)
Project5 uses the transient markers in a clip to stretch or shrink the clip to synchronize to different tempos. Transient markers mark the loudest and most characteristic-sounding parts of the clip, so Project5 tries to leave these parts of the clip alone as much as possible when adjusting tempo. If you want to move markers, you can drag them to new positions, with or without the Snap to Grid button enabled. You can add new markers by double-clicking in the Time Ruler.
See Editing Patterns for more information.