Cakewalk // Documentation // SONAR // Track view
Table of Contents Previous Next Index

View reference ► Track view

The Track view is always visible. It is the main window that you use to create, display, and work with a project. When you open a project file, the Track view is displayed for the project. Closing the Track view closes the project.
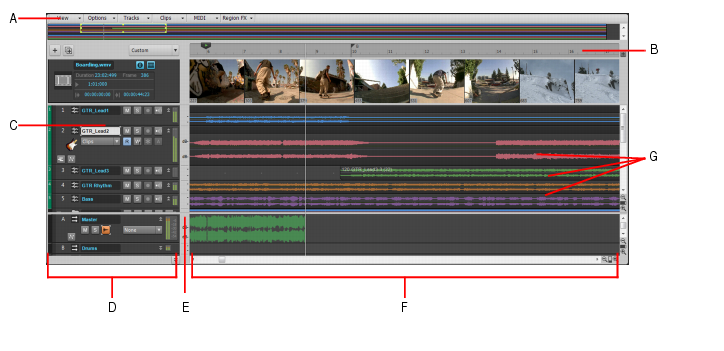
The Track view is divided into several sections: toolbars (at the top), the Navigator pane, the Video Thumbnails pane, the Track pane, the Clips pane, and the Bus pane. You can change the size of the panes by dragging the vertical or horizontal splitter bars that separate them.
Figure 640. The Track view.Track Control ManagerBus paneClips paneBusesTrack view menuVideo ThumbnailsNavigator paneTime rulerTrack controls
A. Track view menu B. Time ruler C. Track strips D. Track pane E. Splitter bar F. Clips pane G. Clips
In addition, all of the current track’s controls, plus a few that are only available in the Console view, are contained in the Track Inspector, which is an expanded version of the current track’s controls located on the far left side of the Track view. You can hide or show the Track Inspector by pressing I on your keyboard.
Figure 641. Track view menus.
The View menu contains the following commands:
*
Navigator Show/Hide. Show or hide the Navigator pane.
*
Video Thumbnail Track Show/Hide. Show or hide the Video Thumbnails track. The Video Thumbnails track can be displayed even if there is no video in your project.
*
Auto Track Zoom. This command enables/disables Auto Zoom, which allows you to automatically enlarge the track that has focus. All other tracks are minimized. When a new track is focused, it swaps heights with the previously focused track.
*
Display.  Use the submenu to select the desired display option:
*
Display Ghosted Data.  Show or hide all data types, regardless of which data type is selected in a track’s Edit Filter control. All but the selected data type will be shaded, or “ghosted”. This allows you to see all data types in context while editing a specific data type.
*
Display Track Separators. Show or hide a horizontal line between each track in the Clips pane.
*
Display Clip Names. Show or hide clip names.
*
Display Clip Contents. Show or hide a graphical depiction of the audio or MIDI data that the track contains, including automation data.
*
Show Audio Scale. Show or hide the Audio Scale Ruler in the splitter bar between the Clips pane and the Track pane.
*
Maximize Waveform Height. Show or hide clip headers. When this option is enabled, waveforms and MIDI data span the full height of clips.
*
Vertical Grid Lines. Show or hide vertical grid lines in the Clips pane that are one measure apart. Use the submenu to specify how the vertical lines should display.
*
None. Vertical grid lines are not displayed.
*
Behind Clips. Vertical grid lines are displayed, but clips will draw on top of them, so clip contents will not be obstructed.
*
In Front of Clips. Vertical grid lines are displayed and drawn on top of clips, always visible.
*
Fit Tracks and Buses to Window. Adjust the vertical track heights to fit all tracks in your project in the Track view.
*
Fit Project to Window. Fit the entire project, or as many tracks as possible, into the Track view.
*
Fit MIDI Content. Fit all displayed MIDI content into the visible area of the Inline Piano Roll view.
*
MIDI Microscope.  Activate Piano Roll Microscope mode. When Microscope mode is enabled, a transparent rounded square centered on the mouse cursor shows a zoomed in region of the Piano Roll data underneath it.
*
View Undo. Returns the Track view to the previous zoom level (undo zoom).
*
View Redo. Negate the last View Undo command (redo zoom).
The Options menu contains the following commands:
*
Auto crossfade.  Enable or disable automatic crossfades.
*
Crossfade Type.  Specify default fade in, fade out and crossfade curve types.
*
Ripple Edit Selection. Enable ripple editing for clips that are downstream from the selected clip(s). Locked clips are ignored.
*
Ripple Edit All. Enable ripple editing for downstream clips on all tracks, plus meter/key changes, tempo changes, and markers. Locked markers are ignored.
*
Click Behavior.  Use the submenu to specify the behavior when clicking in the Clips pane:
*
Left Click Sets Now. Set the Now Time by left-clicking a location in the Clips pane.
*
Right Click Sets Now. Set the Now Time by right-clicking a location in the Clips pane.
*
Left Click Locks Scroll. Prevent the Clips pane from scrolling horizontally during playback while you edit data. This allows you to focus on the edit location without worrying that the screen will eventually scroll away from the edit location. When you are done with the edit and want the Clips pane to scroll again during playback, click in the background of the Clips pane to clear auto scroll lock.
*
Double-Click. Use the submenu to specify what happens when you double-click a clip:
*
MIDI Clips > -Nothing-. Prevent any view from opening when you double-click a MIDI clip.
*
Audio Clips > Clip Properties. Open the Clip Properties Inspector when you double-click a MIDI clip.
*
MIDI Clips > Event List View. Open the Event List view when you double-click a MIDI clip.
*
MIDI Clips > Staff View. Open the Staff view when you double-click a MIDI clip.
*
MIDI Clips > Piano Roll View. Open the Piano Roll view when you double-click a MIDI clip.
*
MIDI Clips > Inline Piano Roll View. Open the Inline Piano Roll view when you double-click a MIDI clip.
*
Audio Clips > -Nothing-. Prevent any view from opening when you double-click an audio clip.
*
Audio Clips > Clip Properties. Open the Clip Properties Inspector when you double-click an audio clip.
*
Audio Clips > Loop Construction View. Open the Loop Construction view when you double-click an audio clip.
*
Meter options.  Use the submenu to specify options for track playback meters, track record meters and bus meters.
*
Drag and Drop Options.  Open the Drag and Drop Options dialog box, which lets you control how clips behave when you drag them.
*
Mouse Wheel Zoom Options. Open the Mouse Wheel Zoom Options dialog box, which lets you specify the mouse zoom behavior.
*
Select Track Envelopes With Clips. Selecting a clip will also select any overlapping track envelopes.
*
On Stop, Rewind to Now Marker. The Now Time jumps back to the Now Time Marker whenever playback stops.
*
Set Now Time With Full Restart. When you change the Now Time during playback, the Transport comes to a full stop, and then restarts playback. This stops the sound for a brief moment, but makes synchronization (especially with video) more robust.
*
Stop at Project End. Playback will automatically stop after the last event in the project is reached. When this option is disabled, playback will continue beyond the end of the project and playback can also be started in an empty project.
The Tracks menu contains the following commands:
*
Make Instrument Track. If an existing audio track and MIDI track are assigned to the same software instrument, this command converts the two tracks into a single instrument track (only available for MIDI tracks).
*
Split Instrument Track. Split an instrument track into separate audio and MIDI tracks. The audio and MIDI tracks will remain assigned to the same software instrument (only available for Instrument tracks).
*
Bounce to Track(s). Combine one or more audio tracks into a submix.
*
Duplicate Track(s). Copy the selected track(s). You can choose to include events, properties, sends, and/or effects in the copied track(s), and specify a destination.
*
Delete Track(s). Delete the selected track(s), including all its track properties and all its clips and events. SONAR does not put deleted information on the Clipboard for later copying.
*
Wipe Track(s). Delete track contents but leave track properties intact. SONAR does not put wiped information on the Clipboard for later pasting.
*
Copy Track Name(s) to Clip Name(s). Copy track names to clips in corresponding tracks.
*
Show All Tracks and Buses. Show all tracks in the project.
*
Hide Track(s). Hide all selected tracks. To display them again, select Tracks > Track Manager or press H on your keyboard to open the Track Manager dialog box.
*
Track Manager. Open the Track Manager dialog box.
*
Sort Tracks. Open the Sort Tracks dialog box, which lets you sort tracks by specific criteria.
*
Selected Track Input Series. Open the Assign Series of Inputs dialog box, which lets you assign a series of track inputs to the selected tracks.
*
Selected Track Inputs. Open the Track Inputs dialog box, which lets you assign a track input to the selected tracks.
*
Selected Track Outputs. Open the Track Outputs dialog box, which lets you assign a track output to the selected tracks.
The Clips menu contains the following commands:
*
Apply Trimming. Permanently delete any data from a selected clip that is hidden by a slip editing edit.
*
Bounce to Clip(s). Combine selected audio clips into a single clip.
*
Convert to Stereo. Convert any selected mono audio clip(s) to stereo.
*
Convert to Mono. Convert any selected stereo audio clip(s) to mono.
*
Fade clips. Open the Fade Selected Clips dialog box, which allows you to create or edit fades on selected clips.
*
Create Clip Selection Group. Place all selected clips in a new selection group.
*
Remove from Clip Selection Group. Remove all selected clips from any selection groups they may belong to.
*
Revert to Original Time Stamp. Move all selected clips back to their original SMPTE time position.
*
Set Snap Offset to Now Time. Set the snap offset at the Now Time. A snap offset is a value, in samples, at which the Snap Grid uses to align the clip. Clips without a snap offset always align at the very beginning of a clip.
*
Select All Siblings. Select all clips that are linked to the selected clip.
*
Unlink Step Sequencer Clips. Unlink the selected step sequencer clips, allowing each clip to be edited separately from each other.
*
Convert MIDI Clip(s) to Step Sequencer. Convert any selected MIDI clip to a step sequencer clip.
*
Convert MIDI Controllers to Envelopes. Open the Convert MIDI To Shapes dialog, which lets you convert MIDI controllers into automation envelopes.
The MIDI menu contains the following commands:
*
Show Notes.  Show or hide Note events in the Inline Piano Roll view.
*
Show Velocity.  Show or hide velocity tails in the Inline Piano Roll view.
*
Show Velocity on Selected Notes. Show velocities for selected Note events only. This makes it easier to see and edit velocities when many Note events are present. It also makes it easier to change the velocity for individual Note events that are stacked (such as chords).
*
Select Controllers Along With Notes.  When enabled, selecting a Note event or a range of Note events will also automatically select any Controller events that exist within the time range of the Note event(s).
*
Show Clip Outlines. Show or hide clip outlines in the Inline Piano Roll view.
*
Hide Muted Clips. Show or hide events that live in muted clips when working in the Inline Piano Roll view.
The Region FX menu contains the following commands:
*
Create Region FX. Create a Melodyne Region FX clip.
*
Remove Region FX. Remove the Melodyne processor from the selected Melodyne Region FX clip.
*
Open Editor. Open the Melodyne interface.
*
Render Region FX. Commit the Melodyne Region FX and render the results to a new audio clip.
*
Bypass Region FX. Bypass or unbypass all selected Melodyne Region FX clips.
*
Follow Host Tempo. Allow the selected Melodyne Region FX clip to automatically follow future tempo changes to SONAR’s tempo map.
*
Copy MIDI Events. Convert the selected Melodyne Region FX clip to MIDI data, and copy to the Clipboard. The data can be pasted to any MIDI or Instrument track.
*
Create Region FX. Create a V‑Vocal Region FX clip.
*
Remove Region FX. Remove the V‑Vocal processor from the selected V‑Vocal Region FX clip.
*
Open Editor. Open the V‑Vocal Editor interface.
*
Render Region FX. Commit the V-Vocal Region FX and render the results to a new audio clip.
*
Bypass Region FX. Bypass or unbypass all selected V‑Vocal Region FX clips.
*
Bypass All Region FX. Bypass or unbypass all Region FX clips in the project.
Note: V-Vocal has been replaced with Celemony Melodyne essential (see Melodyne (Platinum and Professional only)) in SONAR X3 and later. However, if you also have a previous version of SONAR Producer or Studio installed that supports V-Vocal, then V-Vocal will also be exposed in SONAR X3 and later.
*
Create Region FX. Create a Drum Replacer Region FX clip.
*
Remove Region FX. Remove the Drum Replacer processor from the selected Drum Replacer Region FX clip.
*
Open Editor. Open the Drum Replacer interface.
*
Render Region FX. Commit the Drum Replacer Region FX and render the results to a new audio clip.
*
Bypass Region FX. Bypass or unbypass all selected Drum Replacer Region FX clips.
*
Follow Host Tempo. Allow the selected Drum Replacer Region FX clip to automatically follow future tempo changes to SONAR’s tempo map.
*
Copy MIDI Events. Convert the selected Drum Replacer Region FX clip to MIDI data, and copy to the Clipboard. The data can be pasted to any MIDI or Instrument track.
The Bus pane contains all of your project’s buses. You display the Bus pane by clicking the Show/Hide Bus Pane button , which is located at the bottom of the Track view.
Figure 642. The Navigator pane.
A. Now Time B. Drag node to zoom C. Clips
Copyright © 2024 Cakewalk, Inc. All rights reserved
Sitemap | Privacy Policy | Legal