Advanced Bus Routing
Last updated on 3/29/2016
| Introduction by Nick Arouca Spatial unity is a vital part to the perfect mix. An engineer needs to make a listener feel as though they are right there with the band, whether they're playing inside of a room, hall, club or even a cave. Due to this, some effects such as reverb, delay, and compression may have the same settings for multiple instruments. However, loading multiple instances of the same effect can be very CPU intensive, especially convolution reverbs and delays. Wouldn't it be amazing if you could send multiple tracks to the same instance of an effect plug-in? Well ... you can and it's much easier than you think! This tip will explain how you can send multiple tracks to the same instance of an effect via sends. Busses and Sends can also be used to improve routing efficiency and deliver audio sub-mixes to multiple outputs. We're also going to discuss using sends and busses to create headphone mixes for players while tracking. Throughout this tip we will be using SONAR's Console view, however all of these functions can also be done in the Track view as well. |
||
| Table of Contents: | ||
| Basic Set-up | ||
| Usage Examples: | ||
| 1. Using a Bus for Reverb | ||
| 2. Using a Bus to Compress Summed Signals | ||
| 3. Creating Headphone (Cue) Mixes | ||
Step 1 - Creating a new Send and Bus
The first step in this process will be creating a new bus to route your tracks to. This can most easily be done within the console view of your project. In the console view, the send controls will already be visible, but may appear to be grayed out. To create a send and a bus to route it to, right-click anywhere on the grayed out area and choose “New Stereo Bus” (or “New Surround Bus” if you are working in a surround environment).
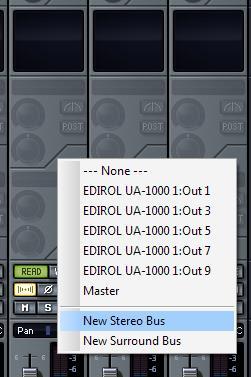
This will create a new stereo bus that appears in the bus section of the Console View. This process will also route the send to the bus that it created. Once your bus is created, you can change the name by double-clicking on it (which appears at the bottom of the bus).

Step 2 – Inserting an Effect into a Bus
Inserting an effect to a bus is essentially the same process as inserting an effect to a track. To do this, simply right-click on the FX Bin of the bus you would like to add the effect to and choose your effect.
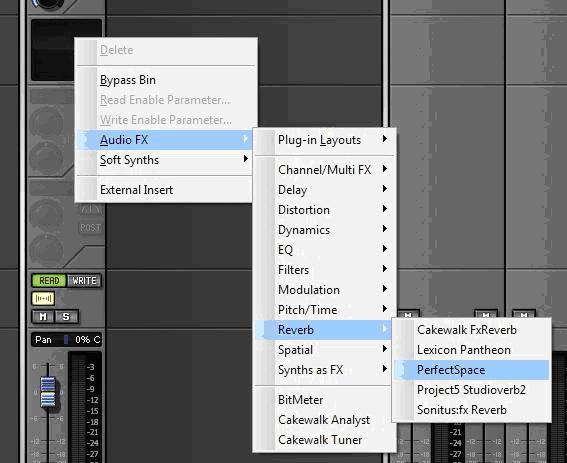
Any tracks you have sent to that bus will be processed through the inserted effects.
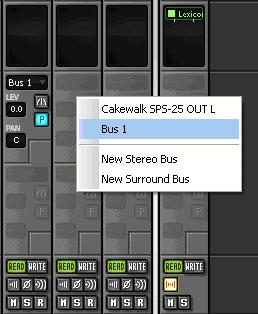
Step 3 – Sending Multiple Tracks to the Same Bus
Now you should have your bus created with one track sending to it, an effect inserted and the settings fit to your liking. The final step will be to send the rest of your desired tracks to the bus as well.
To do this, right-click on the grayed out send of the other tracks you wish to send to the bus. Below the options for new busses, you will see the name of the bus you created (if you have not assigned a new name to the bus it should read “Bus 1”).
Now you will have the ability to run multiple tracks through the same instance of an effect such as reverb or delay to give your projects a great sense of unity, without eating up all of your CPU!
| Send Features | ||||
 |
Bus Select | This control allows you to change the bus you are sending your track to | ||
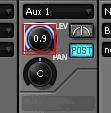 |
Send Level | This control allows you to adjust the amount of signal being sent to the bus | ||
 |
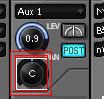
Pre/Post Fader | This control allows you to decide whether the signal will be sent to the bus before or after it is affected by the track's fader (Solo, Mute, Input Echo, Phase Inversion, and Automation included) | ||
 |
Send Pan | Determines which side of the stereo bus signal will be sent to | ||
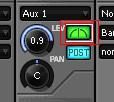 |
Power Button | Turns the send on or off | ||
Usage Examples
The following contains three examples of how busses may be used for mixing. The first example involves using a bus for a Reverb Effect, the second example pertains to Compression and the third examples discusses how busses can be used for headphone mixes. Enjoy!
Example #1 – Using a Bus to House a Reverb Effect
by Nick Arouca
So you’ve completed the tracking portion of your song and most of the editing. At this point, you’re ready to start assigning some effects to your tracks. One of the most vital effects to any mix is Reverb. Reverb is most often used to recreate an environment for the band to be playing in. In this usage, it is very important that the players sound as though they are in the same space (unless reverb is being used to create a different type of feel for the mix). So, it would make a great deal of sense to route all of your tracks to the same instance of a reverb pluginThis example will give a step-by-step walkthrough of sending multiple tracks to one instance of a reverb plugin inside of SONAR.
Step 1 – Setting Up The Bus
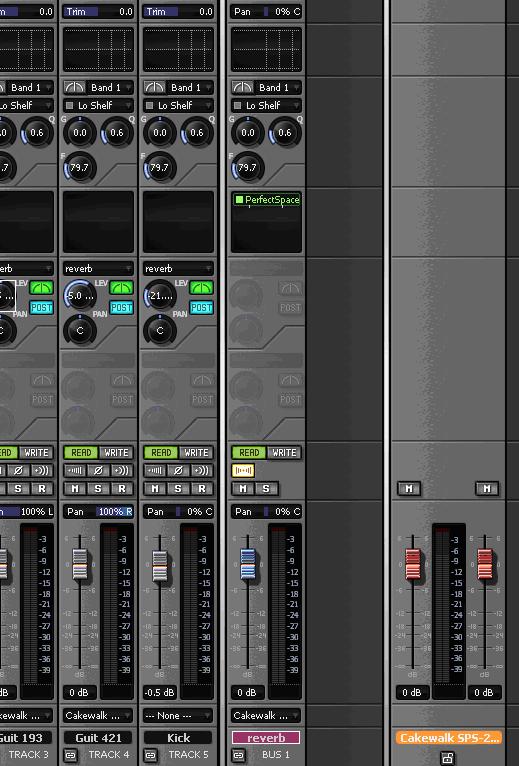
Create a new stereo bus and route the channels you would like to send to it via the send controls. Insert a reverb plugin of your preference into the Bus (in this example, I used Perfect Space)
Step 2 – Setting Levels
When sending multiple tracks to a reverb via sends it is important to make sure that you set your levels correctly. More often than not, you are not going to be sending the full signal to a reverb. Also, the level of the bus containing the reverb will often be brought down quite a bit, as you do not want the reverb to be overbearing. However, when using sends, you are able to keep the mix level of the reverb effect at 100%, causing the volume of the bus to control the amount of reverb heard in the mix.
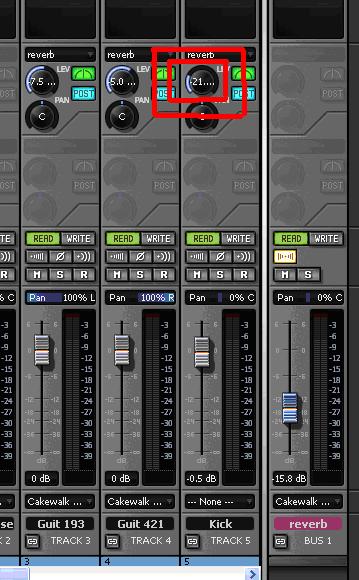
This may take a little getting used to, but this method essentially will create a track of reverb. Adjusting the level of the send will change the percentage of the tracks signal that is routed to the bus. The volume of the bus will allow you to control the overall volume of the reverb in this case.
Example #2 – Using Buses to Compress Summed Signals
by Nick Arouca
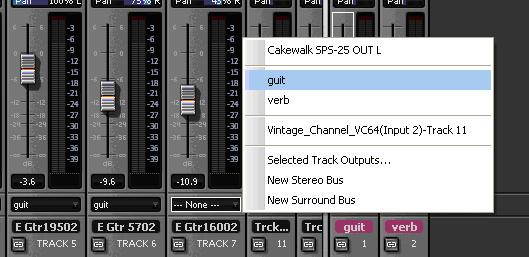
A common technique in recording is to use multiple mics on the same instrument. Most often this is found when mic’ing guitar or bass amps. This technique allows the mixing engineer to blend the multiple signals in order to create a wonderfully original and full sound. After the mixing engineer has found the perfect blend of levels between the tracks, he/she will be ready to start adding effects. However, it doesn’t always make sense to add the same effects, with the same settings, to each individual track. It would make much more sense, and conserve CPU, if the engineer could sum the tracks to a bus before applying effects. This example will use three tracks of the same guitar take (with three different microphones) to show you how to sum multiple tracks to a bus in order to be compressed.
Step 1 – Summing the Signals
When summing the signals of the guitar tracks in this exercise, it is not very efficient to use a send. Sending the tracks via a send would leave the engineer with the task of blending the compressed signal from the bus with the uncompressed signal still playing through the tracks (note: this technique is called “Parallel Compression” and is very useful, however it will not be used in this example).
In this example, we have blended the tracks to our liking and we simply want to run them all through the same instance of a compression plugin. In order to send the tracks to the bus with the blend heard through the speakers you will have to route the tracks output to the bus. This can be done from either the console or track views by clicking on the tracks output and selecting the desired bus. In this example we created a bus named “guit” to route the guitar tracks to.
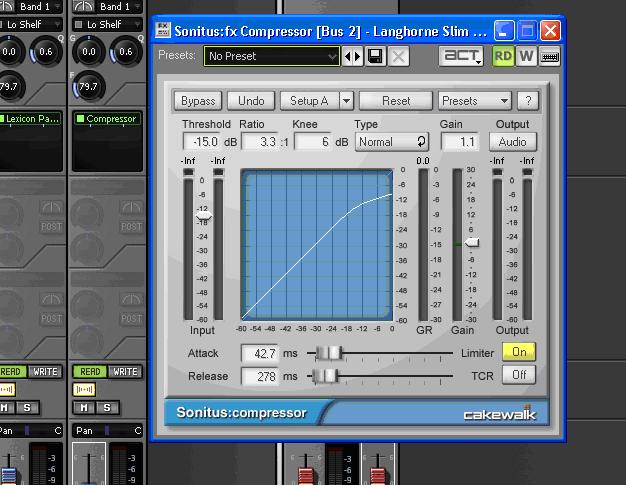
Step 2 – Compressing the Signal
At this point you should have multiple tracks playing through the assigned bus. This bus will contain the blend of levels assigned by the faders of the tracks being sent to it. The next step will be to insert a compression plugin and apply your desired settings. You will now only hear the signal being played through the bus and can compress the blend without loading the plugin multiple times.
This technique can also be used to EQ, Gate, or apply an effect to summed tracks.
Example #3 – Using Buses for Separate Headphone (Cue) Mixes
by Steve Cox
Have you ever been in a tracking session where you find yourself needing independent control over what is being played back over the speakers compared to the player’s headphones? For example: You may be tracking a bass player who needs to hear the drum track, click track, a little piano, but not the guitar or vocals. However, the engineer may want to hear all tracks, but not the click-track.
SONAR’s bussing capabilities makes it easy to create separate headphone mixes as long as you have a multi-channel interface. A headphone (or cue) mix is basically a separate mix controlled by pre fader sends inserted into each audio track. These sends are routed to a bus, which is then routed to a separate stereo output on the interface.
Step 1 – Setting Up the Tracks with Send Assistant
For this example, we’re going to switch to the Track view. Select all audio tracks by dragging your mouse down the track numbers. Once they are highlighted, right-click on any of the track numbers and go to Insert Send | Send Assistant. Note: If your version of SONAR does not have the Send Assistant, Select “New Bus” from the Insert Send menu and name it “Cue Mix” in the bus section.
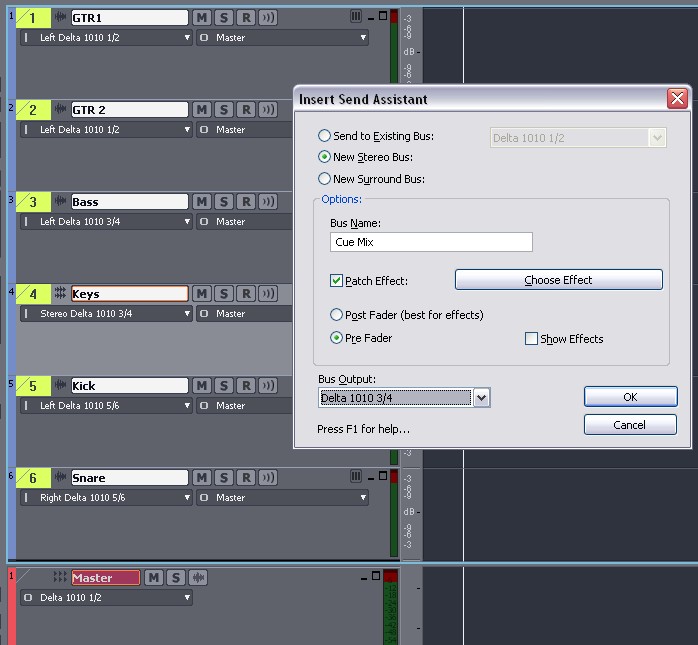
Choose “New Stereo Bus”. Name the bus “Cue” or “Headphone Mix”, make sure “Pre Fader” is ticked, then assign the separate stereo pair that is going to your headphone preamp or mixer.
Step 2 – Adjusting Levels Independently
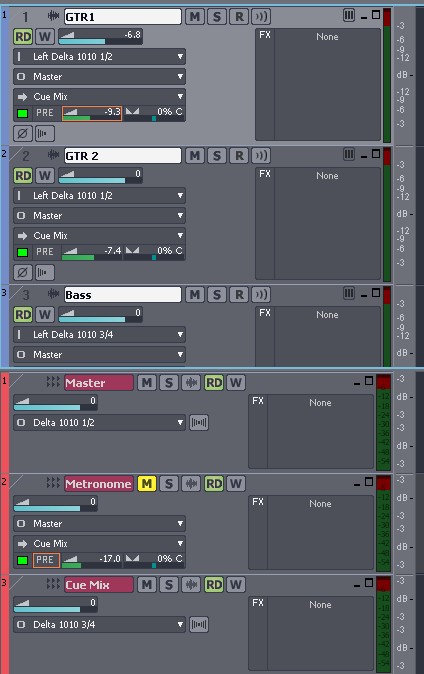
In this case the Master output is set to channels 1-2, which are connected to the studio monitors (speakers). Channels 3-4 are connected to a headphone amplifier. Because all of the sends are Pre Fader, this means that the track’s volume (as well as solo and mute) will not affect the signal going to the Cue Mix bus. You can also add the Cue Mix send to other busses, like the Metronome bus. This allows you to have control over the metronome volume in the headphone mix, while giving you the option to mute it in the control room. See below for a routing example:
While we only covered three scenarios there are thousands of creative uses for busses and SONAR's flexible routing. To experiment some more try using multiple busses to house different effects. Have Fun!