The Drum Grid Pane
Last updated on 3/31/2016SONAR and Home Studio's new Drum Grid Pane makes editing drum tracks and patterns a whole lot easier. The new Drum Grid pane appears at the top of the Piano Roll view automatically when you open a MIDI drum track.
Timing and velocity information are the key to making a MIDI drum track sound realistic, so we've made it easy to edit these parameters in a single window. The Drum Grid Pane allows you to add or delete notes, paint them in with the new Pattern Brush, and modify any note property. You decide the number of grid lines displayed in the grid, and whether or not to show note velocity "tails."
To Display Tracks in the Drum Grid
- Create or load a drum map if you have not already done so. (See the topic "Creating A Drum Map" in the Home Studio 2004 Help file)
- Change the focus to the Track view.
- In the track(s) you want to view in the Drum Grid Editor, select a drum map in the Output dropdown menu. By default, Home Studio 2004 only installs a few common drum maps, but there are many additional drum maps available on the Home Studio 2004 CD-ROM. All drum maps are located on the Home Studio 2004 CD-in the \Sample Content\Drum Maps directory. You can copy any drum map to the \Drum Maps folder in the Home Studio 2004 installation directory (default is C:\Program Files\Cakewalk\Home Studio 2004\Drum Maps)."
- Select the tracks you want to view in the Drum Grid Editor and select View-Piano Roll. Note: If multiple tracks are assigned to the same drum map, you can quickly open all tracks as a group by selecting any of the tracks and holding down Ctrl+Shift while selecting View-Piano Roll.
The Piano Roll view appears with the selected track's data appearing in the Drum Grid Editor.
To Create a New Drum Map
- In any MIDI track, click the Out dropdown and choose Drum Map Manager from the menu that appears. OR Select Options-Drum Map Manager.
Note: When creating a new drum map, the map settings are derived from the current track's instrument definition if the track is assigned to a "drum" instrument definition.
- If you want to create a totally new drum map, click the Create New Drum Map button
 next to the Drum Maps Used in Current Project field.
Note: If your Drum Maps are missing, make sure the Drum Map files have not been compressed. Find them by going to Start | Run and type:
%appdata%/cakewalk
Now find the Drum Maps folder, right-click, Properties, Advanced and make sure the folder is not compressed. Open the folder and check the individual map files as well.
Right above the Drum Map Manager (if you right click on the midi track) is New Drum Map. Use that to pick a map; don't use the drum map manager unless you want to create a new map or edit an existing one. If you pick one from the New Drum Map list, then use the drum map manager, you will see it populated with the info from the current map.
Velocity Tails
In the Drum Grid pane, you have the option of showing the velocity of each note as a series of bars. The higher the bars, the higher the velocity value. 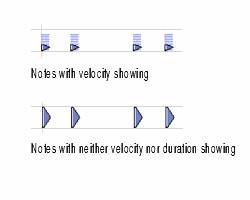
To Display Velocity Tails in the Drum Grid Pane
- Click the Show/Hide Velocity Tails button
 in the Piano Roll view toolbar or Press the Y key.
Editing Note Velocities
In the Drum Map Editor you can display note velocities as a series of horizontal bars behind the note. Click the Show/Hide Velocity Tails button or press Y to display note velocities.
To Edit a Note Velocity in the Drum Grid Pane
- Click the Draw tool button
 .
.
- Move your cursor over the velocity tail you want to edit until the cursor changes to look like this:

- Press Shift, then click and drag the velocity tail. Drag it up to increase the velocity. Drag it down to decrease the velocity.
To Edit Multiple Note Velocities in the Drum Grid Editor
When you edit multiple notes that have different initial velocities, the velocities are adjusted on a relative basis, so if you reduce a velocity by 50%, all other selected notes have their velocities reduced by the same percentage. For example: you select three notes. The first has a velocity of 100, the second a velocity of 50, and the third a velocity of 30. You click and drag the velocity of the first note down to 50. The second note's velocity changes from 50 to 25 and the third note's velocity changes from 30 to 15.
- Select the notes you'd like to edit.
- Click the Draw tool button .
- Move your cursor over the velocity tail you want to edit until the cursor changes to look like this:
- Click and drag the velocity tail. Drag it up to increase the velocity. Drag it down to decrease the velocity.
Using the Pattern Brush
When you select the Pattern Brush tool, clicking and dragging to produce a series of notes is a snap! Use this tool in the Drum Grid pane (also works in the Note pane) to produce a series of notes. Which notes appear in the Drum Grid depends on the settings you make in the Pattern Brush tool's dropdown menu. To open the Pattern Brush tool's dropdown menu, click the right side of the Pattern Brush tool.
- When you first use the Pattern Brush we recommend you check the following options: Use Pattern Polyphony, and Use Pattern Velocities.
- Select a Kick + Snare pattern
- Click and drag across the Drum Grid Pane to paint a drum pattern into your song.