Using the Novation ReMOTE SL as a controller with SONAR
Last updated on 3/29/2016by Ryan Munnis
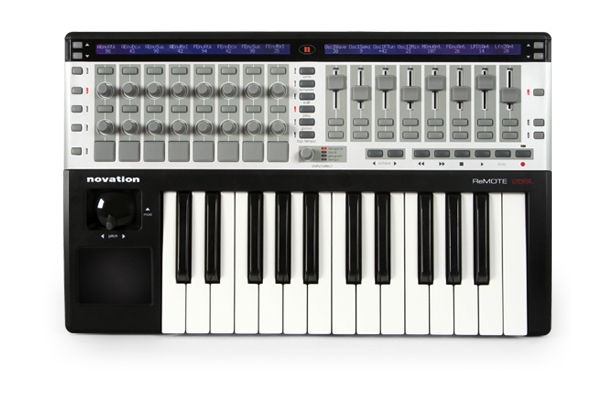
Table of Contents:
Chapter 1 - About the Novation ReMOTE SL’s Editor and the MIDI specification
Chapter 2 - Mapping out the ReMOTE SL Editor to your custom MIDI commands
- Breakdown of Control Settings in the Editor
- The Complete Template
- Saving the Template
Chapter 3 - Uploading your SONAR Cakewalk Generic Surface or ACT Template to your ReMOTE Controller
- Open your template
- Selecting MIDI devices
- Sending the SysEx dump to the ReMOTE
Chapter 4 - Setting up the Novation ReMOTE SL as a Controller/Surface in SONAR
- Enabling your MIDI devices in SONAR
- Adding a new controller or surface in SONAR
Chapter 5 - Creating an ACT MIDI Controller preset for your ReMOTE
- Mapping the Cells and saving your preset
- Mapping ACT to controlling plug-in parameters
Chapter 6 - Creating a Cakewalk Generic Surface preset for your ReMOTE
- Breakdown of Cakewalk Generic Surface parameters
- How to configure the Cakewalk Generic Surface to receive MIDI commands from our ReMOTE template
- How to save your Cakewalk Generic Surface preset
Chapter 7 - How to import/export ACT or Cakewalk Generic Surface presets
Chapter 8 – Available resources and downloads
Chapter 1 - About the Novation ReMOTE SL’s Editor and the MIDI specification
One of the coolest features the Novation ReMOTE SL offers is its ReMOTE SL Editor. The editor is laid out like the controller itself, making it simple to customize virtually any MIDI command. This guide discusses using the ReMOTE SL Editor to create an Active Controller Technology (ACT) preset as well as a Cakewalk Generic Surface preset for optimal integration with SONAR.
Note: This editor is a powerful tool and therefore requires an understanding of the MIDI specification. We will discuss some of the basic parameters in this guide for the purposes of creating our custom template. If you find that you are unfamiliar with some of the terminology or would like to read up more on the MIDI specification there are many excellent sources available on this topic.
A good place to start regarding the basics of MIDI is the Desktop Music Handbook in the Tips section on our website, which can be found here: http://www.cakewalk.com/Tips/GS/Desktop.aspx
For a more advanced read, an excellent in-depth source on the MIDI specification is MIDI for the Professional by Paul D. Lehrman. You can find this in many music stores as well as on Amazon.com here: http://www.amazon.com/Midi-Professional-Paul-D-Lehrman/dp/0825613744
Last but not least, your ReMOTE 25 SL User Guide will offer a more in-depth look at this full feature set of this controller. This can be found on Novation’s website here http://www.novationmusic.com/support/user_guides?id=2
For this guide, you will want to make sure you have downloaded and installed the ReMOTE SL Template Editor from the download’s section of Novation’s website, which can be found here:
http://www.novationmusic.com/support/downloads?id=2
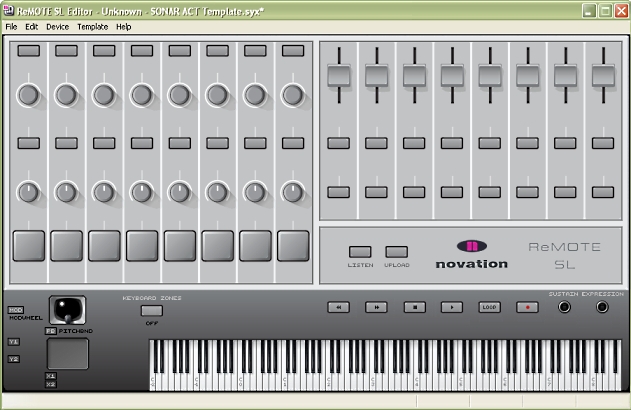
After installing the Editor, you can launch it by going to Start | All Programs | Novation | ReMOTE SL Editor and clicking on the ReMOTE SL Editor application. When you launch the Editor, you will want to create a new template. If you do not see the quick start screen, you can create a new template by going to File | New. In the Template name field, type “SONAR CGS and ACT Template” and click OK.
Once you’ve opened a new template, you will see the blank template editor shown below.
Chapter 2 -Mapping out the ReMOTE SL Editor to your custom MIDI commands
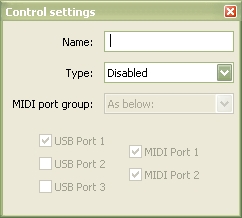
As you will see, there are graphical representations of all buttons, knobs, and sliders as on the ReMOTE 25 SL itself. Each of these icons can be mapped to any MIDI command you wish to assign to it. By default in a new template, there are no assignments made. Let’s start creating our own template by double-clicking on the top left button of the Editor. When doing so, you will see the Control Settings screen as shown below. Let’s discuss the settings necessary to create a SONAR control surface.
Breakdown of the Control Settings in the Editor:
1. Control Settings - Name
For our template, we are going to assign these top buttons to control SONAR’s “Automation Write Enable” function on each track. The “Name” field is what will be displayed on the ReMOTE’s LCD when pressing the corresponding button. You will want to name it something that describes its function. Let’s name this button “Write”. Further below you will find screenshots of what to name each of your buttons, sliders and knobs in the editor.
2. Control Settings – Type
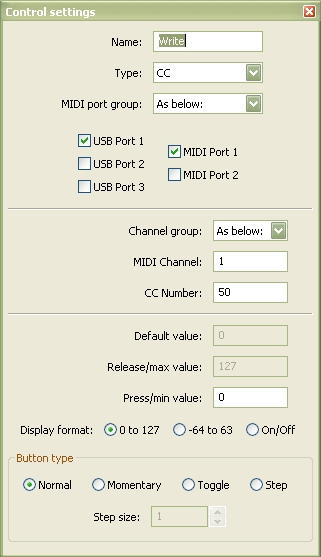
Our next step is to assign what type of message this button will send. For our template, we are going to send Continuous Controller (CC) messages to SONAR, so you will want to assign the “Type” field to “CC”. When doing so, your Control Settings menu will display more options as shown below:
3. Control Settings – MIDI port group
The MIDI port group section determines the MIDI ports over which you would like to send data. The ReMOTE 25 SL is capable of sending MIDI data over 3 ports on one USB cable, as well as MIDI data over both MIDI outputs on the device. For our template, let’s select USB Port 1 and MIDI Port 1 for all knobs, buttons and sliders.
4. Control Settings – MIDI channel
The MIDI specification allows MIDI data to be sent over 16 channels in a single cable. This is useful when triggering multitimbral instruments or when trying to control certain parameters via a specific channel. For our purposes, we’ll be assigning everything to MIDI channel 1.
5. Control Settings – CC Number
This is the Continuous Controller number that you will assign the corresponding knob or fader on the ReMOTE SL to send. Since we will want to assign every knob or fader to a different parameter in SONAR, we are going to make sure this number is different for each button and never overlaps for all of our Control Setting assignments in the ReMOTE Editor. Let’s assign the top-left button to CC 50. Further below you will find screenshots of which CC numbers to assign to which controls in the Editor.
6. Control Settings – Press/Min Value
This parameter controls the minimum value sent when pressing a button on the controller.
- For the Cakewalk Generic Surface, set this value to “0” for every button in the Editor.
- For the ACT MIDI Controller set this to a value of “64” for every button in the Editor.
The Complete Template
Complete the above process for every knob, button and slider. In our template, most settings will be identical except for the names and CC assignments. Note that the Editor screen updates to reflect the changes made in the Control Settings dialog box. See the below pictures for which CC numbers and names to assign to your SONAR Template.
Buttons and Rotary Knob Assignments:
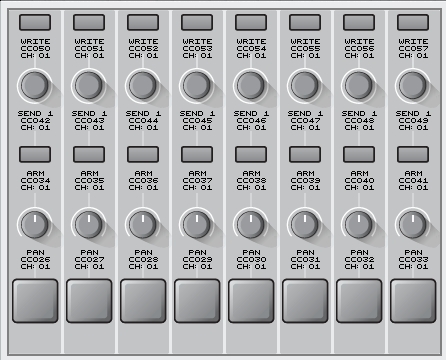
WRITE –Toggles Automation Write Enable. Control Settings should be set to: MIDI Channel 1, CC 50-57, USB Port 1, MIDI Port 1, Press/min value = “0” for Cakewalk Generic Surface or “64” for ACT, Button type: Normal.
SEND 1 – Controls the Send level of the first send on each track. Control Settings should be set to: MIDI Channel 1, CC 42-49, USB Port 1, MIDI Port 1, Default value = 0, High value = 127, Low value = 0.
ARM –Toggles arming/record enabling of a track. Control Settings should be set to: MIDI Channel 1, CC 34-41, USB Port 1, MIDI Port 1, Press/min value = “0” for Cakewalk Generic Surface or “64” for ACT, Button type: Normal.
PAN –Controls the Panning of a track. Control Settings should be set to: MIDI Channel 1, CC 26-33, USB Port 1, MIDI Port 1, Default value = 0, High value = 127, Low value = 0.
Buttons and Slider Assigments:
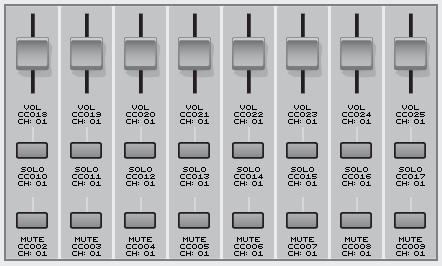
VOL – Controls the Volume of a track. Control Settings should be set to: MIDI Channel 1, CC 18-25, USB Port 1, MIDI Port 1, Default value = 0, High value = 127, Low value = 0.
SOLO – Toggles the Soloing of a track. Control Settings should be set to: MIDI Channel 1, CC 10-17, USB Port 1, MIDI Port 1, Press/min value = “0” for Cakewalk Generic Surface or “64” for ACT, Button type: Normal.
MUTE – Toggles the Muting of a track. Control Settings should be set to: MIDI Channel 1, CC 2-9, USB Port 1, MIDI Port 1, Press/min value = “0” for Cakewalk Generic Surface or “64” for ACT, Button type: Normal.
Transport Assignments:
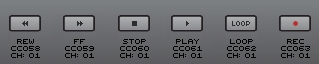
TRANSPORT CONTROLS - Control the playback state of your project. Control Settings should be set to: MIDI Channel 1, CC 58-63, USB Port 1, MIDI Port 1, Press/min value = “0” for Cakewalk Generic Surface or “64” for ACT, Button type: Normal.
X/Y Touchpad:
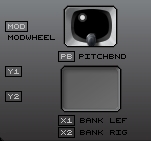
BANK LEF/RIG– Switches between selected banks in your project. Sliding from left to right goes up/right one bank to the next 8 tracks, sliding right to left goes down/left in bank numbers. Control Settings should be set to: MIDI Channel 1, CC 70-71, USB Port 1, MIDI Port 1, Default value = 0, High value = 127, Low value = 0.
Saving your Template
When finished setting up your template, you will want to save it. Do this by going to File | Save As. Choose a destination, such as the Desktop, to save your Template for easy access. You will need to load it each time you wish to use the Novation ReMOTE SL with ACT in SONAR. Under the File Name field, type “SONAR CGS Template” or “SONAR ACT Template” and click on Save.
Ultimately you will want to have two separate working ReMOTE templates for the Cakewalk Generic Surface preset, as well as for Active Controller Technology preset due to the differences in how they interpret MIDI data. The difference between the two presets is simply the “Trigger Value” that you are assigning to the buttons.
Note: while the instructions for creating these templates are listed above, we also have both templates available for download in the links below:
Download the Novation ReMOTE Cakewalk Generic Surface template
Download the Novation ReMOTE ACT template
Chapter 3 - Uploading your SONAR Cakewalk Generic Surface or ACT Template to your ReMOTE Controller
Now that you have created your own custom template, upload it to the ReMOTE via sending System Exclusive data. Essentially this sends the custom configuration made in the Editor and tells the ReMOTE to send these exact messages when being used as a controller with your host application. We will need to take a few easy steps to upload our template to the controller.
Open your Template
Make sure you have your custom template open and that you are not looking at the blank default template. You can do this by going to File | Open and finding the “SONAR CGS Template.syx” file or “SONAR ACT Template.syx” file that you created in the above steps or downloaded from our website.
Selecting MIDI Devices
The ReMOTE SL Editor must know which MIDI devices and ports to use for sending and receiving this information. To make this assignment, bring up the Editor and go to Device | Select MIDI Input/Output device. This will prompt you with the following dialog box:
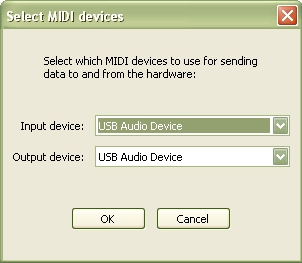
You will want to make your assignments as shown above unless you are using a MIDI cable to connect your ReMOTE to a MIDI interface. If the ReMOTE is set up with a MIDI cable to an interface, you will want to select the MIDI Input/Output ports associated with your MIDI Interface. Click OK when you have set this up appropriately.
Sending the System Exclusive (SysEx) dump
After assigning your MIDI devices, you are ready to send your template info to the ReMOTE. First, make sure that you have loaded your SONAR ACT Template. Next, go to Device | Upload Template and you will see the two LCDs on the ReMOTE change to reflect your custom template names. Your ReMOTE is now set to use your custom template and will send MIDI data according to how it was programmed.
Chapter 4 - Setting up the Novation ReMOTE SL as a Controller/Surface in SONAR
Once you have uploaded your template to the ReMOTE, you are ready to configure SONAR to recognize the device. At this point you can close the Editor application.
Enabling your MIDI Devices in SONAR
Launch SONAR, and go to Options | MIDI Devices. This will bring up the following screen:
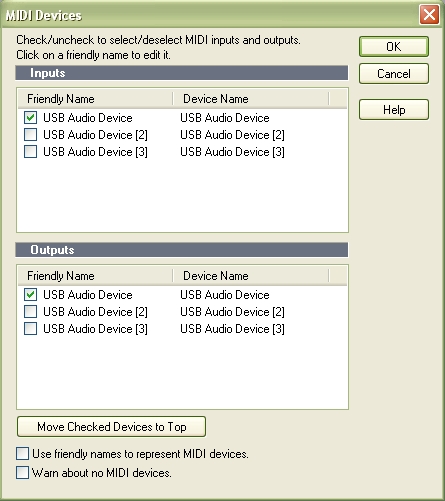
In our SONAR Template, we configured our knobs and faders to communicate via USB Audio Device port 1 and MIDI port 1. This means you will want to select USB Audio Device for Inputs and Outputs and to click OK.
Note: this screen may look slightly different depending on what MIDI devices you have connected. If you are connecting the ReMOTE to a MIDI interface via a MIDI cable, then you will want to select the input and output ports for your MIDI interface.
Adding a new Controller or Surface in SONAR
You will need to configure SONAR to recognize the ReMOTE as a controller. Do this by going to Options | Controllers/Surfaces. This will bring up the following window:
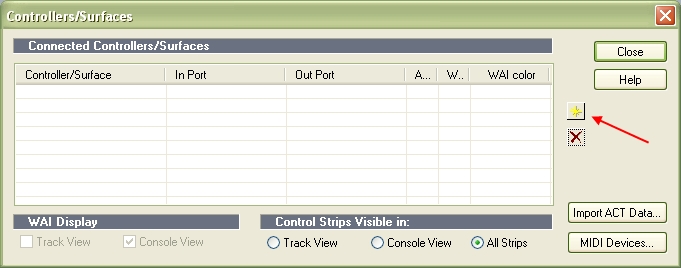
Click on the “Add New Controller/Surface” Button (indicated with the red arrow in the picture above) to bring up the Controller/Surface Settings window as shown below:
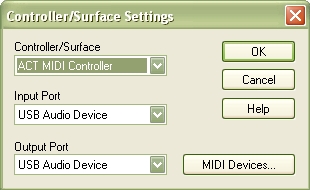
When configuring the ReMOTE to work with SONAR’s Active Controller Technology, set the Controller/Surface to ACT MIDI Controller, as shown above. When configuring the ReMOTE to work with SONAR’s Cakewalk Generic Surface, set the Controller/Surface to Cakewalk Generic Surface. The Input Port and Output Port should match the same settings you applied in the MIDI Devices section. Click OK when you are finished making these assignments. Afterwards, ensure that both the ACT and WAI (Where Am I) are checked. It should look similar to the image below:
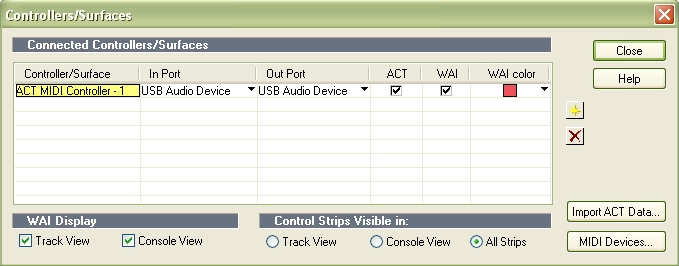
Note: The Controller/Surface field will display Cakewalk Generic Surface when configuring it for such use.
When you are finished setting up the Controllers/Surfaces settings, click Close.
Chapter 5 - Creating an ACT MIDI Controller preset for your ReMOTE
Now that SONAR is ready to send and receive MIDI data to and from your ReMOTE, we can start creating an ACT template for controlling parameters in SONAR. Active Controller Technology (ACT) gives you the ability to control Strip Parameters such as volume and pan as well as plug-in parameters such as a filter cutoff on an oscillator directly from your controller. ACT, in conjunction with the ReMOTE, will offer you the best control over plug-in automation, so if that is your ultimate goal this will be the best configuration.
We will only explore briefly how to setup the ReMOTE with the ACT Property page but if you would like more in-depth information you can check out the ACT help contents by pressing F1 on your keyboard when the ACT Property page is open.
Before setting up the ACT Property page, you must first make sure that you have inserted the ACT MIDI Controller as a Controller/Surface into SONAR. If you have not already done so, see Chapter 4 - Setting up the Novation ReMOTE SL as a Controller/Surface in SONAR.
Mapping the cells and saving your Preset
- Begin by going to Tools | ACT MIDI Controller – 1 to bring up the ACT MIDI Controller’s property page.
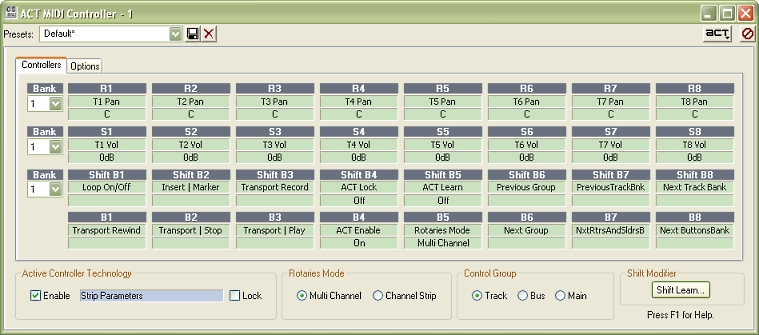
- In the lower left-hand corner, place a check mark next to “Enable” to enable ACT. Notice that the field to the right of “Enable” displays whatever view is currently in focus in SONAR.
- Since ACT translates the MIDI CC messages the ReMOTE sends, you will need to map each of the Cells in the ACT panel to MIDI CC messages from the ReMOTE.
- Note that the ACT panel has 4 groups of 8 cells. These groups also have different Banks for mapping different CC messages to the cells.
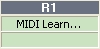
- Click in the top portion of the first cell you'd like to map - it will display "MIDI Learn"
- To map cells to a fader or knob on your ReMOTE, do the following:
- Click in the top portion of the first cell you’d like to map. It will display “MIDI Learn” like shown below:
- Click in the top portion of the first cell you’d like to map. It will display “MIDI Learn” like shown below:
-
- Move the fader or knob on your ReMOTE you wish to assign to this cell until “MIDI Learn” disappears and you can see adjustments on the parameter assigned to that cell. Note: since different controllers use different resolutions for sending MIDI data, you may need to move the fader or knob back and forth a few times before it fully registers and displays a value adjustment.
- Repeat this same process for EVERY cell in the ACT panel
- When you have finished mapping all of your cells, you can save it as a preset to store your settings. This can be done by typing “Novation ReMOTE SL” in the section to the right of “Presets” and by clicking on the Floppy Disk icon (
 ).
).
Note: while the instructions for creating this preset are listed above, we also have the preset available for download on our website. Download the Novation ReMOTE ACT Preset.spp
For instructions on how to import/export this preset, see Chapter 7 - How to import/export your ACT or Cakewalk Generic Surface presets.
Mapping ACT to control plug-in parameters
Now that the cells in your ACT MIDI Controller are mapped to the MIDI commands being sent from the ReMOTE, you can use ACT to manipulate your plug-ins and software instruments. Here’s how to establish this connection:
- Open up the property page for one of your software instruments in SONAR.
- Click the ACT button in the upper right corner of the instruments interface. It will glow blue to reflect that you have entered “ACT learn mode” as shown here:

- Using your mouse, move any two parameters in the plug-in’s interface.
- On your ReMOTE, adjust two knobs or sliders that you would like to assign to the parameters in the same order.
- Click the ACT button again to exit “ACT learn mode”.
- If you did it correctly, you will get a pop-up window stating “2 Parameters and 2 Controls were touched. Do you want to keep these assignments?”
- Click Yes to save the assignments.
Now, when you move the respective sliders and/or faders, you will see the controls change in the software instrument’s interface allowing you easier control over the manipulation and automation of the parameters.
Chapter 6 - Creating a Cakewalk Generic Surface preset for your ReMOTE
The Cakewalk Generic Surface may offer the best integration between the ReMOTE and SONAR’s strip parameters. Using the Cakewalk Generic Surface you can easily map all buttons, knobs, and faders on the ReMOTE to such parameters as Volume, Pan, Record Arm, Mute, Solo, Send level and pan controls, Automation Write Enable and more. To begin this process, you will want to configure SONAR to use the Cakewalk Generic Surface as explained in the section “Setting up the Novation ReMOTE SL as a Controller/Surface in SONAR” above.
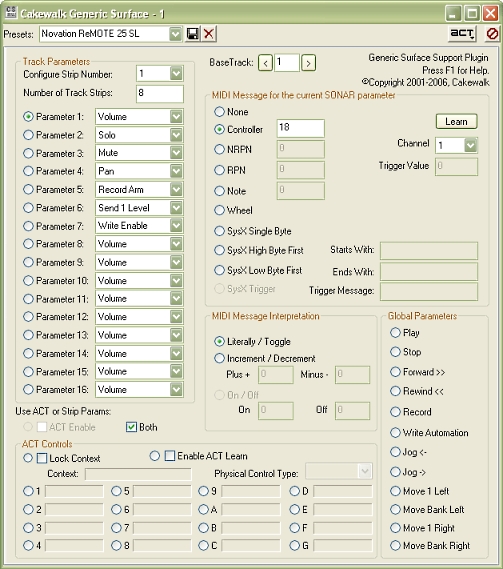
We’ll begin by taking a look at the Cakewalk Generic Surface property page by going to Tools | Cakewalk Generic Surface – 1. Let’s discuss some of the settings in the Cakewalk Generic Surface. For a more in-depth explanation of the Cakewalk Generic Surface, press F1 one your keyboard when looking at its property page.
Breakdown of Cakewalk Generic Surface parameters
1. Cakewalk Generic Surface – Number of Track Strips
Essentially this is the number of tracks controlled in each bank. Since the ReMOTE is set up in groups of 8 buttons, sliders, and faders, let’s set the Number of Track Strips to 8.
2. Cakewalk Generic Surface – Configure Strip Number
The Strip Number value determines which channel in your bank you are setting parameter values to. In the picture above, having “Configure Strip Number” set to “1” means we are on channel strip 1 of 8. Note that this option is simply a means of changing which channel you assign parameters and CC messages to.
3. Cakewalk Generic Surface - Parameters 1-16
With the Cakewalk Generic Surface you have the ability to assign up to 16 parameters for each channel strip in your bank. In our example, we are using seven parameters to match up to the seven different types of controls we set up with the ReMOTE- Volume, Solo, Mute, Pan, Record Arm, Send 1 level, and Write Enable. In the picture above, notice that we have a bullet placed next to “Parameter 1: Volume” and that we are on channel strip number 1. This means we are assigning the CC number we would like to control the volume of channel strip1 of our bank.
4. Cakewalk Generic Surface – Global Parameters
These global parameters are assignable regardless of which Channel Strip you are currently set to. We will be using this section to map our Transport Controls and X/Y Touchpad to commands in SONAR.
How to Configure the Cakewalk Generic Surface to receive MIDI commands from our ReMOTE Editor Template
Ultimately, each function and parameter in the Cakewalk Generic Surface will need to be assigned to receive the CC message you assigned your ReMOTE to send. To do this, set up your Cakewalk Generic Surface as follows:
Track Parameters:
- Configure Strip Number: toggles which strip parameter when making the CC assignments for Parameters 1-7.
- Number of Track Strips: Set to 8
- Parameter 1: Volume – MIDI settings assigned to Channel = 1 and Controller set to 18-25
- Parameter 2: Solo – MIDI settings assigned to Channel 1, Trigger Value = 0, Controller set to 10-17
- Parameter 3: Mute – MIDI settings assigned to Channel 1, Trigger Value = 0, Controller set to 2-9
- Parameter 4: Pan – MIDI settings assigned to Channel = 1 and Controller set to 26-33
- Parameter 5: Record Arm – MIDI settings assigned to Channel 1, Trigger Value = 0, Controller set to 34-41
- Parameter 6: Send 1 Level – MIDI settings assigned to Channel = 1 and Controller set to 42-49
- Parameter 7: Write Enable – MIDI settings assigned to Channel 1, Trigger Value = 0, Controller set to 50-57
Global Parameters:
- Play – MIDI settings assigned to Channel = 1, Trigger Value = 0, Controller = 61
- Stop – MIDI settings assigned to Channel = 1, Trigger Value = 0, Controller = 60
- Record – MIDI settings assigned to Channel = 1, Trigger Value = 0, Controller = 63
- Jog <- - MIDI settings assigned to Channel = 1, Trigger Value = 0, Controller = 58
- Jog -> - MIDI settings assigned to Channel = 1, Trigger Value = 0, Controller = 59
- Move Bank Left - MIDI settings assigned to Channel = 1, Trigger Value = 0, Controller = 70
- Move Bank Right - MIDI settings assigned to Channel = 1, Trigger Value = 0, Controller = 71
How to save your Cakewalk Generic Surface preset
Once you have set up your Cakewalk Generic Surface as described above, you will want to save this as a Preset to store your settings. This can be done by typing “Novation ReMOTE SL” in the section to the right of “Presets” and clicking on the Floppy Disk icon ().
Note: while the instructions for creating this preset are listed above, we also have the preset available for download on our website. Download the Novation ReMOTE CGS Preset.spp
For instructions on how to import/export this preset, see Chapter 7 - How to import/export your ACT or Cakewalk Generic Surface presets.
Chapter 7 - How to import/export your ACT or Cakewalk Generic Surface presets
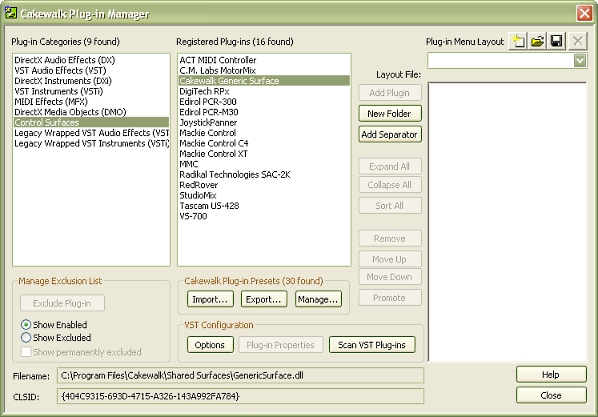
Your Control Surfaces presets can be imported and exported for backup and transfer purposes using the Cakewalk Plug-in Manager, shown below:
To import or export your preset, do the following:
- Open the Plug-in Manager by going to Tools | Cakewalk Plug-in Manager.
- Under “Plug-in Categories” select “Control Surfaces”
- Under “Registered Plug-ins” select “ACT MIDI Controller” or “Cakewalk Generic Surface” (depending on which preset you are working with)
- Under “Cakewalk Plug-in Presets” click on the Import or Export button
-
- If you are importing, navigate to your preset file on your hard drive, select it, and click Open. Your Preset will now be available on the dropdown list from the ACT MIDI Controller or Cakewalk Generic Surface property page.
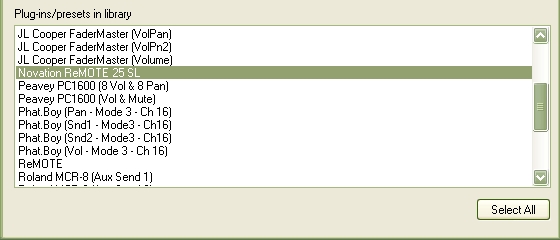
- If you are exporting, select your “Novation ReMOTE SL CGS” or “Novation ReMOTE SL ACT” preset you created and saved in the Cakewalk Generic Surface or ACT MIDI Controller property pages. To do this, simply select the preset from the “Plug-ins/presets in library” section of the Export Presets screen as shown below:
-
-
- Then, in the “File Name” section, type in the name you would like to call this file, select a destination, and click Save.
-
Chapter 8 – Additional Resources and Downloads
Hopefully with the help of this guide you will be well on your way to using your Novation ReMOTE SL with two of SONAR’s most powerful control surface features. To review, there are some great sources and downloads available, should you need additional help or simply want to research further into these topics. Also, don’t forget that you can always access SONAR’s Online Help by pressing F1 on your keyboard at any time.
Additional Resources:
- Desktop Music Handbook: http://www.cakewalk.com/Tips/GS/Desktop.aspx
- MIDI for the Professional by Paul D. Lehrman: http://www.amazon.com/Midi-Professional-Paul-D-Lehrman/dp/0825613744
- Novation ReMOTE 25 SL User Guide: http://www.novationmusic.com/support/user_guides?id=2
- ACT MIDI Controller Setup Guide: http://static.cakewalk.com/support/knowledge-base/files/ACT_Setup.pdf
Available Downloads:
- ReMOTE Editor Cakewalk Generic Surface Template: click to download
- ReMOTE Editor ACT Template: click to download
- Cakewalk Generic Surface plug-in ReMOTE preset: click to download
- ACT MIDI Controller plug-in ReMOTE preset: click to download
- Novation ReMOTE Editor: http://www.novationmusic.com/support/downloads?id=2