Sonitus fx:modulator
Last updated on 3/29/2016by Willy Jones
The Sonitus Modulator combines six time-varying effects into one handy effect that can be used for a variety of different tasks. In this tip we are going to explore the use of this effect to process guitar sounds but its creative uses go way beyond that. First let's take a look at the interface and the six modes of the Sonitus Modulator.
The effect can be changed by using the 'Mode' drop down in the upper left corner. If you are unfamiliar - a brief description of each mode is below from the plug-in's help contents. For more in-depth info on every parameter on the modulator's interface simply click the Help button in the upper right corner of the plug-in's interface.
- Flanger - A popular effect, flanging is useful for adding depth to guitar tracks, or it can be used for strange special effects. Flanging was originally invented by a recording engineer during a Beatles session. They had two tape copies of a Lennon vocal running in sync, and the engineer slowed down one of the tape machines with his hand by pressing down on the tape reel flange, creating the now classic delay effect.
- Ensemble - uses three non-synchronized modulating delays, offering a shimmering effect that produces a deep lush sound. It is, however, a more diffuse chorus effect than the Flanger, and should be used with care. The Ensemble mode is especially good for single instruments, vocals or whole mixes.
- String Phaser - attempts to recreate the sound of analog sweeping synth-strings. The phaser effects are created by modulating the phase of the signal instead of delaying it. This is coupled with a chorus effect to create really deep sweeping sounds out of all types of strings.
- Phaser 6 - is a six stage phaser. This mode does not have a chorus effect like the String Phaser mode.
- Phaser 12 - is a twelve stage phaser. This mode does not have a chorus effect like the String Phaser mode.
- Tremolo - uses the LFO waveform to cycle the volume of the input audio signal according to the rate parameter.
Now that you have a general idea of what each mode does - let's give some of them a listen. In this demo we are using a clip of the guitar track "Magic's Strat" from the SONAR 8 demo song Guilty by Unified Tribe but you can use any audio file. First listen to the dry original recorded version.
To get started, let's check out the Flanger mode by doing the following:
- Right-click on your audio tracks fx bin and choose Audio Fx | Sonitus:fx | modulator
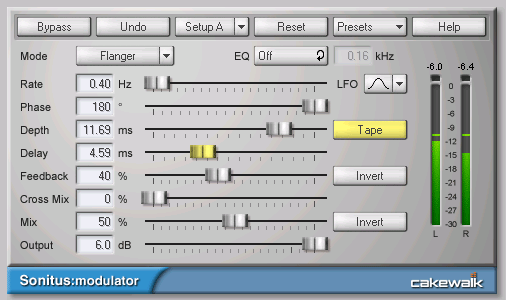
- The Sonitus:modulator effect will pop up for a quick result click on the 'Presets' drop down menu and select "[01] Default Flanger"
- Give your track a listen. Experiment with the 'Rate' slider; this will affect the speed at which the delay/phase is modulated. For this example I set my 'Rate' to "1.46" and my 'Cross Mix' to "37%". I also enabled the Tape button which makes the flanger sound more like analog tape flanging. Listen to the guitar track with some flanger.
So we applied this flanger effect but what is really happening to the audio signal? Well let's take a look at the following image:
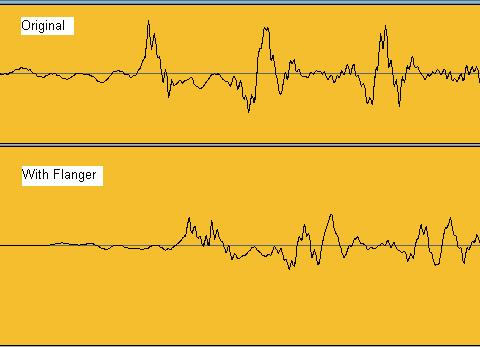
The top waveform is the original track, the bottom is the track with the flanger effect applied. The first thing that stands out is that the first peak is slightly behind the original - this is a result of the 'Delay' setting which will represent the minimum delay time to be used (in milliseconds). The delay time is influenced by the Depth setting, meaning the delay time varies from Delay to Delay+Depth milliseconds.
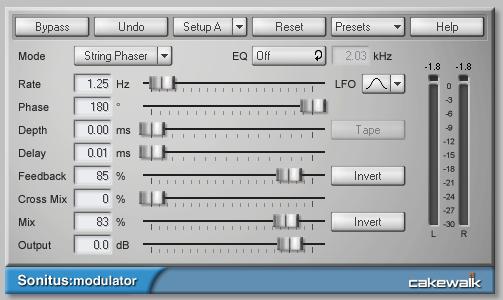
When working with guitar tracks one of my favorite effects is the String Phaser mode. The Modulator comes with a lot of great presets - but I like mine with a lot of feedback. To follow along load up the modulator in your track's fx bin and use the following settings:
- Set your 'Mode' to "String Phaser" and your 'EQ' to "Off"
- Set your 'Rate' somewhere in the range of ".24" up to "1.25" (Experiement with this one!)
- Set your 'LFO' to "Sine" and your phase all the way to "180"
- Bring both the 'Delay' and 'Depth' sliders to their minimal setting (all the way to the left)
- Crank your 'Feedback' and 'Mix' sliders to somwhere between "75%" and "85%"
- Set your 'CrossMix' to "0%" and your 'Output' to "0.0 dB"
Your modulator should now resemble the following image:
Give your track a listen - this is a bit of an extreme use of a phaser but you should get the general idea when used lightly this can add a unique timbre to your tracks. Listen to our track with the String Phaser.
There are still four more modes that you can experiment with - I'll leave you with two final tips:
- Get creative - try chaining multiple modulators in an fx bin to get unique sounds. For example - set your first modulator to use the Ensemble mode and your second to use the Tremolo mode for some interesting results.
- Use it on vocals! It's an easy way to fatten up your sound with Ensemble mode. Be gentle though with your 'Mix' setting. It's very easy to over do it.