File Management Basics
Last updated on 3/28/2016|
Improve your Life with By Jesse Recinos, Cakewalk Senior Technician SONAR 2.0 adds numerous file management features to help you work efficiently and securely. We touched upon these features briefly in a previous tech tip, but now we’re going to show you how to take advantage of these new features in everyday tasks. We’ll show you how to use file naming and management tools in SONAR to do the following:
Some of the features we’ll use include Per-Project Audio Folders, Intelligent Track-Naming, Consolidate Project Audio, Find Missing Audio, and the Create One File Per Clip option. Whether it’s to create a backup of your client’s recordings or to free up space on your hard drive, all of us at one time or another are faced with the daunting task of backing up all of the work that we have spent so much time on. Long-time users of Cakewalk will recognize the Cakewalk Bundle File as the de facto way to ensure the longevity of your data. Nota Bene!
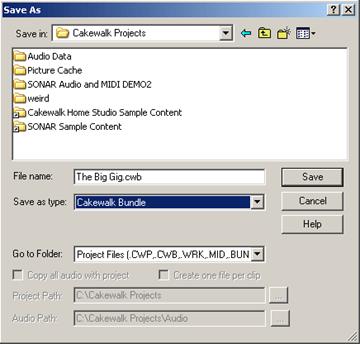
To create a Bundle file, simply go to the File | Save As menu. Choose a name and location to place the data and choose “Save As Type: Cakewalk Bundle”.
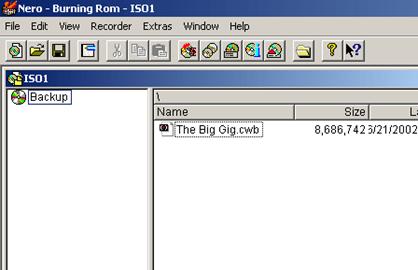
Next, SONAR will compact your audio data into an easier to manage file along with all of the project information. This means you have just one file to burn to CD-R (or DVD-R!) or put on the backup medium of your choice. If you are going to create a CD-R backup of your work, we’d advise you to save the bundle to your hard drive first, then use a data burning utility such as Nero to create the CD. Writing directly to CD via Direct CD, etc is not recommended.
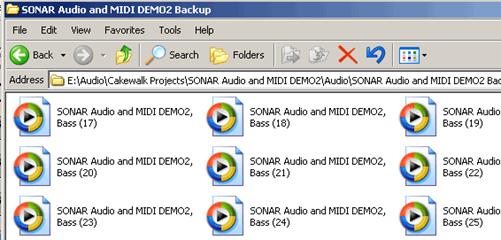
When you reopen your bundle file, all of the audio information will be extracted back onto your hard drive using either your Global Audio directory or the Project Folder that you specify. Hitting save will then save the file as a Project file (.CWP). If you make some edits and want to recompile the Bundle file, go back to File | Save As and choose “Save As Bundle” If you want to save in a format that is more easily accessible to other programs, you can also take advantage of the Consolidate Project Audio function under the Tools menu. This will create a backup folder named after your project in either the Global audio directory or in the project audio directory. It will contain copies of all of your audio clips. Since SONAR includes intelligent track naming which utilizes a combination of Project and Track Name as well as reference counting (see number in parenthesis), it's easy to locate any clip or track you may need in the future without having to reopen the whole file.
Using Multiple or Removable Hard Drives Depending on the way you work, you may not want all of your projects to occupy the same hard drive. You’re system may be comprised of many smaller drives or you may have removable drive racks to increase portability, allowing you to swap in the drive corresponding to the project you are currently working on.
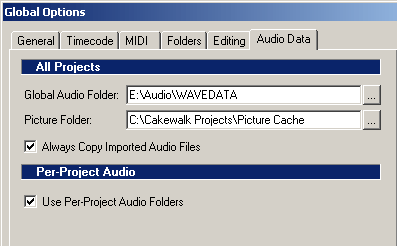
There can be several advantages to either of these methods. For example, you may have a system that you’ve been adding to over a number years and its not worthwhile to replace all of your hard drives, especially if you’re using a fast protocol such as SCSI. There are lots of 9Gb SCSI drives available these days but larger capacity SCSI drives will still cost a lot more than the equivalent IDE drive. Most importantly, if you’re happy with the way your equipment has been performing, why not stick with it? If you are accustomed to bringing data back and forth between two workstations or you simply don’t have room in your computer case for all of those hard drives, using removable drive cages may be the answer. Organizing your data onto different drives can give you piece of mind when storing a client’s work, as well. Whatever your reasons, using the Per-Project Audio Folders makes life simple. To enable this feature, go to Options | Global | Audio Data and check “Use Per-Project Audio Folders”. Now, whenever you open an existing Bundle file or create a new file, a dialog box will prompt you to choose whether or not you wish to use a Project Audio Folder and if so, to choose a location for the Audio Folder. The default will be a folder using the project name created in your Project Files folder (as defined in Options | Global | Folders).
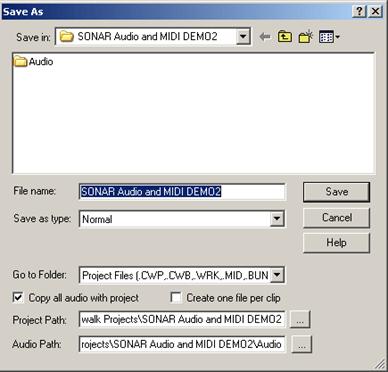
To enable this feature, go to Options | Global | Audio Data and check “Use Per-Project Audio Folders”. Now your personal projects can live in C:\Cakewalk Projects, your band’s jam sessions can be saved on D:\Band and you can save your client’s work on your removable hard drive in E:\Projects. Transferring your Project to Another SONAR Workstation When the time comes to bring your project to another studio or simply to have your friend lay down some additional tracks at his/her place, there are few methods at your deposable (besides buying a laptop). Since almost everyone has a CD or DVD burner these days, the cheapest, quickest, easiest way is to create a disk containing a Bundle file of your project (as long as the bundle file will fit on a single CD-R). Simply go to File | Save As and choose “Save As Type: Cakewalk Bundle”. Save this to a location on your hard drive and then use your CD-burning software to create the disk. Everything you need, including audio, MIDI , and FX Settings will be included in this file. One important thing is to make sure that your friend has the same plug-ins installed on his system as you, or they won’t be able to hear tracks the way you intended them. Furthermore, when they save the file as a Bundle, those FX associations will get lost. Of course, the new audio tracks could simply be pulled right out of the Audio folder and burned to a data disk. Then all you need to do is bring them into SONAR via File | Import Audio.
Another option is to use a removable or external hard drive for projects that you anticipate needing in other locations. If you choose an external drive, we’d recommend SCSI or IEEE1394 Firewire for reasons of speed and throughput. If you already have a project stored on drive, and you want to copy it to another, simply go to File | Save As and alter the name and project path. The audio will automatically be copied to the new location.
Preparing Your Project for Use on Other Software or Platforms
What if you want to give a project to your friend to do a remix, or you want to bring your song to a studio for mixing and they don’t run SONAR? Or maybe they don’t even run PCs. Because the .WAV file format is almost universally recognized on computers and even many hard disk recorders, there’s nothing to worry about. In this scenario there are many strategies, which one you choose depends on what you need done with your project and what type of file you have, i.e. Audio, MIDI , or a combination of the two. If you have a MIDI-based project, or MIDI components to your project, you’ll first want to save your project in a universal MIDI format. While some older sequencers can only read MIDI Format 0, any modern software should be able to read MIDI Format 1. You can create a MIDI file using File | Save As and setting “Save as Type: MIDI Format 1”. If your project utilizes any real-time MIDI effects, makes sure to apply them first, as the MIDI format won’t save any of these parameters. To save the audio you have several methods at your disposal. First you can simply mix down each track to a .WAV file by selecting a track and choosing File | Export Audio. You can choose to mix down any effects that are present on the track to create a reference file, or you can mix down the dry tracks so you can add effects later on. The choice is yours. Another method for saving your audio, which is handy for people doing remixes, is the option to create a separate wave file for each clip. Go to File | Save As and create a new project folder. Now check “Create one file per clip”. You’ll now have all of your Reverse Cymbals, Synth hooks, and drum loops saved as separate wave files ready to import. Tip: this is also useful in scenarios where you didn't supply descriptive track names before recording. You can supply track names at any time, then go to File | Save As (check “Create one file per clip”), and SONAR will automatically apply the new track names to the .WAV files. Once you’ve decided on a method to use, simply point your favorite CD-burning program to the folder and you’re done! Wrapping Up Hopefully we’ve given you an overview not only of the new file management features in SONAR 2.0, but also some ideas on how to take advantage of them to work quicker, more efficiently, and more securely. |