Project5 Version 2 - Main Control View
Last updated on 3/18/2016The information in this article applies to:
- Project5 Version 2
The Main Control view has controls for starting and stopping; tempo; metronome; project name; swing; global mute, solo, and arm; selection; automation; Snap to Grid; looping; master volume; and CPU usage.
The Main Control view is split into three groups of controls.
Here's a description of each group of controls:
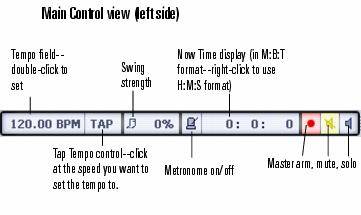
Main Control View--Left Side
Here's a picture of the Main Control view controls that are grouped on the left side:
Song Title--This is the name of the current project as it was last saved. If you have made any edits since you last saved the file, an asterisk appears at the end of the song title.

Tempo (BPM) Control--The Tempo control displays the current tempo, which is displayed in the BPM (Beats Per Minute) field. Tempo automation can be edited in the Editor.
To set the tempo, double-click the BPM field and either type a number, or click the Up/Down arrows to set the tempo. You can also click and drag up/down over the arrows for faster response. See Changing the Tempo for more information.
Tap Tempo Button--You can set the tempo in Project5 by clicking the Tap button that's in the Main Control view. Just click the button at the playback speed that you want your project to use. You can also click the Tap button by Remote Control--right-click the Tap button and choose MIDI Remote Control from the context menu, and assign a MIDI note or controller to the Tap button.
Swing Strength--The swing strength field sets the amount of swing applied to a selected pattern in the Editor when the swing note-size menu in the Editor is displaying a note size. The amount of swing ranges from 0 to 100%. See Setting Swing for more information.
Metronome On/Off--The Metronome On/off button turns a click sound on or off, so you can hear the tempo while you're recording. To set the count-in and other metronome options, use the Options-Metronome command.
Now Time Display--The Now Time display shows the current Now Time as a numerical value. You can choose to display the Now Time in either measures, beats, and ticks (M:B:T) or in SMPTE. To change the display, right-click the display and choose the option on the popup menu.
Master Arm Button--This button lights up whenever any track or bus is armed. You can disarm all tracks and buses by clicking the button.
Master Mute Button--This button lights up whenever any track or bus is muted. You can unmute all tracks and buses by clicking the button.
Master Solo Button--This button lights up whenever any track is soloed. You can unsolo all tracks by clicking the button.
Transport Controls
The Transport contains the Play, Record, Rewind, Jog Backward, and Jog Forward buttons.
The following table gives a brief description of each of the Transport buttons:
|
Button |
Description |
| Play | The Play button begins playback at the current Now Time. |
| Record | The Record button begins recording MIDI data to all armed tracks at the current Now Time. |
| Rewind | The Rewind button moves the Now Time to the beginning of your project. |
| Jog Backward | The Jog Backward button nudges the Now Time backward by the current Snap Grid resolution. |
| Jog Forward | The Jog Forward button nudges the Now Time forward by the current Snap Grid resolution. |
Main Control View--Right Side
Here's a picture of the Main Control view controls that are grouped on the right side:
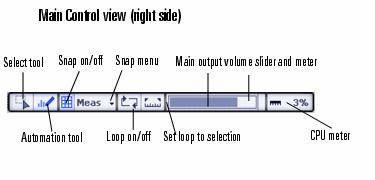
Selection Tool--Use this tool to select data in the Arrange pane.
Automation Tool--Use this tool to draw automation in the Arrange pane.
Snap to Grid On/Off Button--Click this button to turn on or turn off the Snap to Grid in Project5. The resolution of the Snap to Grid button is determined by the setting in the dropdown menu to the right of the Snap to Grid button.
Snap to Grid Resolution Menu--Set the resolution of the Snap to Grid in Project5.
Loop On/Off Button--Project5 allows you to loop over a section. Enabling the Loop On/Off button displays two markers in the Time Ruler of the Arrange pane that show what time range your project is repeating.
Set Loop to Selection Button--Clicking this button creates markers at the beginning and end of the selection. A selection can be either a pattern or several patterns.
Master Volume Slider and Meter--Drag this slider to control the main output volume. This slider is a duplicate of the one on the Master track in the Bus pane. The meter to the right of the slider displays the master volume level. If the meter is displaying the red clipping indicator, turn down your loudest track, and click the meter to reset the meter.
CPU Meter--The CPU meter displays the current CPU usage on a percent scale.
The Overload indicator lets you know if you have exceeded your computer's CPU. Clicking the number field in the CPU meter resets the audio and MIDI engines of Project5. You can try this if you have any stuck notes or sudden audio problems.
Show/hide Track Inspector Button

Click this button to show or hide the Track Inspector.
Add Track Buttons

Clicking the left button adds a new audio track below the last track in the Track pane. Clicking the right button opens the Device Browser, which lets you add a new instrument track or device track just above whatever track is highlighted.
Show/hide Groove Matrix Button

Click this button to show or hide the Groove Matrix.